


過去の日記を読み返していて、
今日までに、
オンプレ時代であれば、
クラウドという環境に初めて触れて、
とはいえ、
そんな俺が次にやるのは、
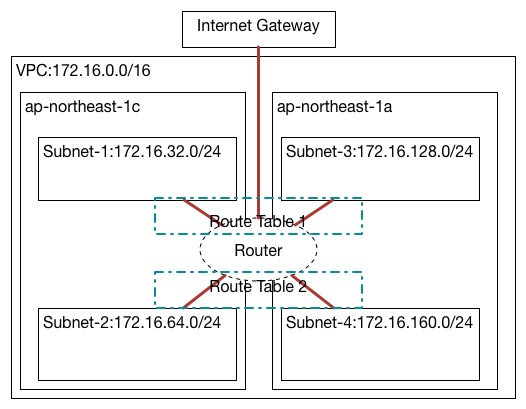
ちなみに前回作ったネットワークはこれ
RDSって便利
サーバを起動してDBサーバをつくろうと思ったけれど、
勝手にバックアップをとってくれるわ、
というわけでRDSというサービスを触ってみて、
DB Subnetってなに?
さっそくプライベート側のネットワーク
とりあえず、
$ aws rds create-db-instance
usage: aws [options] <command> <subcommand> [parameters]
aws: error: argument --db-instance-identifier is required
--db-instance-identifierをつけろと。dentifierと入っているなら、
$ aws rds create-db-instance  --db-instance-identifier test-db
usage: aws [options] <command> <subcommand> [parameters]
aws: error: argument --allocated-storage is required
まだ足りないパラメータがあるらしい。こんなやりとりを繰り返すこと数回。
$ aws rds create-db-instance  --db-instance-identifier test-db \
--allocated-storage 5 --db-instance-class db.t2.micro \
--engine mysql --master-username root --master-user-password password
結局これだけの必須項目があった。ちなみに--master-user-password はちゃんとしたパスワードにしよう。
起動したようだけれど…、
$ aws rds delete-db-instance --db-instance-identifier test-db
まさかこんなにすぐに-db-instance-identifierを使うことになるとは。
A client error (InvalidDBInstanceState) occurred when calling the DeleteDBInstance operation: Instance test-db is currently creating - a final snapshot cannot be taken.
すぐに削除しようとしたせいか、
$ aws rds delete-db-instance --db-instance-identifier test-db --skip-final-snapshot
今度はうまくいった。
気を取り直してもう1回作る。
$ aws rds create-db-instance --db-instance-identifier test-db --vpc[TAB]
これできっとVPCのなんかいい感じのパラメータが出てくることだろう。
--vpc-security-group-ids…。違う。違くないけど、
調べてみると、
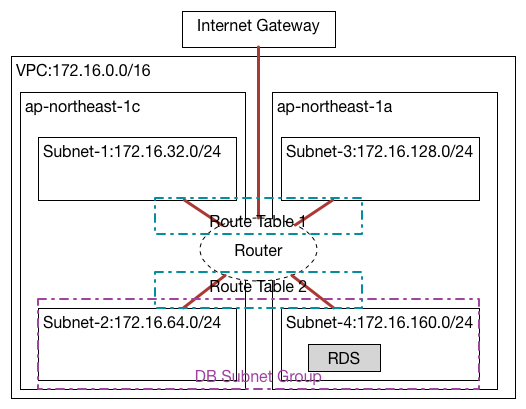
複数のAvailability Zoneを含んだSubnetを束ねて、
というわけでこのDB Subnet Groupというのを作ってみる。create-db-subnet-groupというコマンドで、
$ aws rds create-db-subnet-group[TAB]
オプションを見てみると、
$ aws ec2 describe-subnets
で今回対象のsubnetIdを調べておく。プライベートなサブネットを二つ作ったので、
AWSとオンプレでの違いは、
$ aws rds create-db-subnet-group --subnet-id subnet-ea00d79d subnet-db06ee82 --
他にも、
$ aws rds create-db-subnet-group --subnet-ids subnet-ea00d79d subnet-db06ee82  --db-subnet-group-name test-db-subnet --db-subnet-group-description "test db subnet group"
{
    "DBSubnetGroup": {
        "Subnets": [
            {
                "SubnetStatus": "Active",
                "SubnetIdentifier": "subnet-db06ee82",
                "SubnetAvailabilityZone": {
                    "Name": "ap-northeast-1c"
                }
            },
            {
                "SubnetStatus": "Active",
                "SubnetIdentifier": "subnet-ea00d79d",
                "SubnetAvailabilityZone": {
                    "Name": "ap-northeast-1a"
                }
            }
        ],
        "DBSubnetGroupName": "test-db-subnet",
        "VpcId": "vpc-6ac1020f",
        "DBSubnetGroupDescription": "test db subnet group",
        "SubnetGroupStatus": "Complete"
    }
}
なんとか無事にできたらしい。RDSを起動するときにはこのdb-subnet-groupを指定することになるんだろう。
改めてRDSを起動する
DBSubnetGroupを作った所で、
$ aws rds create-db-instance  --db-instance-identifier test-db \
--allocated-storage 5 --db-instance-class db.t2.micro \
--engine mysql --master-username root --master-user-password password \
--db-subnet-group-name test-db-subnet
--db-subnet-group-nameオプションを追加して、
$ aws rds describe-db-instances
-略-
"DBSubnetGroup": {
                "Subnets": [
                    {
                        "SubnetStatus": "Active",
                        "SubnetIdentifier": "subnet-db06ee82",
                        "SubnetAvailabilityZone": {
                            "Name": "ap-northeast-1c"
                        }
                    },
                    {
                        "SubnetStatus": "Active",
                        "SubnetIdentifier": "subnet-ea00d79d",
                        "SubnetAvailabilityZone": {
                            "Name": "ap-northeast-1a"
                        }
                    }
                ],
                "DBSubnetGroupName": "test-db-subnet",
                "VpcId": "vpc-6ac1020f",
                "DBSubnetGroupDescription": "test db subnet group",
                "SubnetGroupStatus": "Complete"
            },
-略-
           "AvailabilityZone": "ap-northeast-1a",
-略-
RDSのインスタンスを見てみると、
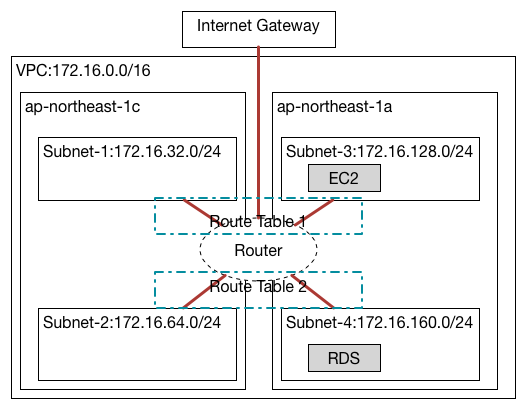
今の状態はこんな感じだろう。
MultiAZってなんだ
MutliAZのAZはAvailability Zoneの事で、
他にもいろいろありそうで、
踏み台
RDSを起動したのは良いけれど、
外から接続できないようにしたのはいいのだけれど、
踏み台起動
EC2の起動はpublic側のサブネットにして、
ここまでできたら、
       __|  __|_  )
       _|  (     /   Amazon Linux AMI
      ___|\___|___|
$ sudo yum install mysql
$ mysql -h test-db.xxxxxxxxxxx.ap-northeast-1.rds.amazonaws.com -u root -p
つながらない。パスワードが間違っているとかそういった感じではなく、
また出てきたよSecurity Group
この何故か接続できないというのは、
と思った所で、
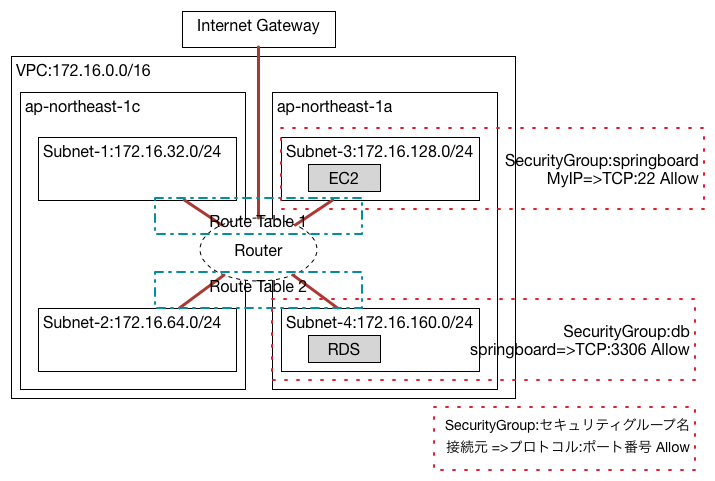
1つめは上の図のような感じで、
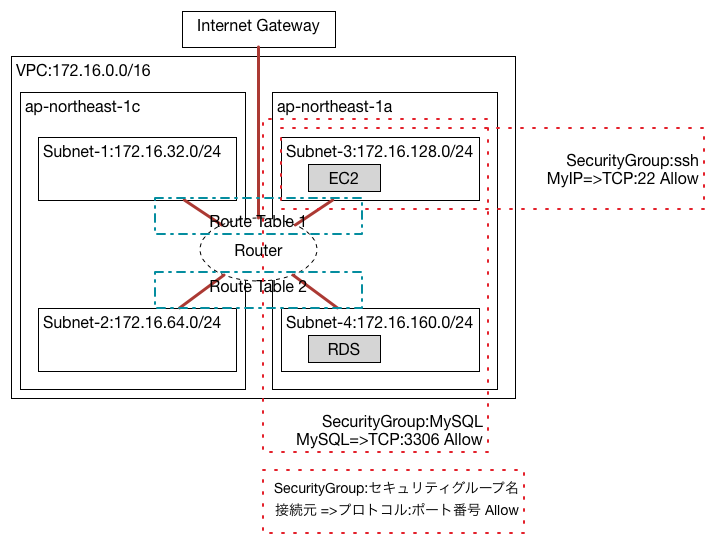
もう1つは通信の内容でSecurity Groupを作る方法。MySQLの通信をしたいのであれば、
どちらの考えかたでも、
前者では、
しかし、
逆に後者では、
こちらのURLで上限数を確認してみると、
“セキュリティグループの設定方法に応じて、
RDSのSnapshotを作る
MySQLに無事に接続できるようになったら、
とはいえ踏み台となるEC2から接続できる事が確認できたら、
SSHのport forwardingを使って手元からつないでも良いし、
Host vpc-test-db
   HostName     ec2-****-conpute.amazonaws.com
   User          ec2-user
   Identityfile  ~/.ssh/id_rsa
   GatewayPorts  yes
   LocalForward  13306 test-db.*************.rds.amazonaws.com:3306
と書いておいて、
$ ssh vpc-test-db
とすればCtrl+Cで終わらせるまで、
$ mysql -P 13306 -u hoge -p
で接続できるから楽だ。
こんな感じでデータベースの操作をしたら、
Snapshotを作る
RDSの機能の1つに、
$ aws rds create-db-snapshot --db-instance-identifier test-db  \
--db-snapshot-identifier test-db-snapshot-001
{
    "DBSnapshot": {
        "Engine": "mysql",
        "Status": "creating",
        "AvailabilityZone": "ap-northeast-1a",
        "PercentProgress": 0,
        "MasterUsername": "root",
        "Encrypted": false,
        "LicenseModel": "general-public-license",
        "StorageType": "standard",
        "VpcId": "vpc-6ac1020f",
        "DBSnapshotIdentifier": "test-db-snapshot-001",
        "InstanceCreateTime": "2015-02-03T23:03:14.906Z",
        "OptionGroupName": "default:mysql-5-6",
        "AllocatedStorage": 5,
        "EngineVersion": "5.6.19a",
        "SnapshotType": "manual",
        "Port": 3306,
        "DBInstanceIdentifier": "test-db"
    }
}
恐ろしく簡単にsnapshotができたような気がする。
Snapshotが作れたら、
aws rds restore-db-instance-from-db-snapshot --db-snapshot-identifier test-db-snapshot-001-略-
snapshotからrestoreするのもものすごく簡単だった。
ただひとつ問題なのが、
もしたとえばこれが実運用の際にはデータベースが破損しているなどの理由でサービスは停止してしまっているような状況が想像できる。言い換えれば、
実際にどうやるかというと
$ aws rds modify-db-instance --db-instance-identifier test-db \
--new-db-instance-identifier test-db-broken --apply-immediately
このコマンドで実行してみる。ただちに変更したい場合は--apply-immediately というオプションを付けないといけないことに気づくまでに少しかかってしまった。
このコマンドを実行すると、
             "PendingModifiedValues": {
                 "DBInstanceIdentifier": "test-db-broken"
             },
こんな感じでPendingModifiedValuesという項目で表示される。
しばらく経つと
こうなれば、
あれ、
結局今日もRDSの使い方の辺りははわかってきたけど、
まあでも最初に比べて、
ついに、
