


はじめに
前回はなぜバックアップが必要なのかを説明しました。今回は実際にBaculaをさわってみて、
用意するのは、
前回の最後で書いた通り、
- 第2回 Baculaでバックアップをしてみよう
- 第3回 GUIツールBaculumを使ってバックアップを簡単にする
- 第4回 Baculaを使いやすくするための設定値解説
- 第5回 LinuxだけじゃないWindowsのファイルもバックアップ
- 第6回 忘れてはいけないリストアの手法
- 第7回 Baculaをもっと活用しよう
(Bacula Enterpriseでできること)
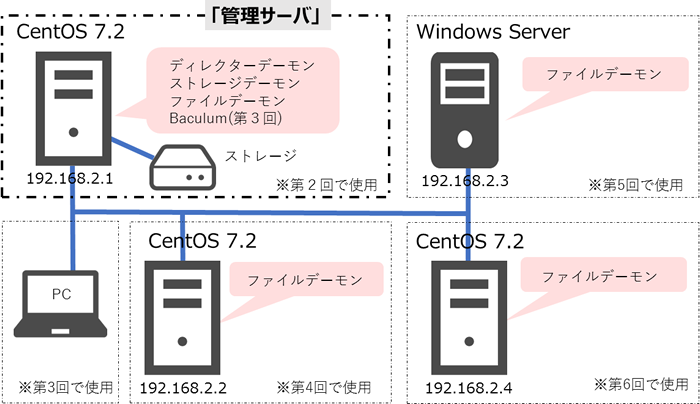
上記で使用する環境をすべて作成すると、
Baculaのアーキテクチャ
最初に、
Baculaの主要なコンポーネントは次の3つです。括弧内はサービス名です。各コンポーネントの起動やステータス確認はこの名前で行ってください。
- ディレクターデーモン
(bacula-dir) Bacula全体の動作を制御するメインコンポーネントです。履歴を管理する内部データベース
(カタログ) も含まれます。 - ストレージデーモン
(bacula-sd) バックアップした実データを保存するサーバにインストールし、
書き込みや読み出し動作を行います。 - ファイルデーモン
(bacula-fd) バックアップ対象のサーバやPCにインストールして、
データの読み出しを行います。リストア時には書き込みを行います。Baculaクライアントと呼ぶこともあります。
これら3つのコンポーネントは1つのサーバにすべて入っていてもいいですし、
今回は1台のサーバにすべてのコンポーネントをインストールします。なお、
また、
- bconsole
bconsoleはディレクターデーモンと通信を行い、
ディレクターデーモンが実際のバックアップやリストア動作の命令を出します。
事前準備
Baculaは以下のポートを使用します。ファイヤーウォールの設定をしておいてください。
| ポート番号 | 利用目的 |
|---|---|
| 9101 | ディレクターデーモン |
| 9103 | ストレージデーモン |
| 9102 | ファイルデーモン |
なお、
# firewall-cmd --permanent --add-service=bacula
success
# firewall-cmd –reload
success
SELinuxはEnforcingのままでも問題ありません。
Baculaのインストール
実際のインストール手順を進めていきましょう
リポジトリの追加
まず、
# cd /etc/yum.repos.d/
# wget https://copr.fedorainfracloud.org/coprs/slaanesh/Bacula/repo/epel-7/slaanesh-Bacula-epel-7.repo
Baculaパッケージのインストール
リポジトリの追加が完了したら、
# yum -y install bacula-director bacula-client bacula-storage bacula-console mariadb-server
MariaDBの初期設定
MariaDBを一度起動して自動起動も有効にしておきます。
# systemctl start mariadb
# systemctl enable mariadb
また、
# mysql_secure_installation
上記コマンド実行後、
Set root password? [Y/n] y
New password: dbpass
Re-enter new password: dbpass
Password updated successfully!
Reloading privilege tables..
 ... Success!
他の質問についてはすべてyと答えておいてください。
Bacula用のデータベースを作成します。
# mysql -u root -p
Enter password: dbpass
MariaDB > create database bacula;
Query OK, 1 row affected (0.00 sec)
MariaDB > grant all privileges on bacula.* to bacula@localhost identified by ' dbpass';
Query OK, 0 rows affected (0.01 sec)
MariaDB > quit
Bacula用のテーブルの作成を行います。
# /usr/libexec/bacula/make_bacula_tables mysql -u bacula -p
Making mysql tables
Enter password: dbpass
Creation of Bacula MySQL tables succeeded.
Baculaが使用するデータベースの変更を行います。
# alternatives --config libbaccats.so

There are 3 programs which provide 'libbaccats.so'.

  Selection    Command
-----------------------------------------------
   1           /usr/lib64/libbaccats-mysql.so
   2           /usr/lib64/libbaccats-sqlite3.so
*+ 3           /usr/lib64/libbaccats-postgresql.so

Enter to keep the current selection[+], or type selection number: 1
もう一度コマンドを実行して、
# alternatives --config libbaccats.so

There are 3 programs which provide 'libbaccats.so'.

  Selection    Command
-----------------------------------------------
 + 1           /usr/lib64/libbaccats-mysql.so
   2           /usr/lib64/libbaccats-sqlite3.so
*  3           /usr/lib64/libbaccats-postgresql.so

Enter to keep the current selection[+], or type selection number:
Baculaの設定ファイルの編集
Baulaのアーキテクチャで説明した通り、
今回は一台のマシンにすべてを入れて動かすので、
- /etc/
bacula/ bacula-dir. conf (ディレクターデーモン設定) - /etc/
bacula/ bacula-sd. conf (ストレージデーモン設定) - /etc/
bacula/ bacula-fd. conf (ファイルデーモン設定) - /etc/
bacula/ bconsole. conf (bconsoleの設定ファイル)
ひとつずつ設定していきましょう。
なお、
bacula-dir.conf
実際のバックアップ動作などはすべてディレクターデーモンが制御します。このためbacula-dir.
すべてのディレクティブを見るのは大変なので、
まず自分自身のDirectorリソース部分を編集します。
Passwordディレクティブに任意のパスワードを記入します。赤太字部分が変更点です。ここではbacula-passというパスワードを使用します。
Director {                            # define myself
  Name = bacula-dir
  DIRport = 9101                # where we listen for UA connections
  QueryFile = "/etc/bacula/query.sql"
  WorkingDirectory = "/var/spool/bacula"
  PidDirectory = "/var/run"
  Maximum Concurrent Jobs = 20
  Password = "bacula-pass"         # Console password
  Messages = Daemon
}
次に、
Job {
  Name = "Backup-TestJob"
  Type = Backup
  Level = Full
  Client = bacula-fd
  FileSet = "Full Set"
  Schedule = "WeeklyCycle"
  Storage = File1
  Messages = Standard
  Pool = File
  Priority = 10
  }
どのディレクトリをバックアップ対象にするかを決めるFilesetリソースを設定します。
FileSet {
  Name = "Full Set"
  Include {
    Options {
      signature = MD5
    }
    File = /test
  }
バックアップ対象を設定するClientリソースを設定します。
Client {
  Name = bacula-fd
  Address = 192.168.2.1
  FDPort = 9102
  Catalog = MyCatalog
  Password = "bacula-pass"          # password for FileDaemon
  File Retention = 60 days            # 60 days
  Job Retention = 6 months            # six months
  AutoPrune = yes                     # Prune expired Jobs/Fileervices
}
バックアップデータの保存先を設定するStorageリソースを設定します。
Storage {
  Name = File1
# Do not use "localhost" here
  Address = 192.168.2.1               # N.B. Use a fully qualified name here
  SDPort = 9103
  Password = "bacula-pass"
  Device = FileChgr1
  Media Type = File1
  Maximum Concurrent Jobs = 10        # run up to 10 jobs at the same time
}
Catalogリソース(内部データベース)の設定
先にMariaDBで作成したbacula用データベースのパスワードを設定します。
Catalog {
  Name = MyCatalog
  dbname = "bacula"; dbuser = "bacula"; dbpassword = "dbpass"
}
Consoleリソースの設定をします。
Console {
  Name = bacula-mon
  Password = "bacula-pass"
  CommandACL = status, .status
}
bacula-sd.conf
次にbacula-sd.
以下の箇所をbacula-dir.
# List Directors who are permitted to contact Storage daemon
#
Director {
  Name = bacula-dir
  Password = "bacula-pass"
}

# Restricted Director, used by tray-monitor to get the
#   status of the storage daemon
#
Director {
  Name = bacula-mon
  Password = "bacula-pass"
  Monitor = yes
}
bacula-fd.conf
bacula-fd.
以下の箇所をbacula-dir.
# List Directors who are permitted to contact this File daemon
#
Director {
  Name = bacula-dir
  Password = "bacula-pass"
}

# Restricted Director, used by tray-monitor to get the
#   status of the file daemon
#
Director {
  Name = bacula-mon
  Password = "bacula-pass"
  Monitor = yes
}
bconsole.conf
bconsole.
以下の箇所をbacula-dir.
Director {
  Name = bacula-dir
  DIRport = 9101
  address = localhost
  Password = "bacula-pass"
}
*.confファイルの設定は以上です。
設定ファイル間の関係
今回は分かりやすいよう、

Baculaでバックアップ
それでは、
バックアップ前の準備
今回は/test配下をバックアップする設定をしているので、
サービスの起動
まず、
# systemctl start bacula-dir
# systemctl start bacula-sd
# systemctl start bacula-fd
また、
# systemctl status mariadb
● mariadb.service - MariaDB database server
   Loaded: loaded (/usr/lib/systemd/system/mariadb.service; enabled; vendor preset: disabled)
   Active: active (running) since…(以下略)
bconsoleからの操作でバックアップジョブを実行
コマンドラインツールであるbconsoleを使います。bconsoleと入力して起動します。
# bconsole
Connecting to Director localhost:9101
1000 OK: 102 bacula-dir Version: 7.4.4 (20 September 2016)
Enter a period to cancel a command.
*
runと入力して、
*run
Automatically selected Catalog: MyCatalog
Using Catalog "MyCatalog"
A job name must be specified.
The defined Job resources are:
     1: BackupClient1
     2: Backup-TestJob
     3: BackupCatalog
     4: RestoreFiles
Select Job resource (1-4):2
選択すると、
Select Job resource (1-5): 2
Run Backup job
JobName:  Backup-TestJob
Level:    Full
Client:   bacula-fd
FileSet:  Full Set
Pool:     File (From Job resource)
Storage:  File1 (From Job resource)
When:     2017-03-01 15:00:00
Priority: 10
OK to run? (yes/mod/no):yes
即座にジョブがキューに入ります。
Job queued. JobId=001
*
ジョブの結果を確認するため、
*staus
Directorを選択します。
Status available for:
     1: Director
     2: Storage
     3: Client
     4: Scheduled
     5: All
Select daemon type for status (1-5): 1
最終行のTerminated Jobsで、
 (略)
Terminated Jobs:
 JobId  Level    Files      Bytes   Status   Finished        Name
====================================================================
   001  Full        3        256   OK       01-Mar-17 15:00 Backup-TestJob
====
バックアップファイルの確認
Bconsoleから、
* list files jobid= jobidの番号
*list files jobid=3
+----------+
| Filename |
+----------+
| /test/   |
| /test/test1|
| /test/test3 |
+----------+
+-------+----------------+---------------------+------+-------+----------+----------+-----------+
| JobId | Name           | StartTime           | Type | Level | JobFiles | JobBytes | JobStatus |
+-------+----------------+---------------------+------+-------+----------+----------+-----------+
|     3 | Backup-TestJob | 2017-03-01 15:00:00 | B    | F     |        3 |        0 | T         |
+-------+----------------+---------------------+------+-------+----------+----------+-----------+
Baculaでリストア
リストアを行ってみましょう。
リストア時にはデフォルトだと/tmp/
バックアップと同様にbconsoleを使用して操作します。bconsoleを起動したら、
*restore
Using Catalog "MyCatalog"

First you select one or more JobIds that contain files
to be restored. You will be presented several methods
of specifying the JobIds. Then you will be allowed to
select which files from those JobIds are to be restored.

To select the JobIds, you have the following choices:
     1: List last 20 Jobs run
     2: List Jobs where a given File is saved
     3: Enter list of comma separated JobIds to select
     4: Enter SQL list command
     5: Select the most recent backup for a client
     6: Select backup for a client before a specified time
     7: Enter a list of files to restore
     8: Enter a list of files to restore before a specified time
     9: Find the JobIds of the most recent backup for a client
    10: Find the JobIds for a backup for a client before a specified time
    11: Enter a list of directories to restore for found JobIds
    12: Select full restore to a specified Job date
    13: Cancel
Select item:  (1-13):1
1を入力すると、
Select item:  (1-13): 1
+-------+---------------+---------------------+----------+----------+----------+
| JobId | Client        | StartTime           | JobLevel | JobFiles | JobBytes |
+-------+---------------+---------------------+----------+----------+----------+
| 001   | bacula-fd     | 2017-03-01 15:00:00 | F        | 2        | 256      |
+-------+---------------+---------------------+----------+----------+----------+
ジョブIDを確認したら、
To select the JobIds, you have the following choices:
     1: List last 20 Jobs run
     2: List Jobs where a given File is saved
     3: Enter list of comma separated JobIds to select
     4: Enter SQL list command
     5: Select the most recent backup for a client
     6: Select backup for a client before a specified time
     7: Enter a list of files to restore
     8: Enter a list of files to restore before a specified time
     9: Find the JobIds of the most recent backup for a client
    10: Find the JobIds for a backup for a client before a specified time
    11: Enter a list of directories to restore for found JobIds
    12: Select full restore to a specified Job date
    13: Cancel
Select item:  (1-13): 3
ここで、
Enter JobId(s), comma separated, to restore: 1
You have selected the following JobId: 1

Building directory tree for JobId(s) 1 ...
1 files inserted into the tree.

You are now entering file selection mode where you add (mark) and
remove (unmark) files to be restored. No files are initially added, unless
you used the "all" keyword on the command line.
Enter "done" to leave this mode.

cwd is: /
すると、
$ ls
test/
testディレクトリの中に移動すると、
$ cd test
cwd is: /test/
$ ls
test-file1
test-file2
リストアしたいファイル
$ add test-file1
1 file marked.
すべてのファイルをリストアしたい場合には、
$ add *
2 files marked.
選択が終わったらdoneを入力します。
リストアの確認画面が表示されます。
$ done
Bootstrap records written to /var/spool/bacula/bacula-dir.restore.2.bsr

The Job will require the following (*=>InChanger):
   Volume(s)                 Storage(s)                SD Device(s)
===========================================================================

    Vol-0001                  File1                     FileChgr1

Volumes marked with "*" are in the Autochanger.


3 files selected to be restored.

Run Restore job
JobName:         RestoreFiles
Bootstrap:       /var/spool/bacula/bacula-dir.restore.2.bsr
Where:           /tmp/bacula-restores
Replace:         Always
FileSet:         Full Set
Backup Client:   bacula-fd
Restore Client:  bacula-fd
Storage:         File1
When:            2017-03-01 15:30:00
Catalog:         MyCatalog
Priority:        10
Plugin Options:
OK to run? (yes/mod/no):
yesを入力します。
OK to run? (yes/mod/no): yes
Job queued. JobId=129
なお、
ジョブの実行後、
*status
Status available for:
     1: Director
     2: Storage
     3: Client
     4: Scheduled
     5: All
Select daemon type for status (1-5):1
Terminated Jobsに、
Terminated Jobs:
 JobId  Level    Files      Bytes   Status   Finished        Name
====================================================================
   001  Full          3       256   OK       01-Mar-17 15:00 Backup-TestJob
   002  Restore       3       256   OK       01-Mar-17 15:30 RestoreFiles
====
実際にファイルがリストアされているか確認してみましょう。
/tmp/
# ls /tmp/bacula-restores/
test
以上、