


最近のWebサイトを表示する際は、サーバー証明書とTLSを利用したセキュアな接続が大半になってきました。これはセキュリティ意識の向上もさることながら、Let's Encryptに代表される
Let's EncryptとACMEプロトコル
Let's Encryptは無償でサーバー証明書を発行し、自動的に更新処理を行える認証局です。インターネットに関わる名だたる企業・
Let's Encryptから証明書を発行
- HTTP-01:Let's Encryptから、発行対象のサーバーのPort 80にHTTPでアクセスして正当性を検証する
- DNS-01:Let's Encryptから、発行対象のドメインが登録されているDNSに問い合わせて正当性を検証する
正当性の検証は、certbotがチャンレンジを実施した際にLet's Encryptから発行されるトークンが、HTTPサーバーもしくはDNSサーバーに適切に記載されているかどうかによって行います。つまりHTTP-01にしろDNS-01にしろ、動的にトークンを書き換える手段が必要であり、またインターネットからHTTP/
しかしながらこの自動化の仕組みはとても便利であり、どうせならLAN内にあるサーバーでも同様の仕組みで証明書を更新したいところです。特に最近のウェブブラウザーは長い有効期間を持つ証明書は信頼しない方向になっています[1]。自前の認証局と自己署名証明書を作るにしろ、定期的な更新は欠かせなくなりそうです。
たとえばコンテナ管理システムであるLXDは、第769回の
ところでLet's Encryptにおけるドメインの検証・
今回は、そんなローカルACMEサーバーのひとつであるsmallstepの
Go言語で構築された「step-ca」
smallstepはPKI
実際にUbuntuにインストールしてみましょう。smallstepではGitHubの複数のプロジェクトで、Debian/
各ページの右側の
$ wget https://dl.smallstep.com/gh-release/certificates/docs-ca-install/v0.24.2/step-ca_0.24.2_amd64.deb
$ wget https://dl.smallstep.com/gh-release/cli/docs-ca-install/v0.24.4/step-cli_0.24.4_amd64.deb
ちなみにUbuntuやDebianにもgolang-github-smallstep」
さて、パッケージの中にはどのようなファイルがインストールされるか確認しておきましょう。どちらも実際は単に1個のバイナリファイルがインストールされるだけです。
$ dpkg-deb -c step-ca_0.24.2_amd64.deb
drwxr-xr-x root/root         0 2023-05-11 20:26 ./usr/
drwxr-xr-x root/root         0 2023-05-11 20:26 ./usr/bin/
-rwxr-xr-x root/root  39159171 2023-05-11 20:23 ./usr/bin/step-ca
drwxr-xr-x root/root         0 2023-05-11 20:26 ./usr/share/
drwxr-xr-x root/root         0 2023-05-11 20:26 ./usr/share/doc/
drwxr-xr-x root/root         0 2023-05-11 20:26 ./usr/share/doc/step-ca/
-rw-r--r-- root/root       816 2023-05-11 20:15 ./usr/share/doc/step-ca/copyright
$ dpkg-deb -c step-cli_0.24.4_amd64.deb
drwxr-xr-x root/root         0 2023-05-11 20:09 ./usr/
drwxr-xr-x root/root         0 2023-05-11 20:09 ./usr/bin/
-rwxr-xr-x root/root  34722510 2023-05-11 20:09 ./usr/bin/step-cli
drwxr-xr-x root/root         0 2023-05-11 20:09 ./usr/share/
drwxr-xr-x root/root         0 2023-05-11 20:09 ./usr/share/doc/
drwxr-xr-x root/root         0 2023-05-11 20:09 ./usr/share/doc/step-cli/
-rw-r--r-- root/root       864 2023-05-11 19:52 ./usr/share/doc/step-cli/copyright
debファイルなので、インストール方法は簡単です。
$ sudo apt install ./step-cli_0.24.4_amd64.deb ./step-ca_0.24.2_amd64.deb
ちなみにstep-cliコマンドの別名としてstepコマンドが用意されます。ここからはstepコマンドで説明しますが、step-cliで代用しても問題ありません。
$ ls -l $(command -v step)
lrwxrwxrwx 1 root root 22 Jul 30 13:17 /usr/bin/step -> /etc/alternatives/step
$ update-alternatives --list step
/usr/bin/step-cli
step-caのセットアップ
必要なツールをインストールできたので、step-caのセットアップを行いましょう。まず、ルート証明書を生成しPKIstep ca init --help」stepコマンドはサブコマンドのほとんどに詳細なヘルプが用意されていますので、困ったら--help」
今回は単にPKIを構築するだけでなく、--acme」
$ step ca init --acme
Use the arrow keys to navigate: ↓ ↑ → ←
? What deployment type would you like to configure?:
  ▸ Standalone - step-ca instance you run yourself
    Linked - standalone, plus cloud configuration, reporting & alerting
    Hosted - fully-managed step-ca cloud instance run for you by smallstep
  => カーソルキーでどのモードかを選ぶ。
     smallstepのサービスを使わないのであればStandaloneでOK。

✔ Deployment Type: Standalone
What would you like to name your new PKI?
✔ (e.g. Smallstep): Smallstep
What DNS names or IP addresses will clients use to reach your CA?
✔ (e.g. ca.example.com[,10.1.2.3,etc.]): acme.lxd
What IP and port will your new CA bind to? (:443 will bind to 0.0.0.0:443)
✔ (e.g. :443 or 127.0.0.1:443): :443
What would you like to name the CA's first provisioner?
m✔ (e.g. you@smallstep.com): test@exampl.com
Choose a password for your CA keys and first provisioner.
✔ [leave empty and we'll generate one]:
  PKIの名前、サーバーのドメイン名、ポート番号、
  メールアドレス、CAのパスワードを指定する。

Generating root certificate... done!
Generating intermediate certificate... done!

✔ Root certificate: /home/ubuntu/.step/certs/root_ca.crt
✔ Root private key: /home/ubuntu/.step/secrets/root_ca_key
✔ Root fingerprint: 7b15cb4f5369ef7d1dce53a8d8aba850fb8819c4b46b6aa9f0596d5cc3641a20
✔ Intermediate certificate: /home/ubuntu/.step/certs/intermediate_ca.crt
✔ Intermediate private key: /home/ubuntu/.step/secrets/intermediate_ca_key
✔ Database folder: /home/ubuntu/.step/db
✔ Default configuration: /home/ubuntu/.step/config/defaults.json
✔ Certificate Authority configuration: /home/ubuntu/.step/config/ca.json

Your PKI is ready to go. To generate certificates for individual services see 'step help ca'.

FEEDBACK 😍 🍻
  The step utility is not instrumented for usage statistics. It does not phone
  home. But your feedback is extremely valuable. Any information you can provide
  regarding how you’re using `step` helps. Please send us a sentence or two,
  good or bad at feedback@smallstep.com or join GitHub Discussions
  https://github.com/smallstep/certificates/discussions and our Discord
  https://u.step.sm/discord.
最初にいくつかの問い合わせがあります。環境に応じて回答してください。今回はホスト名にacme.」ホスト名.lxd」
生成したファイルは、ユーザーのホームディレクトリの~/.step/」
$ find ~/.step -type f | xargs file
/home/ubuntu/.step/secrets/intermediate_ca_key: PEM EC private key
/home/ubuntu/.step/secrets/root_ca_key:         PEM EC private key
/home/ubuntu/.step/config/defaults.json:        JSON data
/home/ubuntu/.step/config/ca.json:              JSON data
/home/ubuntu/.step/certs/root_ca.crt:           PEM certificate
/home/ubuntu/.step/certs/intermediate_ca.crt:   PEM certificate
今後必要になるのが
ルート証明書は~/.step/」step ca root」
$ step ca root | openssl x509 -text -noout
Certificate:
    Data:
        Version: 3 (0x2)
        Serial Number:
            c2:64:37:d7:32:e9:4c:7c:8b:f9:34:91:f6:2d:a0:dd
        Signature Algorithm: ecdsa-with-SHA256
        Issuer: O = Smallstep, CN = Smallstep Root CA
        Validity
            Not Before: Aug 12 15:24:51 2023 GMT
            Not After : Aug  9 15:24:51 2033 GMT
        Subject: O = Smallstep, CN = Smallstep Root CA
        Subject Public Key Info:
            Public Key Algorithm: id-ecPublicKey
                Public-Key: (256 bit)
                pub:
                    04:b2:95:8e:a6:e8:c8:96:26:ed:ac:a8:3f:d1:53:
                    79:08:0b:aa:9f:f6:6e:2d:5f:50:03:84:6c:2e:fe:
                    34:14:ad:7e:3d:49:a2:fd:84:40:63:54:02:38:33:
                    82:fb:92:e0:44:d2:b4:17:5e:3d:bf:97:cb:be:23:
                    4f:5d:ee:e0:55
                ASN1 OID: prime256v1
                NIST CURVE: P-256
        X509v3 extensions:
            X509v3 Key Usage: critical
                Certificate Sign, CRL Sign
            X509v3 Basic Constraints: critical
                CA:TRUE, pathlen:1
            X509v3 Subject Key Identifier:
                19:BF:5E:AC:5F:E4:4E:BB:7F:BC:7D:86:6D:66:3E:E4:81:1C:1F:E5
    Signature Algorithm: ecdsa-with-SHA256
    Signature Value:
        30:45:02:21:00:e7:d0:f5:52:c1:79:48:b9:40:82:de:96:31:
        b8:d9:7e:6d:0d:58:2e:51:26:3a:55:13:0d:46:70:5f:91:74:
        36:02:20:13:64:74:5a:b5:ba:9b:56:8f:f6:9e:b2:cd:5e:d5:
        ea:61:a6:65:b6:11:04:d7:23:6e:88:83:b4:c8:4a:1b:5b
IssuerはPKI設定時に指定した名前が残ります。また、次のように引数にファイル名を追加してやると、そこに保存してくれます。このCRTファイルは後ほど利用します。
$ step ca root acme.crt
The root certificate has been saved in acme.crt.
$ file acme.crt
acme.crt: PEM certificate
準備ができたのでACMEサーバーを起動しましょう。これは設定ファイルを指定してstep-caコマンドを実行するだけです。443のような若番のポートを使用する場合は、管理者権限が必要になります。
$ sudo step-ca $(step path)/config/ca.json
badger 2023/08/13 07:51:26 INFO: All 0 tables opened in 0s
Please enter the password to decrypt /home/ubuntu/.step/secrets/intermediate_ca_key:(初期化時に指定したパスワード)
(中略)
2023/08/13 07:55:45 X.509 Root Fingerprint: 7b15cb4f5369ef7d1dce53a8d8aba850fb8819c4b46b6aa9f0596d5cc3641a20
2023/08/13 07:55:45 Serving HTTPS on :443 ...
証明書の鍵を利用するためにパスワードが求められます。これはstep ca init」step ca health」
$ sudo ss -ltnp | grep 443
LISTEN 0      128                *:443             *:*    users:(("step-ca",pid=1077,fd=10))
$ step ca health
ok
次に
$ curl -I https://acme.lxd:443/
curl: (60) SSL certificate problem: unable to get local issuer certificate
More details here: https://curl.se/docs/sslcerts.html

curl failed to verify the legitimacy of the server and therefore could not
establish a secure connection to it. To learn more about this situation and
how to fix it, please visit the web page mentioned above.
サーバー証明書を検証できない旨のメッセージが表示されてしまいました。試しにopensslコマンドで証明書を表示してみましょう。
$ openssl s_client -connect acme.lxd:443 </dev/null 2>/dev/null | openssl x509 -noout -subject -issuer -dates
subject=CN = Step Online CA
issuer=O = Smallstep, CN = Smallstep Intermediate CA
notBefore=Aug 13 07:54:45 2023 GMT
notAfter=Aug 14 07:55:45 2023 GMT
無事にSmallstepの証明書が使われているようです。これは1日以内に内部で更新される証明書になっているため、証明書の期限も1日だけとなっています。さて、先ほどstep ca root」
$ curl --cacert acme.crt -I https://acme.lxd:443/
HTTP/2 404
content-type: text/plain; charset=utf-8
x-content-type-options: nosniff
content-length: 19
date: Sun, 13 Aug 2023 11:18:58 GMT
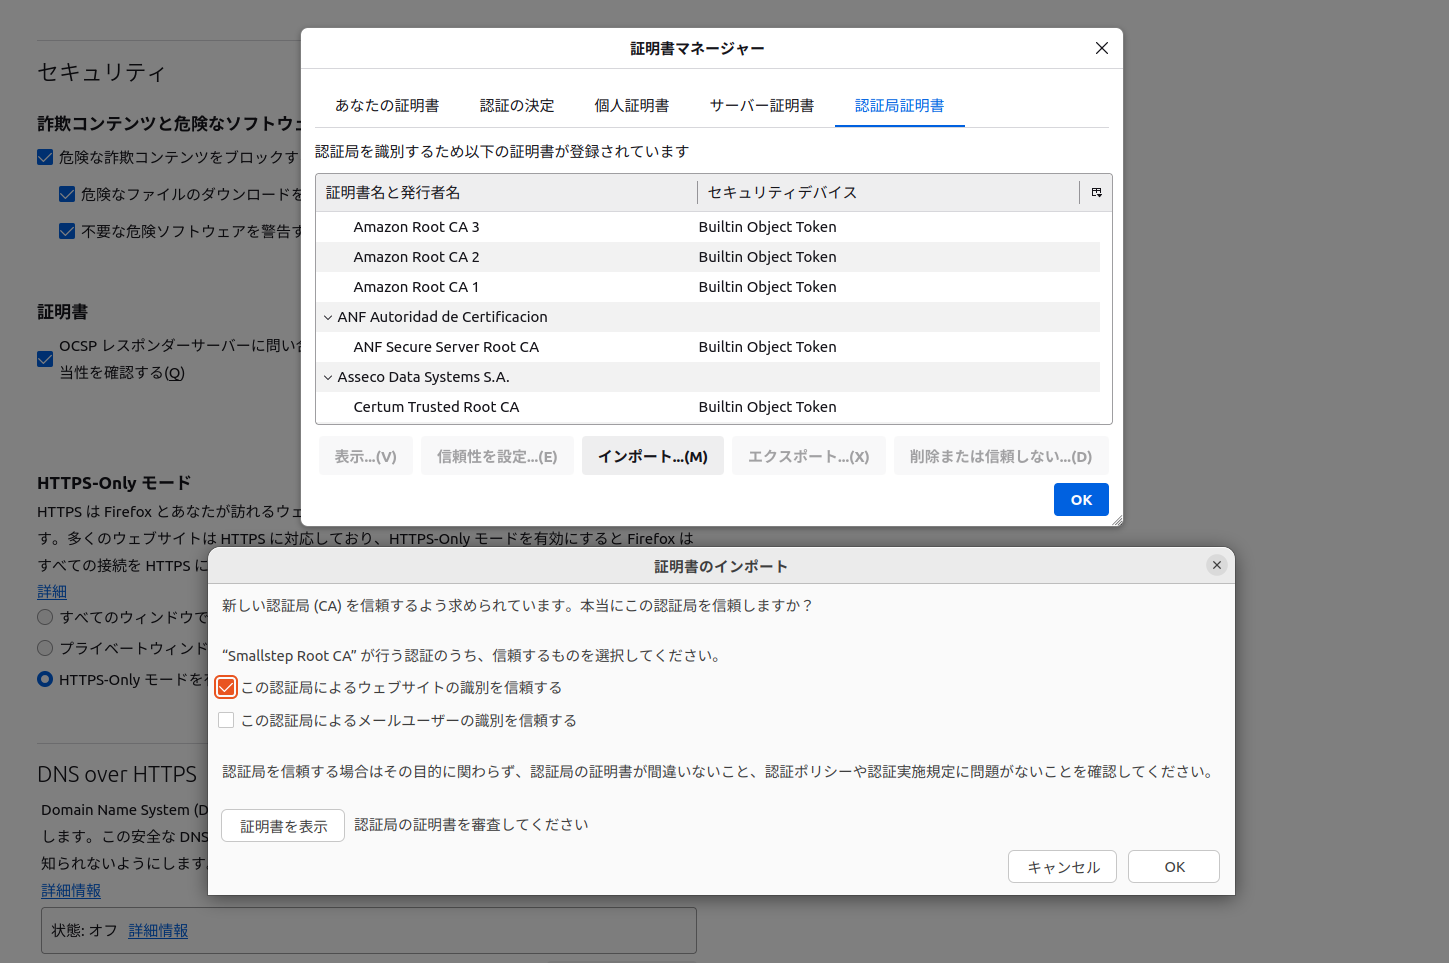
今度は無事にアクセスできたようです。トップページは存在しないので404になってしまいます。次にこのルート証明書をシステムにインストールします。Firefoxであれば、設定のabout:preferences#privacy)
curlコマンドのようにCLIのツールであれば、次のようにファイルをコピーしてupdate-ca-certificatesコマンドを実行してください。
$ sudo cp acme.crt /usr/local/share/ca-certificates/
$ sudo update-ca-certificates
Updating certificates in /etc/ssl/certs...
rehash: warning: skipping ca-certificates.crt,it does not contain exactly one certificate or CRL
1 added, 0 removed; done.
Running hooks in /etc/ca-certificates/update.d...
done.
ためしに証明書未指定で、ACMEプロトコル用のAPIにアクセスしてみましょう。
$ sudo apt install jq
$ curl -s https://acme.lxd:443/acme/acme/directory | jq
{
  "newNonce": "https://acme.lxd/acme/acme/new-nonce",
  "newAccount": "https://acme.lxd/acme/acme/new-account",
  "newOrder": "https://acme.lxd/acme/acme/new-order",
  "revokeCert": "https://acme.lxd/acme/acme/revoke-cert",
  "keyChange": "https://acme.lxd/acme/acme/key-change"
}
無事にACMEプロトコルも動いているようです。ちなみにAPI用のURLはhttps://ホスト名:ポート番号/acme/名前/directory」--acme」acmeとなります。具体的には次のように設定されています。
$ cat $(step path)/config/ca.json
(中略)
        "authority": {
                "provisioners": [
(中略)
                        {
                                "type": "ACME",
                                "name": "acme"
                        }
(後略)
これでACMEプロトコルサーバーの準備が整いました。
Nginxとcertbotで独自ACMEサーバーを利用する
最後にACMEサーバーから通信できる場所にいる任意のマシンにNginxとcertbotをインストールし、Let's Encryptと同じ手順で証明書を取得できるようにしてみましょう。と言っても、その方法は普通のUbuntuと同じです。とりあえずNginxをインストールしましょう。
$ sudo apt install nginx
次に基本的な設定を行います。
$ cat <<'EOF' | sudo tee /etc/nginx/sites-available/default
server {
    listen 80 default_server;
    listen [::]:80 default_server;
    root /var/www/html;
    index index.html index.htm index.nginx-debian.html;
    server_name ssl.lxd;
    location / {
        try_files $uri $uri/ =404;
    }
}
EOF
$ sudo systemctl reload nginx.service
トップページを取得してみましょう。Debianパッケージで提供されているシンプルなトップページのHTMLファイルが表示されるはずです。
$ curl http://ssl.lxd/
次にcertbotをインストールします。Ubuntuの場合、Ubuntuの公式リポジトリにあるcertbotパッケージと、certbotの開発元が提供するsnapパッケージの2種類が存在します。snapパッケージのほうがバージョンが新しいため、特別な理由がない限りはsnap版を使うことをおすすめします。
snap版のcertbotパッケージをインストールするには--classic」/etc以下のNginxやApacheの設定を変更できるようになります。
$ sudo snap install certbot --classic
独自のACMEサーバーに対してcertbotコマンドを使う場合、次の注意点が存在します。
- 最初の取得時に
「 --server」オプションでACMEサーバーを指定する必要がある - ACMEサーバーが自己署名証明書を使っている場合はルート証明書を、環境変数
「 REQUESTS_」CA_ BUNDLE で指定する必要がある
Nginxプラグインを使って設定を行うなら、次のようになります。--server」
$ sudo REQUESTS_CA_BUNDLE=/usr/local/share/ca-certificates/acme.crt \
    certbot --nginx -d ssl.lxd -m test@example.com \
    --server https://acme.lxd/acme/acme/directory
Saving debug log to /var/log/letsencrypt/letsencrypt.log
Plugins selected: Authenticator nginx, Installer nginx

- - - - - - - - - - - - - - - - - - - - - - - - - - - - - - - - - - - - - - - -
Would you be willing, once your first certificate is successfully issued, to
share your email address with the Electronic Frontier Foundation, a founding
partner of the Let's Encrypt project and the non-profit organization that
develops Certbot? We'd like to send you email about our work encrypting the web,
EFF news, campaigns, and ways to support digital freedom.
- - - - - - - - - - - - - - - - - - - - - - - - - - - - - - - - - - - - - - - -
(Y)es/(N)o: n
  => EFFにメールアドレスを登録するかどうかは「n」を指定しないとエラーになる
Account registered.
Requesting a certificate for ssl.lxd
Performing the following challenges:
http-01 challenge for ssl.lxd
Waiting for verification...
Cleaning up challenges

Successfully received certificate.
Certificate is saved at: /etc/letsencrypt/live/ssl.lxd/fullchain.pem
Key is saved at:         /etc/letsencrypt/live/ssl.lxd/privkey.pem
This certificate expires on 2023-08-14.
These files will be updated when the certificate renews.
Certbot has set up a scheduled task to automatically renew this certificate in the background.

Deploying certificate
Deploying Certificate to VirtualHost /etc/nginx/sites-enabled/default
Successfully deployed certificate for ssl.lxd to /etc/nginx/sites-enabled/default
Redirecting all traffic on port 80 to ssl in /etc/nginx/sites-enabled/default
Congratulations! You have successfully enabled HTTPS on https://ssl.lxd

- - - - - - - - - - - - - - - - - - - - - - - - - - - - - - - - - - - - - - - -
If you like Certbot, please consider supporting our work by:
 * Donating to ISRG / Let's Encrypt:   https://letsencrypt.org/donate
 * Donating to EFF:                    https://eff.org/donate-le
- - - - - - - - - - - - - - - - - - - - - - - - - - - - - - - - - - - - - - - -
ここでは詳細な実行結果を表示していますが、気をつけなければいけないのは(Y)es/(N)o:」/etc/」
$ curl -I https://ssl.lxd/
HTTP/1.1 200 OK
Server: nginx/1.18.0 (Ubuntu)
Date: Sun, 13 Aug 2023 19:42:14 GMT
Content-Type: text/html
Content-Length: 612
Last-Modified: Sun, 13 Aug 2023 16:10:06 GMT
Connection: keep-alive
ETag: "64d9005e-264"
Accept-Ranges: bytes

$ openssl s_client -connect ssl.lxd:443 </dev/null 2>/dev/null | openssl x509 -noout -ext subjectAltName -issuer -dates
X509v3 Subject Alternative Name: critical
    DNS:ssl.lxd
issuer=O = Smallstep, CN = Smallstep Intermediate CA
notBefore=Aug 13 19:51:50 2023 GMT
notAfter=Aug 14 19:52:50 2023 GMT
どちらも問題なく接続できましたし、証明書も期待通りになっているようです。--server」/etc/」renewを実行してみましょう。
$ sudo REQUESTS_CA_BUNDLE=/usr/local/share/ca-certificates/acme.crt \
  certbot renew --force-renewal
Saving debug log to /var/log/letsencrypt/letsencrypt.log

- - - - - - - - - - - - - - - - - - - - - - - - - - - - - - - - - - - - - - - -
Processing /etc/letsencrypt/renewal/ssl.lxd.conf
- - - - - - - - - - - - - - - - - - - - - - - - - - - - - - - - - - - - - - - -
Renewing an existing certificate for ssl.lxd
Reloading nginx server after certificate renewal

- - - - - - - - - - - - - - - - - - - - - - - - - - - - - - - - - - - - - - - -
Congratulations, all renewals succeeded:
  /etc/letsencrypt/live/ssl.lxd/fullchain.pem (success)
- - - - - - - - - - - - - - - - - - - - - - - - - - - - - - - - - - - - - - - -
無事に更新できたたようです。ちなみに、snap版のcertbotはsystemd timerを用いて定期更新を実施しています。
$ systemctl status snap.certbot.renew.service
○ snap.certbot.renew.service - Service for snap application certbot.renew
     Loaded: loaded (/etc/systemd/system/snap.certbot.renew.service; static)
     Active: inactive (dead)
TriggeredBy: ● snap.certbot.renew.timer
$ systemctl status snap.certbot.renew.timer
● snap.certbot.renew.timer - Timer renew for snap application certbot.renew
     Loaded: loaded (/etc/systemd/system/snap.certbot.renew.timer; enabled; vendor preset: enabled)
     Active: active (waiting) since Sun 2023-08-13 19:25:47 UTC; 9h ago
    Trigger: Mon 2023-08-14 09:25:00 UTC; 4h 30min left
   Triggers: * snap.certbot.renew.service

Aug 13 19:25:47 ssl systemd[1]: Started Timer renew for snap application certbot.renew.
systemd timerから実行するcertbotプログラムに対して、ACMEサーバーの証明書を渡さなくてはいけないケースもあるでしょう。方法はいくつかありますが、snap.が実行時に/etc/を読み込んでいるため、ここに設定を追記するのが一番簡単です。
$ echo 'REQUESTS_CA_BUNDLE=/usr/local/share/ca-certificates/acme.crt' | sudo tee -a /etc/environment
ところで/etc/」certbotコマンドを実行することになっています。何時に実行するかはインストール時にランダムに決まります。
さらに現在のLet's Encryptのサーバー証明書は90日間の有効期限となっており、certbotは
Let's Encryptに対して、step-caのACMEプロトコルで提供されるサーバー証明書の有効期限は
幸いなことにcertbotのサーバーごとの設定ファイルにあるrenew_」
$ sudo sed -i 's/^# \(renew.*\) =.*/\0 = 8 hours/' /etc/letsencrypt/renewal/ssl.lxd.conf
$ sudo grep renew_ /etc/letsencrypt/renewal/ssl.lxd.conf
renew_before_expiry = 8 hours
ただし変更対象のファイル名にある通り、対象となるサーバーごとに設定が必要な点に注意してください。これで1日まてば2回行われる更新処理のうち片方で、更新が行われていることでしょう。
mDNSなドメイン名でstep-caを利用する
ACMEプロトコルで証明書を生成・FOO.」FOO.」
もし物理マシン上ではなくLXDインスタンス上にACMEサーバーを構築し、なおかつLAN上のmDNSFOO.)
$ lxc config device add acme eth1 nic nictype=macvlan parent=enp0s31f6
最後の
さらにacmeインスタンス側で、DHCPでアドレスを取得できる設定ファイルを作成します。もちろん固定IPアドレスでもかまいません。
$ cat <<'EOF' | sudo tee -a /etc/netplan/70-eth1.yaml
network:
    version: 2
    ethernets:
        eth1:
            dhcp4: true
EOF
$ sudo netplan apply
最後にnetplan apply」ipコマンドか何かでアドレスが設定されていることを確認しておきましょう。もし同じネットワーク内部の他のマシンからacme.」
$ sudo apt install avahi-utils
$ avahi-resolve -n acme.local
acme.local      192.168.0.14
ただしstep-caはavahi-utilsをインストールしてもmDNSでのFOO.の)
そこで、systemd-resolvedの設定を変更しましょう。このあたりはUbuntu 24.
$ sudo mkdir /etc/systemd/resolved.conf.d/
$ echo -e "[Resolve]\nMulticastDNS=resolve" | sudo tee /etc/systemd/resolved.conf.d/mdns.conf
$ sudo systemctl restart systemd-resolved.service
最初の3行でグローバルなmDNS機能のうち名前解決
$ sudo mkdir /etc/systemd/network/10-netplan-eth1.network.d
$ echo -e "[Network]\nMulticastDNS=resolve" | sudo tee /etc/systemd/network/10-netplan-eth1.network.d/override.conf
$ sudo systemctl restart systemd-networkd
これでstep-caからも、FOO.を解決できるようになりました。試しに近くのマシンの名前を解決してみます。
$ resolvectl mdns
Global: resolve
Link 14 (eth0): no
Link 16 (eth1): resolve
$ resolvectl query nuc.local
nuc.local: 192.168.0.59                        -- link: eth1

-- Information acquired via protocol mDNS/IPv4 in 171.1ms.
-- Data is authenticated: no; Data was acquired via local or encrypted transport: no
-- Data from: network
さらに独自ACMEサーバーで証明書を取得したマシンでもavahi-utilsなどをインストールし、avahi-resolve -n acme.」http://」
$ sudo sed -i 's/\(server_name.*\);/\1 ssl.local;/' /etc/nginx/sites-available/default
$ sudo sed -i '/if ($host = /!b;:a;N;/# managed by Certbot/!ba;:b;p;s/ssl\.lxd/ssl.local/;t' /etc/nginx/sites-available/default
$ sudo systemctl reload nginx.service
1行目はserver_にssl.を追加しているだけです。2行目はCertbotが追加したifブロックを複製し、後者のif文をssl.に変更しています。
    if ($host = ssl.lxd) {
        return 301 https://$host$request_uri;
    } # managed by Certbot
    if ($host = ssl.local) {
        return 301 https://$host$request_uri;
    } # managed by Certbot
あとはssl.-d」--server」
$ sudo certbot --nginx certonly \
  --server https://acme.lxd/acme/acme/directory \
  -d ssl.lxd -d ssl.local
Saving debug log to /var/log/letsencrypt/letsencrypt.log

- - - - - - - - - - - - - - - - - - - - - - - - - - - - - - - - - - - - - - - -
You have an existing certificate that contains a portion of the domains you
requested (ref: /etc/letsencrypt/renewal/ssl.lxd.conf)

It contains these names: ssl.lxd

You requested these names for the new certificate: ssl.lxd, ssl.local.

Do you want to expand and replace this existing certificate with the new
certificate?
- - - - - - - - - - - - - - - - - - - - - - - - - - - - - - - - - - - - - - - -
(E)xpand/(C)ancel: e
Renewing an existing certificate for ssl.lxd and ssl.local

Successfully received certificate.
(後略)
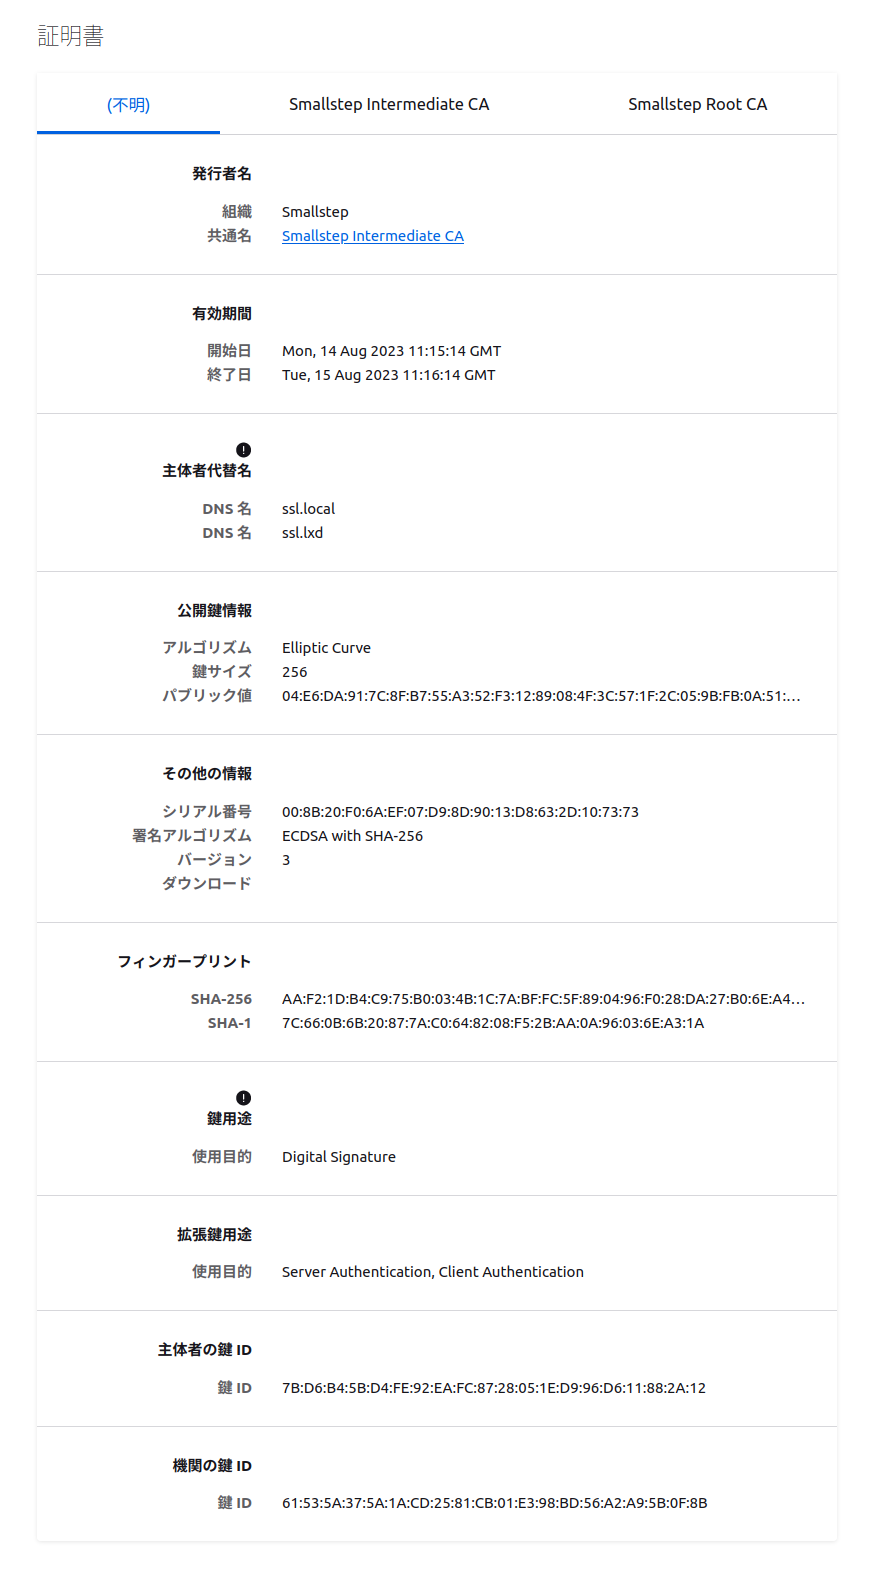
どうやら無事にssl.を追加できたようです。試しに証明書を表示すると、Subjcet Alt Namesにssl.」
$ openssl s_client -connect ssl.lxd:443 </dev/null 2>/dev/null | openssl x509 -noout -ext subjectAltName -issuer -dates
X509v3 Subject Alternative Name: critical
    DNS:ssl.local, DNS:ssl.lxd
issuer=O = Smallstep, CN = Smallstep Intermediate CA
notBefore=Aug 14 11:15:14 2023 GMT
notAfter=Aug 15 11:16:14 2023 GMT
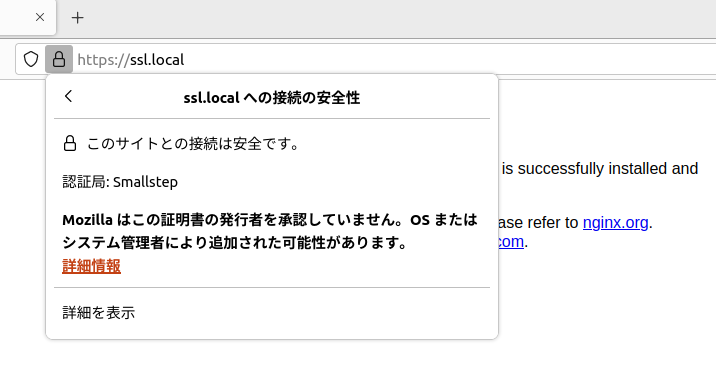
試しにルート証明書をインポートしたFirefoxでアクセスしてみましょう。
これでローカルネットワーク内部でもACMEプロトコルとcertbotを利用して、自己署名証明書の自動更新を実現できるようになりました。組織内のVPNのみアクセスできるようなサーバーもTLS/
step-caはACMEだけでなく、単なる独自PKIの証明書管理の自動化にも便利なツールです。mTLS