


UbuntuにはDebian由来の豊富なパッケージ資産が存在します。しかしながら登場したばかりのソフトウェアがなかったり、最新のバージョンに追随できていないことも多々あります。そこで今回は、他のディストリビューションのパッケージを気軽に素早く試せる
Distroboxとは
「Distrobox」
Distroboxを使うと次のようなことを実現できます。
- 特定のディストリビューションの特定のバージョンの環境を構築できる
- コマンドひとつでその環境にログインし、操作できる
- ホストのホームディレクトリがマウントされるため、コンテナ内外を意識する必要が少なくて済む
- コマンドの中の特定のコマンドを、ホスト側から直接実行するラッパースクリプトを生成できる
- コンテナ内のGUIアプリケーションも気軽に動かせる
これらはいずれも既存のコンテナ管理システムでも実現できていたことです。Distroboxの強みは機能を限定することで、それをよりシンプルで直感的に操作できるようにしたことでしょう。
たとえばホストのホームディレクトリがコンテナからそのまま見えることは、一般的なコンテナ管理システムでは利点・
この
ルートファイルシステムそのものは分離されるため、ホームディレクトリ以外の場所を汚すことはありません。よってcurl ... | sudo bash」
UbuntuにおけるDistrobox
このDistroboxは、Ubuntuに対してどんな恩恵をもたらしてくれるのでしょうか。その際たる例が
UbuntuはDebian由来の強力なパッケージ管理システムであるAptと、種類が多く、品質の高いパッケージリポジトリを備えています。この品質の高さは
同時にUbuntuでは、リリースされた安定版の品質を担保するために、
このような運用になっているため、Ubuntuのリポジトリにあるソフトウェアのバージョンは
そんな問題に対する解答のひとつがFlatpakやSnapといったユニバーサルパッケージングシステムです。ただ、これらはAptをはじめとするディストリビューションごとのパッケージよりこなれていないことも多く、求めるものがないこともありえます。
今回紹介するDistroboxは、もうひとつの解答となりうる存在です。つまりUbuntuに限らず、あるディストリビューションだとより新しいバージョンのパッケージが用意されているのに、という歯がゆさを解決できるツールなのです。
Distroboxのインストール
Distroboxは、Ubuntu 24.
なお、より古いバージョンのUbuntuであれば
$ sudo apt install distrobox
$ distrobox --version
distrobox: 1.8.1.2
$ podman --version
podman version 5.4.2
これで準備完了です。ちなみにDebianパッケージ版のDistroboxはPodmanとDockerのいずれかをバックエンドとして利用できます。どちらもインストールされていなければ上記のようにPodmanがインストールされます。もしDockerがインストール済みであれば、PodmanはインストールせずにDockerを使います。両方ともインストールされている場合は、Podmanを使います。また、環境変数DBX_を設定すればコンテナ管理システムを切り替え可能です[3]。
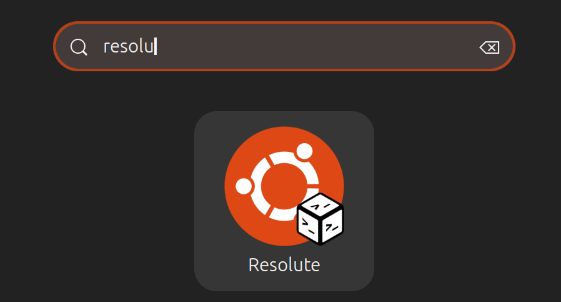
実際にコンテナを作ってみましょう。ここではubuntu:26.」resolute」
$ distrobox create --name resolute --image ubuntu:26.04
Image ubuntu:26.04 not found.
Do you want to pull the image now? [Y/n]:
Resolved "ubuntu" as an alias (/etc/containers/registries.conf.d/shortnames.conf)
Trying to pull docker.io/library/ubuntu:26.04...
Getting image source signatures
Copying blob f784408d7713 done   |
Copying config d92a6abc12 done   |
Writing manifest to image destination
d92a6abc129dcf0ad899cc339da85b29a76fc8cec85cf343e20c446a8c69c9d7
Creating 'resolute' using image ubuntu:26.04     [ OK ]
Distrobox 'resolute' successfully created.
To enter, run:

distrobox enter resolute
作成したコンテナは次の方法で確認できます。
$ distrobox list
ID           | NAME                 | STATUS             | IMAGE
ff3721bac84c | resolute             | Created            | docker.io/library/ubuntu:26.04
ここからもわかるとおり、UbuntuのコンテナはDockerで提供されるイメージが使われているようです。今回はバックエンドがPodmanであるため、Podmanコマンドでもイメージの存在を確認できます。
$ podman images
REPOSITORY                TAG         IMAGE ID      CREATED      SIZE
docker.io/library/ubuntu  26.04       d92a6abc129d  4 weeks ago  182 MB
ちなみにイメージの保存先は~/.local/」
それではコンテナの中に入ってみます。
$ distrobox enter resolute
Starting container...                            [ OK ]
Installing basic packages...                     [ OK ]
Setting up devpts mounts...                      [ OK ]
Setting up read-only mounts...                   [ OK ]
Setting up read-write mounts...                  [ OK ]
Setting up host's sockets integration...         [ OK ]
Integrating host's themes, icons, fonts...       [ OK ]
Setting up distrobox profile...                  [ OK ]
Setting up sudo...                               [ OK ]
Setting up user groups...                        [ OK ]
Setting up user's group list...                  [ OK ]
Setting up existing user...                      [ OK ]
Ensuring user's access...                        [ OK ]

Container Setup Complete!
bash: /usr/share/byobu/profiles/bashrc: No such file or directory
$
実はここでかなり時間がかかります。先ほど
最後にNo such file or directory」~/.bashrc」
dbox$ cat /etc/os-release
PRETTY_NAME="Ubuntu Resolute Raccoon (development branch)"
NAME="Ubuntu"
VERSION_ID="26.04"
VERSION="26.04 (Resolute Raccoon)"
VERSION_CODENAME=resolute
ID=ubuntu
ID_LIKE=debian
HOME_URL="https://www.ubuntu.com/"
SUPPORT_URL="https://help.ubuntu.com/"
BUG_REPORT_URL="https://bugs.launchpad.net/ubuntu/"
PRIVACY_POLICY_URL="https://www.ubuntu.com/legal/terms-and-policies/privacy-policy"
UBUNTU_CODENAME=resolute
LOGO=ubuntu-logo
このように、Distrobox内部はUbuntu 26.host$」、Distrobox内部で実行するときはdbox$」
デスクトップファイルについて
Distrobxで
host$ cat ~/.local/share/applications/resolute.desktop
[Desktop Entry]
Name=Resolute
GenericName=Terminal entering Resolute
Comment=Terminal entering Resolute
Categories=Distrobox;System;Utility
Exec=/usr/bin/distrobox enter  resolute
Icon=/home/shibata/.local/share/icons/distrobox/ubuntu.png
Keywords=distrobox;
NoDisplay=false
Terminal=true
TryExec=/usr/bin/distrobox
Type=Application
Actions=Remove;

[Desktop Action Remove]
Name=Remove Resolute from system
Exec=/usr/bin/distrobox rm  resolute
これは何かと言うと、GNOME ShellのDashに登録したり、アプリケーション一覧からコンテナを起動するためのエントリーです。たとえばdistrobx enter resolute」
ホームディレクトリについて
何度か紹介しているように、Distroboxはホームディレクトリをそのままコンテナの中から見えるようになっています。実際に確認してみましょう。
dbox$ findmnt ~
TARGET        SOURCE                                           FSTYPE OPTIONS
/home/shibata /dev/mapper/ubuntu--vg-ubuntu--lv[/home/shibata] ext4   rw,relatime

host$ podman inspect resolute | jq '.[0].Mounts'
(中略)
  {
    "Type": "bind",
    "Source": "/home/shibata",
    "Destination": "/home/shibata",
    "Driver": "",
    "Mode": "",
    "Options": [
      "rbind"
    ],
    "RW": true,
    "Propagation": "rslave"
  },
(後略)
Podmanを使う場合、Podmanの名前空間でマウントするため、ホスト上のmountコマンド等では表示されません。
もしホームディレクトリをマウントされるのが困るユースケースの場合は、--home 任意のディレクトリ」
指定できるイメージ名について
resoluteを作成する際に、createコマンドに--image ubuntu:26.」/etc/」
host$ grep ubuntu /etc/containers/registries.conf.d/shortnames.conf
  "ubuntu" = "docker.io/library/ubuntu"
ここに書いてあるのは短い名前と、レジストリ名の対応表です。言い方を変えると、レジストリ名をきちんと書けば、任意のレジストリの任意のイメージを利用できます。
host$ distrobox create --name 名前 --image レジストリアドレス/イメージ名:タグ
もし認証が必要なら、使用しているバックエンドに合わせてpodman login レジストリアドレス」
ArchのCLIアプリケーションを動かしてみる
基本的な使い方を覚えたところで、少し応用してみましょう。最新パッケージの豊富さと言えばやはりArch Linuxは外せません。そこでArch Linuxのコンテナを作り、そこにCLIのテキストエディタである
まずはArch Linuxのコンテナを作ります。ここで--yes」
host$ distrobox create --yes --name arch --image archlinux:latest
Resolved "archlinux" as an alias (/etc/containers/registries.conf.d/shortnames.conf)
Trying to pull docker.io/library/archlinux:latest...
Getting image source signatures
Copying blob 51b3e517c730 done   |
Copying blob 3073b417e59b done   |
Copying config 0db2337dce done   |
Writing manifest to image destination
0db2337dce953d567245583cfe3a1e55714f97b2f269602d9b452f6e7641341b
Creating 'arch' using image archlinux:latest     [ OK ]
Distrobox 'arch' successfully created.
To enter, run:

distrobox enter arch
次に
host$ distrobox enter arch
Starting container...                            [ OK ]
Installing basic packages...                     [ OK ]
Setting up devpts mounts...                      [ OK ]
Setting up read-only mounts...                   [ OK ]
Setting up read-write mounts...                  [ OK ]
Setting up host's sockets integration...         [ OK ]
Integrating host's themes, icons, fonts...       [ OK ]
Setting up distrobox profile...                  [ OK ]
Setting up sudo...                               [ OK ]
Setting up user's group list...                  [ OK ]
Setting up existing user...                      [ OK ]
Ensuring user's access...                        [ OK ]

Container Setup Complete!
bash: /usr/share/byobu/profiles/bashrc: そのようなファイルやディレクトリはありません
無事にArch Linuxの環境を構築できました。
dbox$ cat /etc/os-release
NAME="Arch Linux"
PRETTY_NAME="Arch Linux"
ID=arch
BUILD_ID=rolling
VERSION_ID=20260201.0.486523
ANSI_COLOR="38;2;23;147;209"
HOME_URL="https://archlinux.org/"
DOCUMENTATION_URL="https://wiki.archlinux.org/"
SUPPORT_URL="https://bbs.archlinux.org/"
BUG_REPORT_URL="https://gitlab.archlinux.org/groups/archlinux/-/issues"
PRIVACY_POLICY_URL="https://terms.archlinux.org/docs/privacy-policy/"
LOGO=archlinux-logo
さて、ここからはArch Linuxの使い方の話です。Ubuntuで言うところのaptコマンドに相当するのが、sudo apt update」apt search helix」apt show helix」
dbox$ sudo pacman -Syy
:: Synchronizing package databases...
 core                             120.0 KiB   375 KiB/s 00:00 [##################################] 100%
 extra                              7.8 MiB  13.7 MiB/s 00:01 [##################################] 100%

dbox$ pacman -Ss helix
extra/helix 25.07.1-1
    A post-modern modal text editor

dbox$ pacman -Si helix
Repository      : extra
Name            : helix
Version         : 25.07.1-1
Description     : A post-modern modal text editor
(後略)
では、Helixをインストールしましょう。
dbox$ sudo pacman -S helix
resolving dependencies...
looking for conflicting packages...

Package (2)               New Version  Net Change  Download Size

extra/hicolor-icon-theme  0.18-1         0.05 MiB       0.01 MiB
extra/helix               25.07.1-1    207.92 MiB      18.56 MiB

Total Download Size:    18.57 MiB
Total Installed Size:  207.97 MiB

:: Proceed with installation? [Y/n]
(中略)
(1/3) Arming ConditionNeedsUpdate...
(2/3) Distrobox hook /etc/distrobox-post-hook.sh...
(3/3) Distrobox hook /usr/share/libalpm/scripts/distrobox_post_hook.sh...

dbox$ helix --version
helix 25.07.1
無事にインストールできました。
HelixはVim・

コンテナの中のコマンドをホストから使えるようにする
さて、Helixが使えるようになったわけですが、毎回distrobox enter」
コンテナの中でdistrobox-export」
host$ distrobox enter arch
dbox$ distrobox-export --bin /usr/bin/helix
/usr/bin/helix from arch exported successfully in /home/shibata/.local/bin.
OK!
上記のログにあるように~/.local/」
host$ file ~/.local/bin/helix
/home/shibata/.local/bin/helix: POSIX shell script, ASCII text executable

host$ cat ~/.local/bin/helix
#!/bin/sh
# distrobox_binary
# name: arch
if [ -z "${CONTAINER_ID}" ]; then
        exec "/usr/bin/distrobox-enter"  -n arch  --  '/usr/bin/helix'  "$@"
elif [ -n "${CONTAINER_ID}" ] && [ "${CONTAINER_ID}" != "arch" ]; then
        exec distrobox-host-exec '/home/shibata/.local/bin/helix' "$@"
else
        exec '/usr/bin/helix' "$@"
fi
スクリプトを見ればわかるように、これは単にdistrobox enter」CONTAINER_」
「~/.local/」PATHに入っていません)。ただ、Ubuntuでは、~/.local/」PATHへとそのディレクトリを追加します。よって初めて~/.local/」echo $PATH」~/.local/」
host$ helix --version
helix 25.07.1
これでUbuntuからもHelixを使えるようになりました。なお、distrobox-export --bin /usr/」
ちなみに--bin 実行ファイルパス」--app アプリケーション名」
FedoraのGUIアプリケーションを動かしてみる
Distroboxの強みは、コンテナの中のGUIアプリケーションもホストから動かせることです。Snapのように権限管理が厳格ではないため、大抵のものがそのまま動いてくれます。
たとえばGNOMEの開発版のアプリケーションを動かす例を考えてみましょう。今ならFlatpakやGNOME OS Nightylyを使うという手もありますが、FedoraのRawhideを使うのもまた昔ながらの定番でした。
そこでRawhideのイメージを作って、GNOME Text Editorをインストールしてみます。
host$ distrobox create --name rawhide --image fedora:rawhide
Image fedora:rawhide not found.
Do you want to pull the image now? [Y/n]:
Resolved "fedora" as an alias (/etc/containers/registries.conf.d/shortnames.conf)
Trying to pull registry.fedoraproject.org/fedora:rawhide...
Getting image source signatures
Copying blob 4a4db5b599c2 done   |
Copying config 7e6677824c done   |
Writing manifest to image destination
7e6677824c77539efc31997c30ad2a4fe7bcf5bd5c9fb4e9d934d97d410174ed
Creating 'rawhide' using image fedora:rawhide    [ OK ]
Distrobox 'rawhide' successfully created.
To enter, run:

distrobox enter rawhide
ここはこれまでと同じ手順です。ただ、Fedoraのregistryはそこまで速くないのか、若干時間がかかります。
次にコンテナの中に入るわけですが、ここでひとつポイントです。Linuxのアプリケーションは伝統的にホームディレクトリ以下のドットファイルに各種設定や状態を保存します。独立したソフトウェアなら設定ファイルも独立しているために、気にしなくても問題ありません。しかしながらGNOMEアプリケーションはgsettingsといった設定フレームワークによって、統一的に設定を保存・
そこでドットファイルのうち、GUIアプリケーションが使いそうなディレクトリは別扱いにしてしまいましょう。あらかじめホスト上で、設定ファイルようのディレクトリを作っておくことにします。
host$ mkdir -p ~/.distrobox-xdg/rawhide/{config,cache,share}
準備ができたらコンテナの中に入ります。
host$ distrobox enter rawhide
Starting container...                            [ OK ]
Installing basic packages...                     [ OK ]
Setting up devpts mounts...                      [ OK ]
Setting up read-only mounts...                   [ OK ]
Setting up read-write mounts...                  [ OK ]
Setting up host's sockets integration...         [ OK ]
Integrating host's themes, icons, fonts...       [ OK ]
Setting up distrobox profile...                  [ OK ]
Setting up sudo...                               [ OK ]
Setting up user's group list...                  [ OK ]
Setting up existing user...                      [ OK ]
Ensuring user's access...
 Warning: There was a problem setting up the user, trying manual addition [ OK ]

Container Setup Complete!
bash: /usr/share/byobu/profiles/bashrc: そのようなファイルやディレクトリはありません
先ほど作成したディレクトリ群をGUIアプリケーションが参照できるように、環境変数を設定しましょう。
dbox$ export XDG_CONFIG_HOME=$HOME/.distrobox-xdg/rawhide/config
dbox$ export XDG_CACHE_HOME=$HOME/.distrobox-xdg/rawhide/cache
dbox$ export XDG_DATA_HOME=$HOME/.distrobox-xdg/rawhide/share
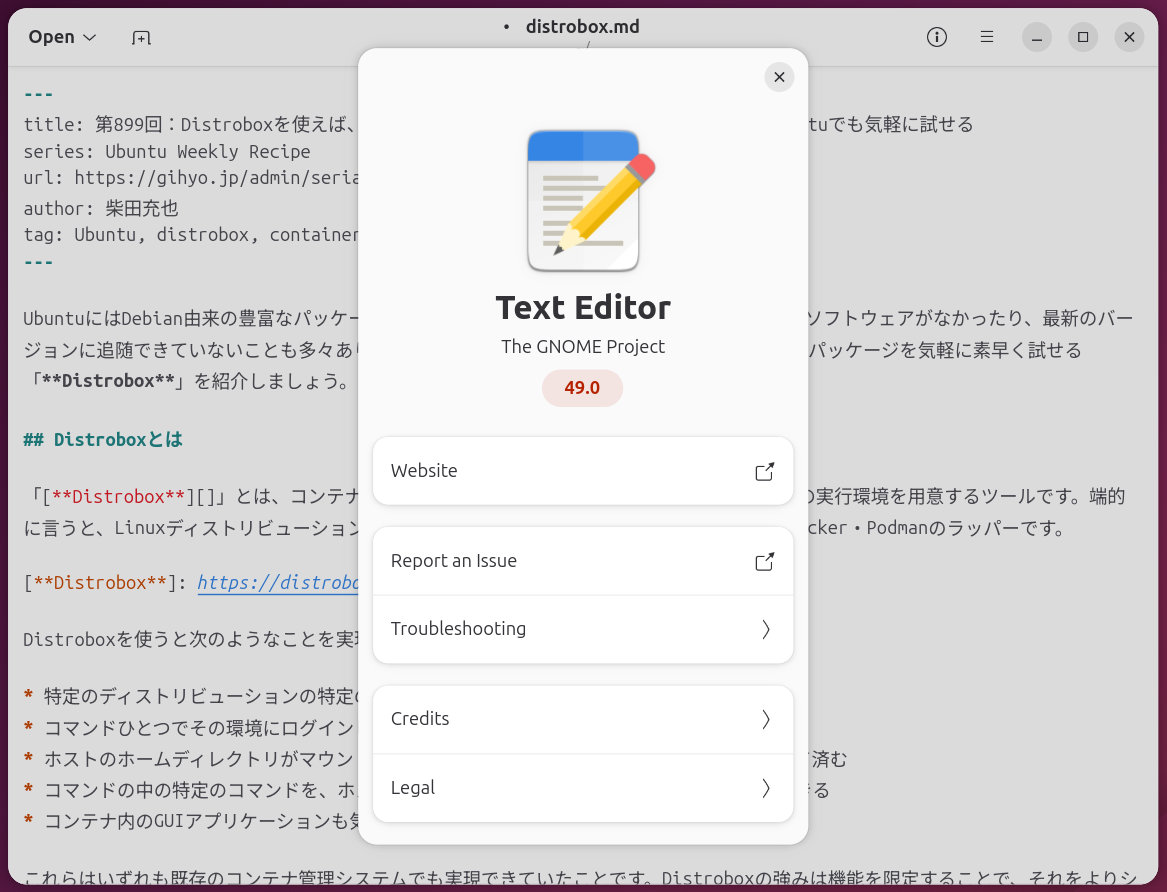
次にFedora上でGNOME Text Editorをインストールします。
dbox$ dnf info gnome-text-editor
リポジトリの更新を読み込み中:
リポジトリを読み込みました。
利用可能なパッケージ
Name           : gnome-text-editor
Epoch          : 0
Version        : 49.0

dbox$ sudo dnf install gnome-text-editor
(snip)
Transaction Summary:
 Installing:       248 packages

パッケージサイズ 131 MiB 、ダウンロードサイズ 131 MiB 。
完了後、467 MiB のサイズが利用されます(インストール 467 MiB、削除 0 B)。
Is this ok [y/N]: y
(snip)
完了しました!
これで準備完了です。2月半ば時点でのFedora RawhideのGNOME Text Editorは開発版の49.
実際にコンテナの中でGNOME Text Editorを起動してみましょう。
dbox$ gnome-text-editor
先ほど作成したディレクトリを見ると、いろいろなファイルが作られていることもわかります。
dbox$ ls -ltr ~/.distrobox-xdg/rawhide/{config,cache,share}
/home/shibata/.distrobox-xdg/rawhide/config:
total 0

/home/shibata/.distrobox-xdg/rawhide/share:
total 4
drwxr-x--- 3 shibata shibata 4096 Feb  9 00:21 org.gnome.TextEditor

/home/shibata/.distrobox-xdg/rawhide/cache:
total 16
drwxr-xr-x  4 shibata shibata 4096 Feb  9 00:17 libdnf5
drwx------ 52 shibata shibata 4096 Feb  9 00:20 radv_builtin_shaders
drwx------ 36 shibata shibata 4096 Feb  9 00:21 mesa_shader_cache
drwxr-xr-x  3 shibata shibata 4096 Feb  9 00:21 gtk-4.0
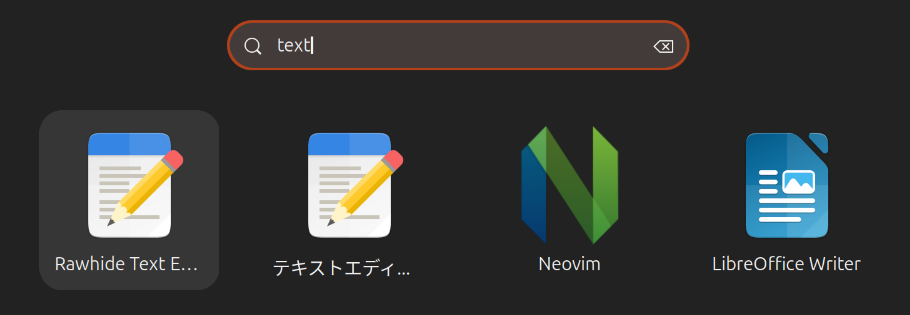
ここで通常はdistrobox-export --app gnome-text-editor」
ランチャースクリプトを次のように作成し、実行権限を付与します。
host$ cat << 'EOF' > ~/.local/bin/gnome-text-editor-rawhide
#!/bin/sh
exec distrobox enter rawhide -- \
  env \
    XDG_CONFIG_HOME="$HOME/.distrobox-xdg/rawhide/config" \
    XDG_CACHE_HOME="$HOME/.distrobox-xdg/rawhide/cache" \
    XDG_DATA_HOME="$HOME/.distrobox-xdg/rawhide/share" \
    gnome-text-editor "$@"
EOF

host$ chmod +x ~/.local/bin/gnome-text-editor-rawhide
さらにそれを呼び出すデスクトップファイルを作成しましょう。
host$ cat << EOF > ~/.local/share/applications/gnome-text-editor-rawhide.desktop
[Desktop Entry]
Categories=GNOME;GTK;Utility;TextEditor;
Name=Rawhide Text Editor
Exec=/home/shibata/.local/bin/gnome-text-editor-rawhide
Icon=org.gnome.TextEditor
StartupNotify=true
Terminal=false
Type=Application
Actions=new-window;
EOF
これで
このようにDistroboxはかんたんに他のディストリビューションのCLI/