



筒井
prekの使い方はpre-commitとほぼ同じですが、本記事ではprek / pre-commitをどちらも使ったことがない人向けに、使い方をていねいに解説します。また、pre-commitから移行したい人のために、最後に移行方法についても解説します。
なお、本記事の内容はprek 0.
なぜprek/pre-commitを使うか
ここでは、prek/
Gitには
Gitフックに関する詳細は、以下の公式ドキュメントを参照してください。
Gitフックの作り方について説明します。Gitリポジトリには、ディレクトリ.git/
$ mkdir git-example  # 専用のディレクトリを作成
$ cd git-example
$ git init
Initialized empty Git repository in /****/git-example/.git/
$ ls .git/hooks/  # 拡張子sampleのファイルが複数ある
applypatch-msg.sample     post-update.sample        pre-merge-commit.sample   pre-receive.sample        sendemail-validate.sample
commit-msg.sample         pre-applypatch.sample     pre-push.sample           prepare-commit-msg.sample update.sample
fsmonitor-watchman.sample pre-commit.sample         pre-rebase.sample         push-to-checkout.sample
これらのファイルの拡張子のsampleを取ると、Gitはそのファイルをカスタムスクリプトとして認識します。各ファイルの用途については以下の公式ドキュメントを参照してください。
なお、.git/
Gitフックは、誤操作を未然に防ぐなどの利点がある一方で、以下のような問題もあります。
- シェルスクリプトなので書きにくい
- 複数のプロジェクトで共通のカスタムスクリプトを作る場合の管理が難しい
- カスタムスクリプトの中でPython、Ruby、Node.
jsなどの言語に依存するツールを呼び出す際は、スクリプトファイルの設置とは別に初期化処理が必要な場合がある
prek/
また、実行に必要な初期化処理も自動的に行なってくれます。たとえば、カスタムスクリプトでPythonのツールを呼び出すのであれば、仮想環境の作成、ツールのインストールも自動化されます。
prekとpre-commitの違い
prekはpre-commitより後発のフレームワークです。pre-commitはPython製のため、実行にPythonが必要ですが、prekはRustで実装されています。Rustはシングルバイナリとしてコンパイルされるため、ランタイムを別途インストールする必要がありません。
また、prekはpre-commitと互換性があります。詳細は後述しますが、pre-commitの設定ファイルをそのまま使えるので、移行は容易です。以下の有名リポジトリでもpre-commitからprekに移行しています。
prekの主な特徴は以下のとおりです。prekはpre-commitより後発だけあって、性能面、機能面でさまざまな改善点があります。
- ビルトインフックをRustで実装して高速化
- ディスク容量の使用効率を改善
- フックの並列実行を可能に
prekのインストール方法
prekのインストール方法は複数提供されています。以下で代表的な例を紹介します。
prekのインストール方法
$ uv tool install prek
$ pip install prek
$ brew install prek
その他のインストール方法は、以下の公式ドキュメントを参照してください。
prekの使い方
ここでは、prekの主なコマンドと使い方について説明します。本記事で紹介している以外の内容については、以下の公式ドキュメントを参照してください。
prek sample-configで初期設定を行う
prekの設定ファイルはYAML形式の.pre-commit-config.
prek sample-configコマンドで設定ファイルのサンプルの生成ができます。--formatオプションでファイル形式-fオプションをつけるとファイルに内容を出力します
以下の手順でprek.
prek sample-configコマンドの実行例$ mkdir prek-example # 専用のディレクトリを作成
$ cd prek-example
$ git init # まずGitリポジトリの初期化
Initialized empty Git repository in /***/prek-example/.git/
$ prek sample-config --format toml -f # サンプルをprek.tomlに出力
Written to `prek.toml`
$ cat prek.toml
# Configuration file for `prek`, a git hook framework written in Rust.
# See https://prek.j178.dev for more information.
#:schema https://www.schemastore.org/prek.json
repo = "builtin"
hooks = [
{ id = "trailing-whitespace" },
{ id = "end-of-file-fixer" },
{ id = "check-added-large-files" },
]
$ git add prek.toml # prek.tomlをGit管理対象に入れる
$ git commit -am "add prek.toml"
[main (root-commit) 45fbeae] add prek.toml 1 file changed, 11 insertions(+) create mode 100644 prek.toml
prek.repo = "builtin"以下に書かれているのが、prekが標準で提供しているビルトインフックです。それぞれ、以下の機能があります。
| フックID | 説明 |
|---|---|
| trailing-whitespace | 行末にスペースがあるとエラーになる |
| end-of-file-fixer | ファイル末尾に改行がないとエラーになる |
| check-added-large-files | ファイルサイズが大きい |
argsにオプション引数を渡すことで、フックの挙動を変更できます。たとえば、check-added-large-filesでチェックする最大ファイルサイズを1024KBに変更する場合は、以下のように書きます。
check-added-large-fileでチェックする最大ファイルサイズを1024KBに変更
repo = "builtin"
hooks = [
    { id = "trailing-whitespace" },
    { id = "end-of-file-fixer" },
    {
        id = "check-added-large-files",
        args = ["--maxkb=1024"]  # これを追加
    },
]
複数のフックを並列実行したい場合は、フックの実行優先順位を表すpriorityオプションを指定します。priorityは値が小さいほど優先的に実行され、同じ値のフックは並列実行になります。以下の例では、trailing-whitespace、end-of-file-fixerを並列実行するようpriorityを設定しています。
priorityの設定例
repo = "builtin"
hooks = [
    # trailing-whitespace、end-of-file-fixerは並列実行
    { id = "trailing-whitespace", priority = 0 },
    { id = "end-of-file-fixer", priority = 0 },
    # 上記の後にcheck-added-large-filesを実行
    { id = "check-added-large-files", priority = 1 },
]
なお、priorityを指定しない場合は上のフックから順に実行されます。
その他のビルトインフックについては、以下の公式ドキュメントを参照してください。
また、ビルトインフック以外にサードパーティのフックも利用できます。サードパーティフックはpre-commit用のフックをそのまま使えます。詳細は、以下のpre-commit公式ドキュメントで紹介しているサードパーティフックを参照してください。
prek installでGitフックを作成
prek installコマンドを実行すると、prek.
prek installコマンドの実行例$ prek install
prek installed at `.git/hooks/pre-commit`
$ cat .git/hooks/pre-commit # このGitフックが作成される
#!/bin/sh
# File generated by prek: https://github.com/j178/prek
# ID: 182c10f181da4464a3eec51b83331688
HERE="$(cd "$(dirname "$0")" && pwd)"
PREK="/****/.local/bin/prek"
# Check if the full path to prek is executable, otherwise fallback to PATH
if [ ! -x "$PREK" ]; then
PREK="prek"
fi
exec "$PREK" hook-impl --hook-dir "$HERE" --script-version 4 --hook-type=pre-commit -- "$@"
デフォルトでは、コミット前に実行されるプレコミットフックのみが作成されます。他のフックも作成したい場合は、prek.
たとえば、プレコミットフックpre-commit)pre-push)
default_install_hook_typesの設定例default_install_hook_types = [
"pre-commit",
"pre-push"
]
# (省略)
default_でサポートする値は、以下の公式ドキュメントを参照してください。
prek uninstallでGitフックを削除
prek installコマンドで作成したGitフックを削除するには prek uninstallコマンドを実行します。一時的にGitフックを無効にしたい場合にこれを使います。
prek uninstallコマンドの実行例$ prek uninstall Uninstalled `pre-commit` $ prek install # 後述する手順を実行するために再度Gitフックを作成 prek installed at `.git/hooks/pre-commit`
変更をコミットしてGitフックを実行してみる
行末にスペースを入れたファイルを追加して、git commitを実行してみましょう。プレコミットフックの中でprekが初期化処理を行ってから、prek.trailing-whitespaceでエラーを検出して、コミットに失敗します。
$ echo "行末にスペースを入れる→ " > test.txt
$ git add test.txt
$ git commit -am "add test.txt"
trim trailing whitespace

.................................................

Failed

- hook id: trailing-whitespace

- exit code: 1

- files were modified by this hook

Fixing test.txt fix end of files

.........................................................

Passed

check for added large files

..............................................

Passed
実行時にファイルを自動修正してくれるので、2度目のコミットは成功します。
$ git commit -am "add test.txt"
trim trailing whitespace

.................................................

Passed

fix end of files

.........................................................

Passed

check for added large files

..............................................

Passed

[main 6098a84] add test.txt 1 file changed, 1 insertion(+) create mode 100644 test.txt
プレコミットフックは、git commitでコミット対象になるファイルに対してのみ実行されます。すでにコミットされたファイルに対しては何もしません。後からprekを導入した場合にこの仕様が問題になる場合があります。
今までコミットしたファイルも含めてチェックを実行したい場合は、次に紹介するprek runコマンドに-aまたは--all-filesオプションをつけて実行します。
prek runでフックを手動実行する
prek runコマンドはgit commitコマンドでコミット対象になるファイルに対してGitフックと同じチェック処理を実行します。
prek runコマンドの実行例$ echo "行末にスペースを入れる→ " > test2.txt $ git add test2.txt $ prek run trim trailing whitespace # (省略) Failed - hook id: trailing-whitespace - exit code: 1 - files were modified by this hook Fixing test2.txt fix end of files # (省略) $ git status # 行末のスペースが除去されているので、さらに差分が生まれている On branch main Changes to be committed: (use "git restore --staged <file>..." to unstage) new file: test2.txt Changes not staged for commit: (use "git add <file>..." to update what will be committed) (use "git restore <file>..." to discard changes in working directory) modified: test2.txt $ git add test2.txt $ prek run # 行末のスペースが除去されているので、今度はエラーにならない # (省略) Passed $ git commit -am "add test2.txt" # (省略) [main db1c5a9] add test2.txt 1 file changed, 1 insertion(+) create mode 100644 test2.txt
また、--filesオプションでファイル名を指定すれば、git addでコミット対象に入れていないファイルもチェックできます。
prek run --filesコマンドの実行例$ echo "行末にスペースを入れる→ " > test3.txt $ prek run --files test3.txt # --filesオプションでファイル名を指定すればgit addでコミット対象に入れていないファイルもチェックできる trim trailing whitespace # (省略) Failed - hook id: trailing-whitespace - exit code: 1 Fixing test3.txt fix end of files # (省略) $ git add test3.txt $ git commit -am "add test3.txt" # (省略) [main 81f8e14] add test3.txt 1 file changed, 1 insertion(+) create mode 100644 test3.txt
-aまたは--all-filesオプションを付けると、すでにコミットされているファイルも対象にしてチェック処理を実行します。
以下の例では、prek uninstallコマンドで一旦Gitフックを無効にしてから行末にスペースが入ったファイルtrailing-whitespaceフックでエラーになる)prek run -aコマンドを実行しています。
prek run -aコマンドの実行例$ prek uninstall # 一旦Gitフックを無効化 Uninstalled `pre-commit` $ echo "行末にスペースを入れる→ " > test4.txt # trailing-whitespaceフックでエラーになるファイル $ git add test4.txt $ git commit -am "add test4.txt" # Gitフックを無効化しているのでコミットできる $ prek install # Gitフックを再び有効化 $ prek run -a # すでにコミットしたファイルも対象にチェックを実行し、test4.txtがエラーになる trim trailing whitespace.................................................Failed - hook id: trailing-whitespace - exit code: 1 - files were modified by this hook Fixing test4.txt fix end of files.........................................................Passed check for added large files..............................................Passed
-aまたは--all-filesオプションは以下のような場合に役立ちます。
- 後からprekを導入する場合
(既存のファイルにルール違反のファイルがないかチェックできる) - GitHub ActionsなどのCI上で実行する
(Gitフックのチェックを通さずコミットしたファイルをここでチェックできる)
GitHub Actionsで実行する場合は、j178/
.github/prek run -aコマンドを実行してくれます。
j178/prek-actionの使用例name: Prek checks
on: [push, pull_request]
jobs:
prek:
runs-on: ubuntu-latest
steps:
- uses: actions/checkout@v7
- uses: j178/prek-action@v2 # ここでprek run -aを実行
prek updateでフックのリビジョンを更新する
prekでは、サードパーティのフックはリビジョン番号の指定rev)
そんな時に役立つのがprek updateコマンドです。prek updateコマンドは、prek.
以下は、prek.revに書かれているのがフックのリビジョンです。
repo = "https://github.com/astral-sh/ruff-pre-commit"
rev = "v0.15.18"  # これがフックのリビジョン
hooks = [
  { id = "ruff-check" },
  { id = "ruff-format" }
]
カレントディレクトリに上記のprek.prek updateコマンドを実行すると、revに書かれたリビジョンを最新版に更新してくれます。
prek updateコマンドの実行例$ prek update
https://github.com/astral-sh/ruff-pre-commit
updating rev `v0.15.18` -> `v0.15.20`
$ cat prek.toml # prek.tomlの現在の内容を確認
repo = "https://github.com/astral-sh/ruff-pre-commit"
rev = "v0.15.20" # これがフックのリビジョン
hooks = [
{ id = "ruff-check" },
{ id = "ruff-format" }
]
次回のGitフック実行時には、更新後のリビジョンのフックをダウンロードしてチェックを実行してくれます。
なお、v0.
AIエージェントのスキルとして使う
prekはAIエージェントからprekを呼ぶためのSKILL.
この機能はGitHub CLIと組み合わせて使います。gh skill install j178/コマンドを実行すると、SKILL.
gh skill install j178/prek prekコマンドの実行例$ mkdir prek-skill # 専用のディレクトリを作成
$ cd prek-skill
$ git init
Initialized empty Git repository in /****/prek-skill/.git/
$ gh skill install j178/prek prek
Using ref v0.4.5 (bb310828)
! Skills are not verified by GitHub and may contain prompt injections, hidden instructions, or malicious scripts. Always review skill contents before use.
? Select target agent(s): [Use arrows to move, space to select, <right> to all, <left> to none, type to filter]
> [x] GitHub Copilot
# agentは「GitHub Copilot」、Installation scopeは「install in current repository (recommended)」を選択
# (省略)
✓ Installed prek (from j178/prek@v0.4.5) in .agents/skills
prek/
└── SKILL.md
! Skills may contain prompt injections or malicious scripts.
Review installed content before use:
gh skill preview j178/prek prek@bb3108283fd4aab0d9eb59f23098e0c05a96cdbe
$ ls .agents/skills/prek # ここにSKILL.mdが作成される
SKILL.md
$ git add .agents
$ git commit -am "add prek skill"
[main (root-commit) b2b91af] add prek skill
1 file changed, 219 insertions(+)
create mode 100644 .agents/skills/prek/SKILL.md
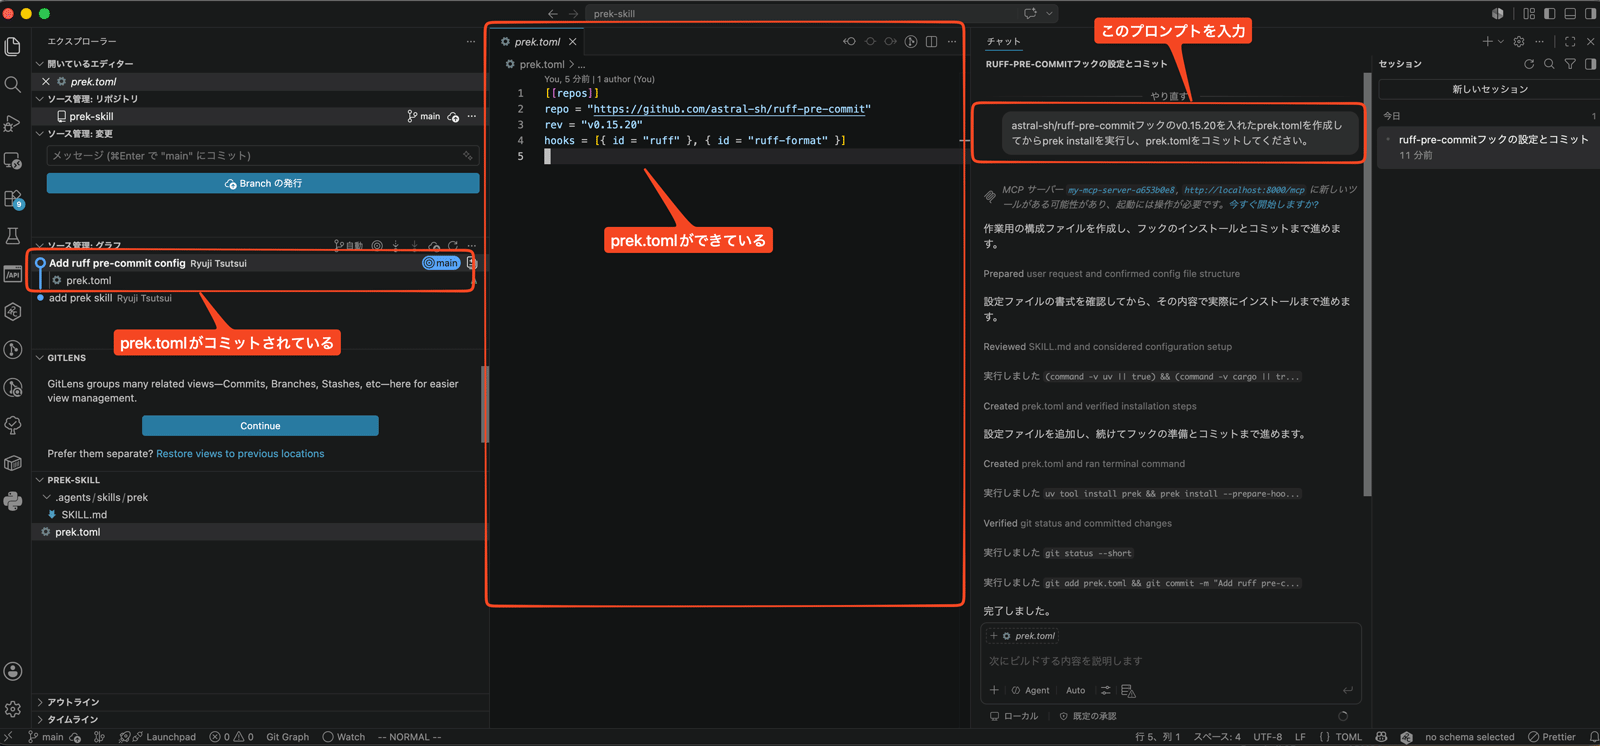
以下は、GitHub Copilot Chat拡張をインストールしたVisual Studio Codeから前述のスキルを呼び出している画面です。プロンプトはastral-sh/です。
pre-commitからの移行方法
すでにpre-commitを導入しているプロジェクトでprekを導入する方法について解説します。
prekはpre-commitの設定ファイル.pre-commit-config.
pre-commitとprekのサブコマンドはほぼ同じです
| prekサブコマンド | pre-commitサブコマンド |
|---|---|
| prek sample-config | pre-commit sample-config |
| prek install | pre-commit install |
| prek uninstall | pre-commit uninstall |
| prek run | pre-commit run |
| prek update | pre-commit autoupdate |
また、prek.prek util yaml-to-tomlコマンドが提供されています。以下がprek util yaml-to-tomlコマンドの使用例です。
まずprek sample-configコマンドで.pre-commit-config.prek util yaml-to-tomlコマンドで.pre-commit-config.
prek util yaml-to-tomlコマンドの使用例$ mkdir yaml-to-toml-example # 専用のディレクトリを作成
$ cd yaml-to-toml-example
$ prek sample-config -f # まず.pre-commit-config.yamlを作成
$ cat .pre-commit-config.yaml # .pre-commit-config.yamlの内容を確認
# See https://pre-commit.com for more information
# See https://pre-commit.com/hooks.html for more hooks
repos:
- repo: 'https://github.com/pre-commit/pre-commit-hooks'
rev: v6.0.0
hooks:
- id: trailing-whitespace
- id: end-of-file-fixer
- id: check-yaml
- id: check-added-large-files
$ prek util yaml-to-toml # .pre-commit-config.yamlをprek.tomlに変換
Converted `.pre-commit-config.yaml` → `prek.toml`
$ rm .pre-commit-config.yaml # .pre-commit-config.yamlは不要になるので消す
$ cat prek.toml # prek.tomlの内容を確認
# Configuration file for `prek`, a git hook framework written in Rust.
# See https://prek.j178.dev for more information.
#:schema https://www.schemastore.org/prek.json
repo = "https://github.com/pre-commit/pre-commit-hooks"
rev = "v6.0.0"
hooks = [
{ id = "trailing-whitespace" },
{ id = "end-of-file-fixer" },
{ id = "check-yaml" },
{ id = "check-added-large-files" }
]
最後に
Python製のpre-commitはPythonがない環境では動かないため、Python以外で開発するプロジェクトに導入しにくいと感じることが個人的にありました。シングルバイナリで動くpre-commitのような類似プロダクトはないものか、と数年前からぼんやり願っていたのですが、そのものズバリのものが登場していたのですね。
実際にpre-commitを使っている自分のリポジトリに導入してみましたが、思った以上に移行が簡単で、かつ使い方もほぼpre-commitなので、すっかり気に入ってしまいました。この先も常用したいと思っています。
pre-commitを愛用している人はもちろん、はじめて知った人もぜひ使ってみてください!