これまで描画APIやイベント関数など、
最終回となる今回はスケッチの例としてペイントプログラムの制作過程を紹介します。
スケッチのはじまり
前回、
このプログラムをスケッチのはじまりとして、
では、
線の色を変化させる
まずは、
package {
  import frocessing.display.F5MovieClip2DBmp;
  [SWF(width=465,height=465,backgroundColor=0x000000,frameRate=60)]
  public class SketchSample1 extends F5MovieClip2DBmp
  {
    public function setup():void
    {
      //キャンバスのサイズ指定
      size( 465, 465 );
      //背景の描画
      background( 0 );
      //HSV
      colorMode( HSV, 1 );  //・・・・(1a)
    }

    public function draw():void
    {
      if ( isMousePressed )
        background( 0 );

      //描画
      stroke( random(0.95,1), random(0.2,1), random(0.3,1) );//(1b)
      line( pmouseX, pmouseY, mouseX, mouseY );
    }
  }
}線の色はHSV指定を利用して(1a)、
線の動きを変化させる
マウス座標に沿って線を描くのはペイントプログラムの基本です。しかしインタラクティブなFlashとしては単調な印象があります。この部分に面白み、
加速度運動
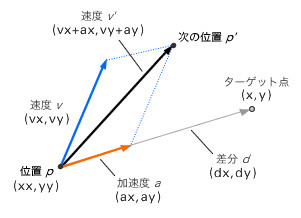
加速度運動のプログラムはペイントプログラムに限らず一般的によく行われることです。ここでは実装方法のひとつの例を紹介しておきます
//位置 (xx, yy)
//速度 (vy, vy)
//加速度の係数 ac
//速度の減衰係数 de
//ターゲット点 (x,y)

//現在位置とターゲット点との差分(d)
var dx:Number = x - xx;
var dy:Number = y - yy;

//差分に係数を乗算して加速度とする(a)
var ax:Number = dx*ac;
var ay:Number = dy*ac;

//速度に加速度を加算(v')
vx += ax;
vy += ay;

//速度を加算して次の位置を計算(p')
xx += vx;
yy += vy;

//速度を減衰
vx *= de;
vy *= de;
リスト2では、
このプログラムは、
xx += vx += ( x - xx ) * ac;
yy += vy += ( y - yy ) * ac;
vx *= de;
vy *= de;
ペイントプログラムに組み込む
リスト1に加速度運動のプログラムを加えてみます
package {
  import frocessing.display.F5MovieClip2DBmp;
  [SWF(width=465,height=465,backgroundColor=0x000000,frameRate=60)]
  public class SketchSample2 extends F5MovieClip2DBmp
  {
    //加速度運動の変数
    private var xx:Number;
    private var yy:Number;
    private var vx:Number;
    private var vy:Number;
    private var ac:Number;
    private var de:Number;

    public function setup():void
    {
      //キャンバスのサイズ指定
      size( 465, 465 );
      //背景の描画
      background( 0 );
      //HSV
      colorMode( HSV, 1 );
      //初期化
      vx = vy = 0.0;
      xx = mouseX;
      yy = mouseY;
      ac = 0.15;
      de = 0.96;
    }

    public function draw():void
    {
      if ( isMousePressed )
        background( 0 );
      //描画
      drawing( mouseX, mouseY );
    }

    //描画関数
    private function drawing( x:Number, y:Number ):void
    {
      var px:Number = xx;
      var py:Number = yy;
      //加速度運動
      xx += vx += ( x - xx ) * ac;
      yy += vy += ( y - yy ) * ac;

      //描画
      stroke( random(0.95,1), random(0.2,1), random(0.3,1) );
      line( px, py, xx, yy );

      //減衰処理
      vx *= de;
      vy *= de;
    }
  }
}加速度運動は性質(ac,de)によって表示結果の印象が変化します。数値を変更して好みのポイントを探してみましょう。
線のサイズを変化させる
加速度運動を追加したため動的な印象は増しましたが、
線幅を変化させる
動きの大きさは速度や方向の変化などで考えることができますが、
リスト4と実行結果をご覧ください。
・・・
//線幅の係数
private var wd:Number;

public function setup():void {
  ・・・
  wd = 0.1;
}

private function drawing( x:Number, y:Number ):void
{
  var px:Number = xx;
  var py:Number = yy;
  //加速度運動
  xx += vx += ( x - xx ) * ac;
  yy += vy += ( y - yy ) * ac;

  //速度のベクトル長
  var len:Number = mag( vx, vy );  //・・・(4a)
  //線幅の指定
  strokeWeight( len * wd );        //・・・(4b)
  //描画
  stroke( random(0.95,1), random(0.2,1), random(0.3,1) );
  line( px, py, xx, yy );

  //減衰処理
  vx *= de;
  vy *= de;
}
・・・速度の大きさはvx,vyから求め(4a)、
- mag
- 指定したベクトルの大きさを求めます。
- strokeWeight
- 線の幅を指定します。GraphicsクラスのlineStyle()の第一引数に該当します。
線をシェイプで表現する
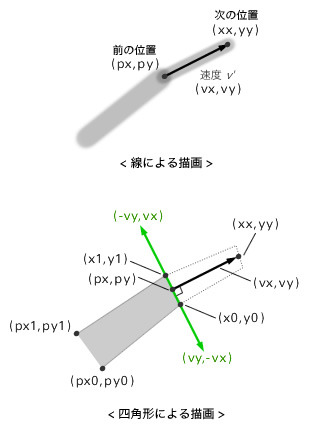
リスト4の実行結果を見ると、

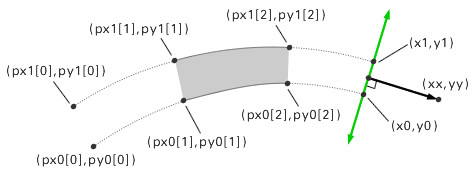
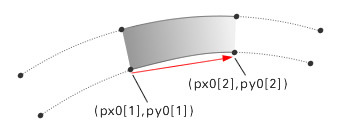
以下のリスト5は、 線の大きさと動きの関連付けを行いましたが、 線を滑らかにするために、 実際のプログラムはリスト6のようになります。曲線の描画には少なくとも4つの座標が必要なため、 線を曲線で表現することで動きと形状のイメージが合ってきたと思います。さらに手を加えて単色による塗りをグラデーションに変更してみます。 グラデーションの指定方法はGraphicsクラスと同じです beginGradientFill()の第5引数 実際に指定方法の違いを見てみましょう。次のリスト8、 FGradientMatrixには線形の他に放射グラデーションなどの指定方法があります。詳しくはドキュメントをご覧ください。 次のFlashはリスト6にグラデーション塗りのプログラムを追加したものです。プログラムはWonderflでご覧ください。 ※プログラム中のcolor()はstorke()やfill()と同じ色指定方法で色値(uint)を求める関数です。 これまでに線の動き・ 複数の線を描く準備として線の形状や動きを決定する変数をクラスにまとめます setup()での線情報の初期化は以下のように書き換えます nは線の本数で、 drawing関数内のプログラムも複数線に対応させます フレームスクリプトに記述する場合、 次のFlashは複数線のプログラムを加えたものです。プログラム全体はWonderflでご覧ください。 今回のスケッチはここまでとしますが、 また、 これまで4回を通じてFrocessingによるグラフィック描画プログラムを紹介してきました。この連載によってわずかでも描画プログラムのたのしみが伝わればと考えています。 連載では2次元グラフィックの基本をテーマとしていましたが、・・・
//描画座標
private var px0:Number;
private var py0:Number;
private var px1:Number;
private var py1:Number;
public function setup():void {
・・・
px0 = px1 = xx;
py0 = py1 = yy;
}
private function drawing( x:Number, y:Number ):void
{
var px:Number = xx;
var py:Number = yy;
//加速度運動
xx += vx += ( x - xx ) * ac;
yy += vy += ( y - yy ) * ac;
//新しい描画座標
var x0:Number = px + vy*wd;
var y0:Number = py - vx*wd;
var x1:Number = px - vy*wd;
var y1:Number = py + vx*wd;
//描画
noStroke();
fill( random(0.95, 1), random(0.2, 1), random(0.3, 1) );
quad( px0, py0, px1, py1, x1, y1, x0, y0 );
//ボーダーの描画
stroke( 0, 0.2 );
line( px0, py0, x0, y0 );
line( px1, py1, x1, y1 );
//描画座標
px0 = x0;
py0 = y0;
px1 = x1;
py1 = y1;
//減衰処理
vx *= de;
vy *= de;
}
・・・線を滑らかにする
線を曲線で描く

・・・
//描画座標
private var px0:Array;
private var py0:Array;
private var px1:Array;
private var py1:Array;

public function setup():void {
  ・・・
  px0 = [xx, xx, xx];
  py0 = [yy, yy, yy];
  px1 = [xx, xx, xx];
  py1 = [yy, yy, yy];
}

private function drawing( x:Number, y:Number ):void
{
  var px:Number = xx;
  var py:Number = yy;
  //加速度運動
  xx += vx += ( x - xx ) * ac;
  yy += vy += ( y - yy ) * ac;

  //新しい描画座標
  var x0:Number  = px + vy*wd;
  var y0:Number  = py - vx*wd;
  var x1:Number  = px - vy*wd;
  var y1:Number  = py + vx*wd;

  //描画
  noStroke();
  fill( random(0.95, 1), random(0.2, 1), random(0.3, 1) );
  beginShape();
  curveVertex( px0[0], py0[0] );
  curveVertex( px0[1], py0[1] );
  curveVertex( px0[2], py0[2] );
  curveVertex( x0, y0 );
  vertex( px1[2], py1[2] );
  curveVertex( x1, y1 );
  curveVertex( px1[2], py1[2] );
  curveVertex( px1[1], py1[1] );
  curveVertex( px1[0], py1[0] );
  endShape();
  //ボーダーの描画
  stroke( 0, 0.2 );
  noFill();
  curve( px0[0], py0[0], px0[1], py0[1], px0[2], py0[2], x0, y0 );
  curve( px1[0], py1[0], px1[1], py1[1], px1[2], py1[2], x1, y1 );

  //描画座標
  px0.shift(); px0.push( x0 );
  py0.shift(); py0.push( y0 );
  px1.shift(); px1.push( x1 );
  py1.shift(); py1.push( y1 );
  //減衰処理
  vx *= de;
  vy *= de;
}
・・・グラデーションで塗る

beginGradientFill( type, colors, alphas, ratios, matrix, .. )
・・・
シェイプの描画
・・・
endFill()FGradientMatrix
import flash.geom.Matrix;
var mtx:Matrix = new Matrix();
var vx:Number = x1 - x0;
var vy:Number = y1 - y0;
var gw:Number =  Math.sqrt( vx*vx + vy*vy );
mtx.createGradientBox( gw, gw, Math.atan2( vy, vx ), (x0+x1-gw)/2, (y0+y1-gw)/2 );
graphics.beginGradientFill( "linear", [0,0xFFFFFF], [1,1], [0,255], mtx);
・・・import frocessing.geom.FGradientMatrix;
var mtx:FGradientMatrix = new FGradientMatrix();
mtx.createLinear( x0, y0, x1, y1 );
graphics.beginGradientFill( "linear", [0,0xFFFFFF], [1,1], [0,255], mtx);
・・・線を複数にしてみる
線情報のクラス化
class BrushState {
  //加速度運動の変数
  public var xx:Number;
  public var yy:Number;
  public var vx:Number;
  public var vy:Number;
  public var ac:Number;
  public var de:Number;
  //線幅の係数
  public var wd:Number;
  //描画座標
  public var px0:Array;
  public var py0:Array;
  public var px1:Array;
  public var py1:Array;
  public function BrushState(){}
}//初期化
n = 10;
brushs = [];
for ( var i:int = 0; i < n; i++ ) {
var o:BrushState = new BrushState(); //(10c)
o.vx = o.vy = 0.0;
o.xx = mouseX;
o.yy = mouseY;
o.ac = random( 0.1, 0.15 ); //・・・(10a)
o.de = 0.96;
o.wd = random( 0.03, 0.06 ); //・・・(10b)
o.px0 = [o.xx, o.xx, o.xx];
o.py0 = [o.yy, o.yy, o.yy];
o.px1 = [o.xx, o.xx, o.xx];
o.py1 = [o.yy, o.yy, o.yy];
brushs[i] = o;
}描画プログラムの修正
private function drawing( x:Number, y:Number ):void
{
  colors[0] = colors[1];
  colors[1] = color( random(0.95,1), random(0.2,1), random(0.3,1) );

  for ( var i:int = 0; i < n; i++ ) {
    var brush:BrushState = brushs[i];  //(11a)
    with( brush ){
      //描画プログラム
      ・・・・
    }
  }
}
フレームスクリプトの場合
スケッチのおわり
おわりに


