本イベントでは、ロクナナワークショップの人気講座
本稿では野中氏からの解説記事をご紹介します。
- ※サンプルファイル ダウンロード
(Flash CS4形式/約328KB)
01:3次元座標空間の表現
Flash Player 10では、
たとえば、
![図1 インスタンスをY軸で[3D回転]させる 図1 インスタンスをY軸で[3D回転]させる](/assets/images/design/serial/01/67ws/0013/thumb/TH800_002.jpg)
コンピュータグラフィックスでこのような表現をする場合、
この機能を用いると、
02:Graphics.drawTriangles()メソッド
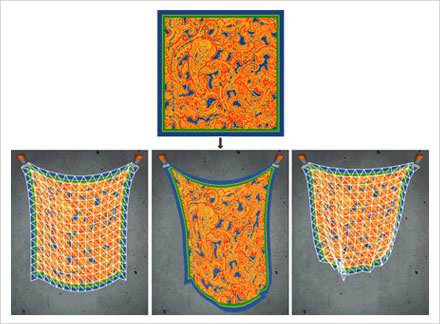
複数の三角形を描いて、
drawTriangles(頂点座標:Vector.<Number>, 頂点番号:Vector.<int> = null, uvtデータ:Vector.
<Number> = null):void
3つの引数には、
メソッドの3つの引数は、
Vectorクラス
Vectorクラスは、
- VectorクラスがArrayクラスと異なる点
- エレメントのデータ型をひとつだけ指定。
- エレメントのインデックスは連番。
Vectorクラスのコンスラクタメソッドは、
Vector.<データ型>(長さ:uint = 0, 長さの固定:Boolean = false) インスタンスを代入する変数宣言のデータ型にも、
var myVector:Vector.<int> = new Vector.<int>(); Vectorインスタンスのエレメントにアクセスするには、
塗りのビットマップの指定
Graphics.
beginBitmapFill(ビットマップ:BitmapData):voidメソッドの第1引数には、
![図3 [ビットマッププロパティ]ダイアログボックスで[クラス]を入力 図3 [ビットマッププロパティ]ダイアログボックスで[クラス]を入力](/assets/images/design/serial/01/67ws/0013/thumb/TH800_004.jpg)
Graphics.
var myTexture:BitmapData = new Pen(0, 0);   // ふたつの0を引数として渡す
mySprite.graphics.beginBitmapFill(myTexture);   // メソッドにBitmapDataインスタンスを渡す
生成したビットマップ
Graphics.drawTriangles()メソッドの引数
前述のとおり、Graphics.
Graphicsインスタンス.drawTriangles(頂点座標, 頂点番号, uvtデータ) ここでGraphics.

Graphics.

Graphics.

ここで、

| 頂点番号 | 第1引数/頂点座標 | 第3引数/uvtデータ |
|---|---|---|
| 0 | (0, 0) | (0, 0) |
| 1 | (100, 0) | (1, 0) |
| 2 | (0, 100) | (0, 1) |
| 3 | (110, 110) | (1, 1) |
もっとも、
さて、
// タイムライン: メイン
// 第1フレームアクション
var mySprite:Sprite = new Sprite();
var myGraphics:Graphics = mySprite.graphics;
var myTexture:BitmapData = new Pen(0, 0);
// 頂点座標のVectorインスタンス生成
var vertices:Vector.<Number> = new Vector.<Number>();
// 頂点番号のVectorインスタンス生成
var indices:Vector.<int>= new Vector.<int>();
// uvtデータのVectorインスタンス生成
var uvtData:Vector.<Number> = new Vector.<Number>();
addChild(mySprite);
// 三角形の頂点座標を加える(第1引数)
vertices.push(0, 0);   // 頂点0
vertices.push(100, 0);   // 頂点1
vertices.push(0, 100);   // 頂点2
vertices.push(110, 110);   // 頂点3
// 三角形の頂点番号の組合わせを加える(第2引数)
indices.push(0, 1, 2);   // 左上半分: 頂点0-1-2
indices.push(1, 2, 3);   // 右下半分: 頂点1-2-3
// テクスチャマッピングのuv座標を加える(第3引数)
uvtData.push(0, 0);   // 頂点0
uvtData.push(1, 0);   // 頂点1
uvtData.push(0, 1);   // 頂点2
uvtData.push(1, 1);   // 頂点3
myGraphics.beginBitmapFill(myTexture);
myGraphics.drawTriangles(vertices, indices, uvtData); 
ドラッグで変形した任意の四角形にテクスチャマッピング
Graphics.
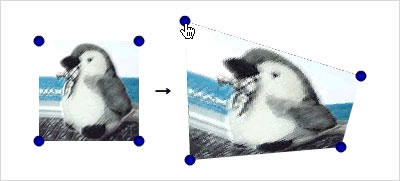
準備として、
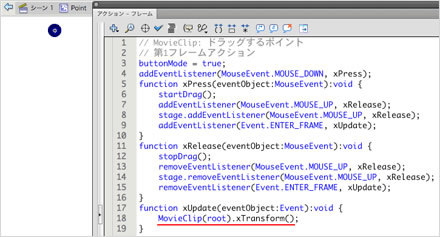
4隅のドラッグにより変わる値は、Graphics.
function xTransform():void {
  // 三角形の頂点座標(第1引数)
  var vertices:Vector. = new Vector.();
  vertices.push(point0_mc.x, point0_mc.y);
  vertices.push(point1_mc.x, point1_mc.y);
  vertices.push(point2_mc.x, point2_mc.y);
  vertices.push(point3_mc.x, point3_mc.y);
  myGraphics.beginBitmapFill(myTexture);
  myGraphics.drawTriangles(vertices, indices, uvtData);
}Spriteインスタンスの生成や、Graphics.
// タイムライン: メイン
// 第1フレームアクション
var mySprite:Sprite = new Sprite();
var myGraphics:Graphics = mySprite.graphics;
var myTexture:BitmapData = new Pen(0,0);
var indices:Vector. = new Vector.();
var uvtData:Vector. = new Vector.();
addChildAt(mySprite, 0);
// 三角形の頂点番号の組合わせ(第2引数)
indices.push(0,1,2);
indices.push(1,3,2);
// テクスチャマッピングのuv座標(第3引数)
uvtData.push(0,0);
uvtData.push(1,0);
uvtData.push(0,1);
uvtData.push(1,1);
xTransform();   // ドラッグ前にテクスチャを初期位置にマッピング
function xTransform():void {
  // 三角形の頂点座標(第1引数)
  var vertices:Vector. = new Vector.();
  vertices.push(point0_mc.x, point0_mc.y);
  vertices.push(point1_mc.x, point1_mc.y);
  vertices.push(point2_mc.x, point2_mc.y);
  vertices.push(point3_mc.x, point3_mc.y);
  myGraphics.clear();   // 描画を一旦消す
  myGraphics.beginBitmapFill(myTexture);
  myGraphics.drawTriangles(vertices, indices, uvtData);
}
新たに加えた処理が3つある。第1は、

第2に、
そして第3は、
03:Matrix3Dクラス
Matrix3Dクラスを使うと、
変換のprependとappend
Matrix3Dクラスによる平行移動や拡大・
| 変換 | 変換を前に適用するメソッド | 変換を後に適用するメソッド |
|---|---|---|
| 平行移動 | Matrix3D. | Matrix3D. |
| 拡大・ | Matrix3D. | Matrix3D. |
| 回転 | Matrix3D. | Matrix3D. |
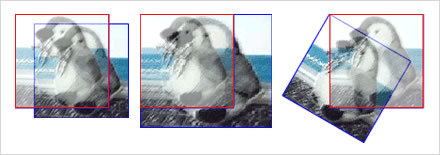
座標変換を前
Matrix3D.prependRotation()メソッド
Matrix3D.
prependRotation(度数角:Number, 回転軸:Vector3D):voidマウスポインタの水平座標に応じた速さで、
// タイムライン: メイン
// 第1フレームアクション
var nX:Number = my_mc.x;
var nDeceleration:Number = 0.3;   // 回転スピードの調整係数
my_mc.z = 0;   // 3次元座標のプロパティを操作
addEventListener(Event.ENTER_FRAME, xRotate);
function xRotate(eventObject:Event):void {
  var nRotationY:Number = (mouseX - nX)*nDeceleration;
  // 3次元座標空間においてy軸でインスタンスを回転
  my_mc.transform.matrix3D.prependRotation(nRotationY, Vector3D.Y_AXIS);
}
ひとつ注意しなければならないのは、
[ムービープレビュー]を見ると、

Matrix3D.appendRotation()メソッド
前掲スクリプト003のリスナー関数xRotate()で、
appendRotation(度数角:Number, 回転軸:Vector3D):void書替えてみると、
function xRotate(eventObject:Event):void {
  var nRotationY:Number = (mouseX - nX)*nDeceleration;
  my_mc.transform.matrix3D.appendRotation(nRotationY, Vector3D.Y_AXIS);
}
実は、
座標変換が適用される順序
インスタンスのもつMatrix3Dオブジェクトに、
my_mc.transform.matrix3D = new Matrix3D()
インスタンスのDisplayObject.
変換を前
変換を後
前掲スクリプト003のリスナー関数xRotate()で、 Matrix3D.
function xRotate(eventObject:Event):void {
  var nRotationY:Number = (mouseX - nX)*nDeceleration;
  var myMatrix3D:Matrix3D = my_mc.transform.matrix3D;   // もとのMatrix3Dオブジェクトを保持
  my_mc.transform.matrix3D = new Matrix3D();   // デフォルト状態に戻す
  my_mc.transform.matrix3D.appendRotation(nRotationY, Vector3D.Y_AXIS);   // 回転を先に適用
  my_mc.transform.matrix3D.append(myMatrix3D);   // もとのMatrix3Dオブジェクトを適用
}なお、Matrix3D.
append(後から適用する変換:Matrix3D):void複数の座標変換を組合わせる
前に適用
var nX:Number = my_mc.x;
var nY:Number = my_mc.y;
var nDeceleration:Number = 0.3;
my_mc.z = 0;
addEventListener(Event.ENTER_FRAME, xRotate);
function xRotate(eventObject:Event):void {
  var nRotationY:Number = (mouseX - nX)*nDeceleration;
  var nRotationX:Number = (mouseY - nY)*nDeceleration;
  my_mc.transform.matrix3D.prependRotation(nRotationY, Vector3D.Y_AXIS);
  my_mc.transform.matrix3D.prependRotation(nRotationX, Vector3D.X_AXIS);
}
[ムービープレビュー]で確かめると、

後に適用
appendTranslation(x:Number, y:Number, z:Number):void// タイムライン: メイン
// 第1フレームアクション
var nX:Number = my_mc.x;
var nY:Number = my_mc.y;
var nDeceleration:Number = 0.3;
my_mc.z = 0;
addEventListener(Event.ENTER_FRAME, xRotate);
function xRotate(eventObject:Event):void {
var nRotationY:Number = (mouseX - nX)*nDeceleration;
var nRotationX:Number = (mouseY - nY)*nDeceleration;
// 3次元座標空間でインスタンスを回転
my_mc.transform.matrix3D.appendTranslation(-nX, -nY, 0);
my_mc.transform.matrix3D.appendRotation(nRotationY, Vector3D.Y_AXIS);
my_mc.transform.matrix3D.appendRotation(nRotationX, Vector3D.X_AXIS);
my_mc.transform.matrix3D.appendTranslation(nX, nY, 0);
}Spriteインスタンスに6面で立方体を作成したMatrix3Dクラスの応用サンプル

var nX:Number = stage.stageWidth / 2;
var nY:Number = stage.stageHeight / 2;
var nSensitivity:Number = 0.2;
var cubeSprite:Sprite = new Sprite();   // 中に別途立方体を作成
function rotateCube(eventObject:Event):void {
  var nRotationX:Number = -(mouseY - nY) * nSensitivity;
  var nRotationY:Number = (mouseX - nX) * nSensitivity;
  rotateSprite(cubeSprite, nRotationX, nRotationY);
}
function rotateSprite(mySprite:Sprite, nRotationX:Number, nRotationY:Number):void {
  var myMatrix3D:Matrix3D = mySprite.transform.matrix3D;
  myMatrix3D.appendTranslation(-nX, -nY, 0);

  myMatrix3D.appendRotation(nRotationX, Vector3D.X_AXIS);
  myMatrix3D.appendRotation(nRotationY, Vector3D.Y_AXIS);
  myMatrix3D.appendTranslation(nX, nY, 0);
}04:Vector3Dクラス
Vector3Dクラスは、
ベクトルの内積
ベクトルの内積を計算すると、
A・B = |A||B|cosθVector3D.
dotProduct(演算対象ベクトル:Vector3D):Number| 内積の値 | なす角(θ) | cosθ |
|---|---|---|
| 正 | 90度より小さい(鋭角) | 正 |
| 0 | 90度(直角) | 0 |
| 負 | 90度より大きい(鈍角) | 負 |
内積を求める前掲の式|A||B|cosθで、
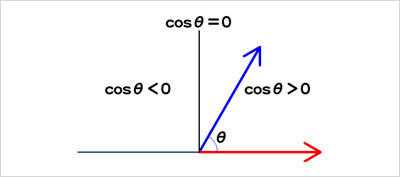
前に紹介した回転する立方体のように閉じた立体については、
以下のスクリプト005は、

// タイムライン: メイン
// 第1フレームアクション
var nX:Number = my_mc.x;
var nY:Number = my_mc.y;
var nDeceleration:Number = 0.3;
var view:Vector3D = new Vector3D(0,0,1);   // 視線のベクトル
var origin:Vector3D = new Vector3D(nX,nY,0);   // 原点のベクトル
my_mc.z = -50;
addEventListener(Event.ENTER_FRAME, xRotate);
function xRotate(eventObject:Event):void {

  var nRotationY:Number = (mouseX - nX)*nDeceleration;
  var nRotationX:Number = (mouseY - nY)*nDeceleration;
  my_mc.transform.matrix3D.appendTranslation(-nX, -nY, 0);
  my_mc.transform.matrix3D.appendRotation(nRotationY, Vector3D.Y_AXIS);
  my_mc.transform.matrix3D.appendTranslation(nX, nY, 0);
  var myPosition:Vector3D = my_mc.transform.matrix3D.position;
  var vector:Vector3D = myPosition.subtract(origin);

  var nDotProduct:Number = view.dotProduct(vector);
  if (nDotProduct > 0) {
    my_mc.alpha = 0.5;
  } else {
    my_mc.alpha = 1;
  }
}新たなVector3Dインスタンスは、Vector3D()コンストラクタにxyz座標を引数に渡して生成する。z軸正方向の視線のベクトル
回転するインスタンスは基準点を真ん中に定めたので、
subtract(差引くベクトル:Vector3D):Vector3Dなお、
視線のベクトル
Matrix3Dクラスの応用サンプルでも、
Transform.
getRelativeMatrix3D(基準タイムライン:DisplayObject):Matrix3Dfunction arrangeFaces():void {
var faceSprite:Sprite;
var nLastIndex:int = cubeSprite.numChildren - 1;
var nLength:Number;
var i:uint;
var view:Vector3D = new Vector3D(0,0,1);
nLength = faces_vector.length;
for (i=0; i < nLength; ++i) {
faceSprite = faces_vector[i];
var myPosition:Vector3D = faceSprite.transform.getRelativeMatrix3D(this).position;
var vector:Vector3D = myPosition.subtract(cubeSprite.transform.matrix3D.position);
var nDotProduct:Number = view.dotProduct(myPosition);
if (nDotProduct > 0) {
faceSprite.visible = false;
} else {
faceSprite.visible = true;
}
}
}透視投影
透視投影とは、
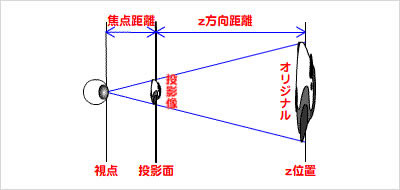
相似の三角形と辺の比の関係から、
投影像の大きさ/オリジナルの大きさ = 焦点距離/(焦点距離+z方向距離)
投影像の大きさ = オリジナルの大きさ×焦点距離/(焦点距離+z方向距離)
Vector3D.
function project():void Vector3Dインスタンスは、

Vector3D.
Vector3D.wプロパティ = (焦点距離 + Vector3D.zプロパティ値)/焦点距離Vector3Dクラスの応用サンプル

function xGetProjectedPoints(myVertices:Vector.<Vector3D>):Vector.<Point> {
  var nLength:uint = myVertices.length;
  var projectedPoints:Vector.<Point> = new Vector.<Point>();
  for (var i:int = 0; i<nLength; i++) {
    var myVector:Vector3D = myVertices[i];
    var cloneVector:Vector3D = myVector.clone();
    cloneVector.w = (focalLength+myVector.z)/focalLength;
    cloneVector.project();
    projectedPoints.push(new Point(cloneVector.x, cloneVector.y));
  }
  return projectedPoints;
}
Vector3D.
clone():Vector3DMatrix3Dクラスを用いたVector3Dの座標変換
Matrix3Dクラスとの関わりで、
transformVector(変換対象べクトル:Vector3D):Vector3DVector3Dクラスの応用サンプルでは、
function xTransform(myVertices:Vector.<Vector3D>, speed:Point):void {
  var myMatrix:Matrix3D = new Matrix3D();
  myMatrix.appendRotation(speed.x, Vector3D.Y_AXIS);
  myMatrix.appendRotation(speed.y, Vector3D.X_AXIS);
  var nLength:uint = myVertices.length;
  for (var i:int = 0; i<nLength; i++) {
    myVertices[i] = myMatrix.transformVector(myVertices[i]);
  }
}


