タイムトライアル機能を追加してゲーム性を強化
前回の記事では、
不要なラベル表示を消す
現状ゲームを実行すると、
Try to kill the bear!
Use Fire1 to shoot bullets
Use Fire2 to toggle aiming with bazooka
と表示されます。
Fire1ボタンで弾を撃て
Fire2ボタンでバズーカを構えろ
という意味の英語です。不要なので削除します。
さて、
私ならこういう場合、
このように、
Bazooka.
    void OnGUI()
    {
        GUILayout.Label("Try to kill the bear!");
        GUILayout.Label("Use Fire1 to shoot bullets");
        GUILayout.Label("Use Fire2 to toggle aiming with bazooka");
    }
Unityの標準UI機能では、
GUILayout.
スコアカウント処理を追加する
GameControl.
int score = 0;続けて以下のコードを追加します。
    public void AddScore() {
        score++;
    }

    bool FinishedGame() {
        return GameObject.FindWithTag("Teddy") == null;
    }
AddScoreメソッドではフィールド定義したscoreを1加算しています。
FinishedGameメソッドはゲームが終了したかの判定をしています。GameObject.でTeddyタグの付いているオブジェクトが一つもない場合trueを返しています。つまり、
続いて、
    void OnCollisionEnter(Collision collision) {
        if (avatar != null) {
            if (hitFlag == false && collision.collider.tag == "Bullet") {
                hitFlag = true;
                GameObject exp = (GameObject)Instantiate(detonator.gameObject, transform.position, Quaternion.identity);

                //今回追加
                var gameCotroll = GameObject.Find("GameControl");
                gameCotroll.transform.GetComponent<GameControl>().AddScore();

                var currentState = avatar.GetCurrentAnimatorStateInfo(0);
                var nextState = avatar.GetNextAnimatorStateInfo(0);
                if (!currentState.IsName("Base Layer.Dying") && !nextState.IsName("Base Layer.Dying")) {
                    avatar.SetBool("Dying", true);
                    Destroy(this.gameObject, 3.0f);
                }
            }
        }
    }
OnCollisionEnterはクマが何かと接触した際に呼び出されるメソッドです。今回追加した2行で、
var gameCotroll =
GameObject.でHierarchyのGameControlオブジェクトを取得して、gameCotroll.で取得してAddScoreメソッドを呼び出しています。
タイム測定処理を追加する
GameControlクラスに以下のフィールドを追加します。
float elapsedTime;続けてUpdateメソッドを以下のように編集します。
    void Update () {
        if (!FinishedGame()) {
            elapsedTime += Time.deltaTime;
        }
    }
Updateメソッドは毎フレームごとに呼び出されるメソッドです。フレームとは画面を描画する単位です。fps
今回追加したコードはif (!FinishedGame()) {でゲームが終了していない場合、elapsedTime += Time.で経過時間を加算しています。Time.は前のフレームから現在のフレームまでに経過した時間を返します。これをUpdateメソッドの中で毎回加算していくことで、
UI処理を追加する
GameControlクラスに以下のフィールドを追加します。
    const float BASE_WIDTH = 511;
    public GUIStyle style = new GUIStyle();
    public GUIStyle endMsgStyle = new GUIStyle();
    Rect scoreRect = new Rect(400, 10, 70, 30);
    Rect timerRect = new Rect(350, 50, 120, 30);
    Rect endMsgRect = new Rect(50, 10, 200, 35);
    Rect rankMsgRect = new Rect(50, 85, 250, 30);
    Rect replayBtnRect = new Rect(50, 150, 120, 40);
続けて以下のコードを追加します。
    float GetValueByScreenSize(float x) {
        float ratio = Screen.width / BASE_WIDTH;
        return x * ratio;
    }

    Rect MakeRect(Rect defaultRect) {
        float left = GetValueByScreenSize(defaultRect.left);
        float top = GetValueByScreenSize(defaultRect.y);
        float width = GetValueByScreenSize(defaultRect.width);
        float height = GetValueByScreenSize(defaultRect.height);
        Rect newRect = new Rect(left, top, width, height);
        return newRect;
    }

    void OnGUI() {
        GUI.Label(scoreRect, "スコア " + score, style);
        GUI.Label(timerRect, "タイム " + elapsedTime, style);
        if (FinishedGame()) {
            GUI.Label(endMsgRect, "Game Clear!!", endMsgStyle);
            GUI.Label(rankMsgRect, "あなたのタイムは" + elapsedTime + "です!", style);
            if (GUI.Button(replayBtnRect, "もう一度プレイする")) {
                Application.LoadLevel("Teddy Bear Bazooka");
            }
        }
    }
MakeRectメソッドで使用しているGetValueByScreenSizeメソッドでは、
MakeRectメソッドでは引数で受け取ったRectのサイズをGetValueByScreenSizeを使って実際の画面の大きさに合わせて変更しています。
OnGUIメソッドで経過時間と現在のスコアの表示、
GUI.でスコアの表示をしています。GUI.
第二引数ではラベルに表示する文字列を指定します。第三引数ではラベルの表示スタイルを指定します。文字の大きさやフォント、
if (FinishedGame()) {でゲーム終了時の判定をして、if (GUI.でApplication.が実行され、
最終的にGemeControl.
using UnityEngine;
using System.Collections;

public class GameControl : MonoBehaviour {
    public GameObject bear;
    int score = 0;
    float elapsedTime;
    const float BASE_WIDTH = 511;
    public GUIStyle style = new GUIStyle();
    public GUIStyle endMsgStyle = new GUIStyle();
    Rect scoreRect = new Rect(400, 10, 70, 30);
    Rect timerRect = new Rect(350, 50, 120, 30);
    Rect endMsgRect = new Rect(50, 10, 200, 35);
    Rect rankMsgRect = new Rect(50, 85, 250, 30);
    Rect replayBtnRect = new Rect(50, 150, 120, 40);

        void Start () {
        for (int i = 0; i < 9; i++) {
            Instantiate(bear);
        }

        scoreRect = MakeRect(scoreRect);
        timerRect = MakeRect(timerRect);
        endMsgRect = MakeRect(endMsgRect);
        rankMsgRect = MakeRect(rankMsgRect);
        replayBtnRect = MakeRect(replayBtnRect);
    }

        void Update () {
        if (!FinishedGame()) {
            elapsedTime += Time.deltaTime;
        }
    }

    public void AddScore() {
        score++;
    }

    bool FinishedGame() {
        return GameObject.FindWithTag("Teddy") == null;
    }

    float GetValueByScreenSize(float x) {
        float ratio = Screen.width / BASE_WIDTH;
        return x * ratio;
    }

    Rect MakeRect(Rect defaultRect) {
        float left = GetValueByScreenSize(defaultRect.left);
        float top = GetValueByScreenSize(defaultRect.y);
        float width = GetValueByScreenSize(defaultRect.width);
        float height = GetValueByScreenSize(defaultRect.height);
        Rect newRect = new Rect(left, top, width, height);
        return newRect;
    }

    void OnGUI() {
        GUI.Label(scoreRect, "スコア " + score, style);
        GUI.Label(timerRect, "タイム " + elapsedTime, style);
        if (FinishedGame()) {
            GUI.Label(endMsgRect, "Game Clear!!", endMsgStyle);
            GUI.Label(rankMsgRect, "あなたのタイムは" + elapsedTime + "です!", style);
            if (GUI.Button(replayBtnRect, "もう一度プレイする")) {
                Application.LoadLevel("Teddy Bear Bazooka");
            }
        }
    }
}
ラベルの表示スタイルを設定する
続いて、
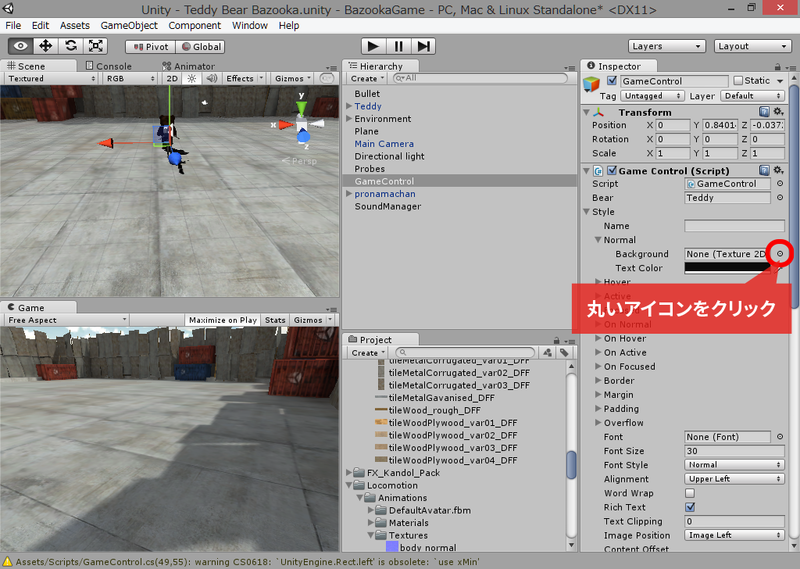
Select Texture2Dダイアログが表示されるので、
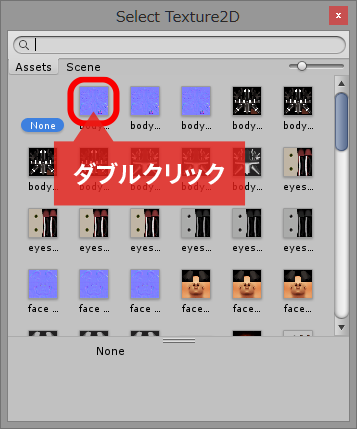
これはラベルの背景に使う画像を指定です。薄い色の背景画像を指定することで文字を読みやすくしています。
続いて、
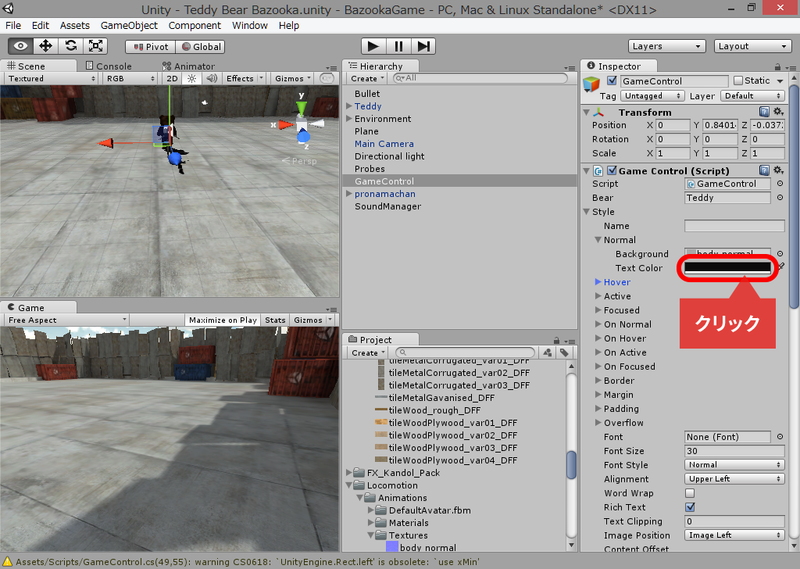
Colorダイアログが表示されるので、
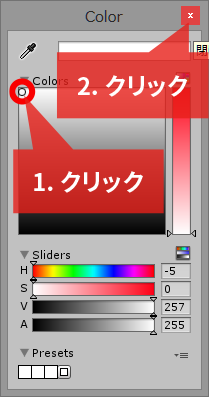
これでラベルの文字が白くなります。
続いて
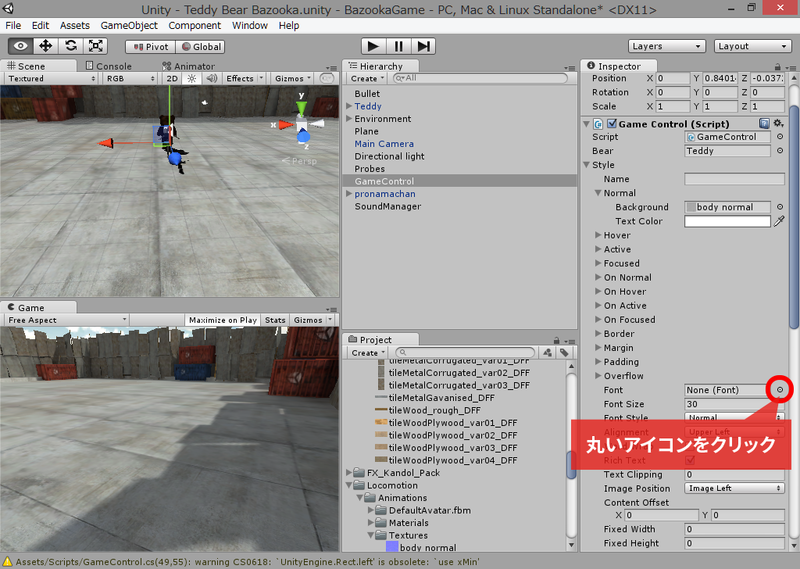
Select Fontダイアログが表示されるので、
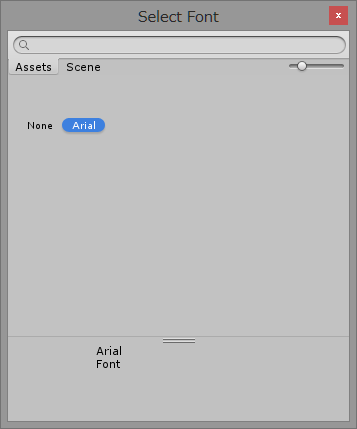
これでラベルのフォントが設定されました。
続いて
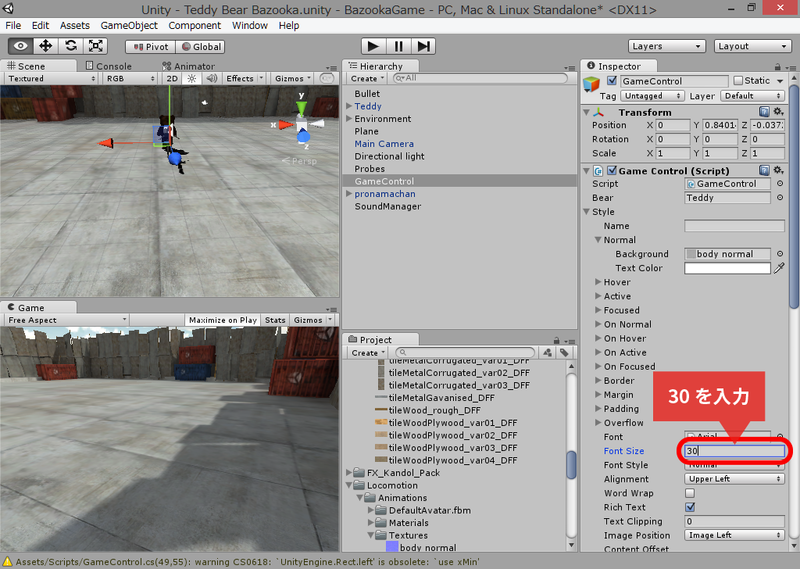
これでラベルのフォントサイズが30となります。
続いて
以上で終了です。ゲームを実行してみましょう!
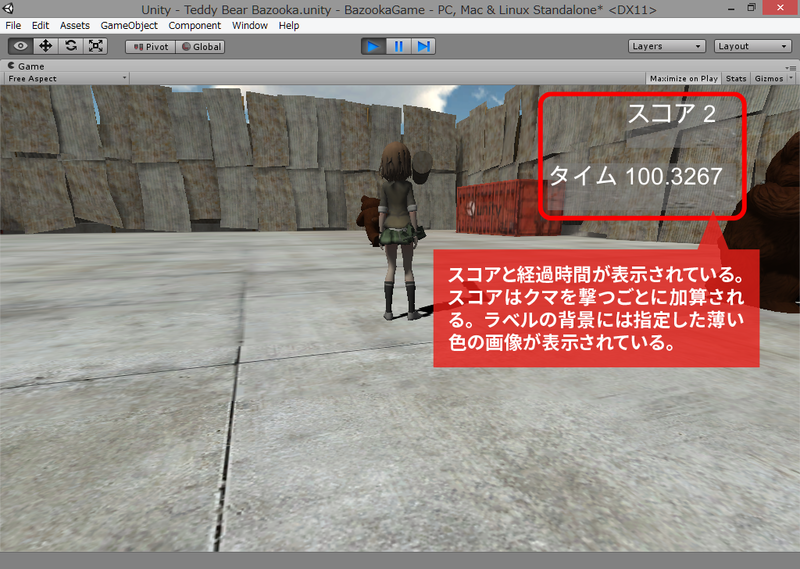
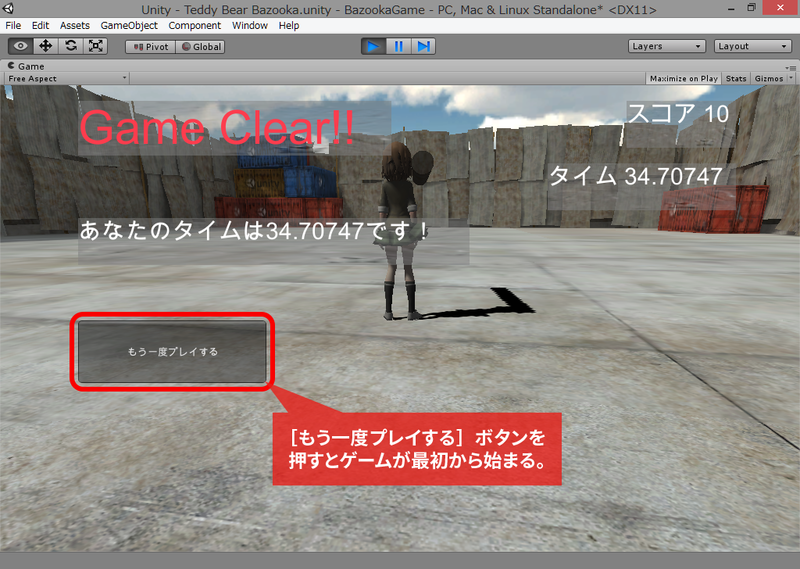
いかがだったでしょうか? 時間を競うという要素が加わったのでゲームとしての面白さが出てきたかと思います。速いタイムでクリアできるようチャレンジしてみてください。
次回はプロ生ちゃんの音声を追加してゲームに華やかさを加えていきたいと思います。プロ生ちゃんの音声は声優の上坂すみれさんが担当されています。プロの声優さんの音声を加えることでゲームの雰囲気がぐっと華やかになります。お楽しみに!


