はじめに
第3回では、
Vue.
Vue.jsのコンポーネント指向
Vue.jsのコンポーネント指向について
Vue.
大規模なアプリケーションを作成する際は、
基本的なcomponent
まず、
Vue.component('fruits-list-title', {
  template: '<h1>フルーツ一覧</h1>'
})この例では、<h1>フルーツ一覧</h1>のHTML要素を含んだコンポーネントを、fruits-list-titleという名前で登録しています。登録したコンポーネントを別のコンポーネントから使用するには、
<div id="fruits-list">
  <fruits-list-title></fruits-list-title>
</div>
このように構成した場合、
<div id="fruits-list">
  <h1>フルーツ一覧</h1>
</div>上記の例ではグローバルのVueにコンポーネントを、Vue.の形式で追加していましたが、Vue.を使用してコンポーネントを作成した上で、componentsというoptionの中に以下のように登録してください。
var fruitsListChild = Vue.extend({
  template: '<h1>フルーツ一覧</h1>'
})

var fruitsListParent = Vue.extend({
  template: '<div>親コンポーネント<fruits-list-child></fruits-list-child></div>',
  components: {
    'fruits-list-child': fruitsListChild
  }
})

new Vue({
    el: "#fruits-list",
  components: {
    'fruits-list-parent': fruitsListParent
  }
})
<div id="fruits-list">
<fruits-list-parent></fruits-list-parent>
</div>jsfiddleで実行するとわかりますが、fruits-list-childコンポーネントはfruits-list-parentコンポーネントのスコープ内に定義されています。そのため、fruits-list-childコンポーネントをfruits-list-parentの外側で指定しても、
<div id="fruits-list">
  <fruits-list-child></fruits-list-child>
  <fruits-list-parent></fruits-list-parent>
</div>
コンポーネントのdataの扱い
各インスタンスごとに異なるdataオブジェクトを定義したいとき、
data: function(){
  return {
    fruits: [/* */]
  }
}
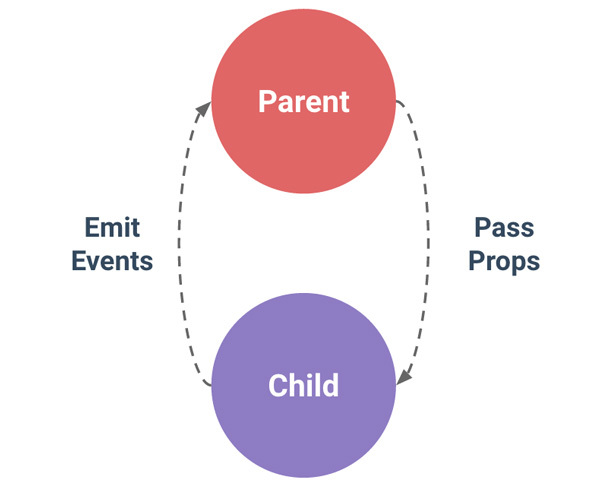
コンポーネント間の通信
親コンポーネントと子コンポーネントのデータのやりとりを解説します。

親コンポーネントが子コンポーネントへデータを渡す際には、
例を見ていきましょう。以下のように、fruitsItemsに入ったフルーツの名前fruitsItem.をリストするテンプレートを含んだコンポーネントを、fruits-listという名前でVueインスタンスに登録しています。
Vue.component('fruits-list', {
  props: ['fruitsItem'],
  template: '<li>{{fruitsItem.name}}</li>'
});
配列fruitsは親コンポーネントのdataで定義します。
new Vue({
  el: '#fruits-component',
  data: {
    fruitsItems: [
      {name: '梨'},
      {name: 'イチゴ'}
    ]
  }
});上記のように子コンポーネントのpropsオプションに変数名fruitsItemsを追加したうえで、fruits-listタグの属性にfruits-itemsを記述します。すると、
propsにキャメルケースでfruitsItemsと書いた場合、fruits-itemsと書きます。
<div id="fruits-component">
  <ol>
    <fruits-list v-for="fruit in fruitsItems" fruits-item="fruit"></fruits-list>
  </ol>
</div>ここで、v-bindディレクティブを使用すると良いでしょう。
<fruits-list v-for="fruit in fruitsItems" v-bind:fruits-item="fruit"></fruits-list>このように記述すると、fruitsの値が更新されるたびに、propsに書いたfruitsItemsが更新されます。なお、v-bindは省略できます。
<fruits-list v-for="fruit in fruitsItems" :fruits-items="fruits"></fruits-list>レンダリングされるHTML要素は以下のようになります。
<div id="fruits-component">
  <ol>
    <li>梨</li>
    <li>イチゴ</li>
  </ol>
</div>
ここまでのサンプルコードは、
子コンポーネントから親コンポーネントへの通信では、
- イベントのlisten:
$on(eventName) - イベントのtrigger:
$emit(eventName)
※ $dispatchや$broadcastを紹介する記事を読んだことのある方もいるかもしれませんが、
こちらも例を見ていきましょう。以下のようにcounter-buttonコンポーネントが定義されているとします。ボタンを押すとこのコンポーネントのaddToCartメソッドが呼ばれ、incrementというカスタムイベントが発行されます。親コンポーネント側では v-on:increment(increment)でincrementイベントをlistenしているため、incrementメソッドが呼ばれます。
var counterButton = Vue.component( {
  template: '<span>{{counter}}個<button v-on:click="addToCart">追加</button></span>',
  data: function () {
    return {
      counter: 0
    }
  },
  methods: {
    addToCart: function () {
      this.counter += 1
      this.$emit('increment')
    }
  },
});

new Vue({
  el: '#fruits-counter',
  components:
    'counter-button': counterButton
  },
  data: {
    total: 0,
    fruits: [
      {name: '梨'},
      {name: 'イチゴ'}
    ]
  },
  methods: {
    increment: function () {
      this.total += 1
    }
  }
});
<div id="fruits-counter">
<div v-for="fruit in fruits">
{{fruit.name}}: <counter-button v-on:increment="increment()"></counter-button>
</div>
<p>合計: {{total}}</p>
</div>ここまでのサンプルコードは、
大規模なアプリケーションを作成していると、
コンポーネントの作成
ログインフォームコンポーネントの作成
ここまでの知識を踏まえてログインフォームを作成しましょう。まずtemplateはログインIDとパスワードのinputフォームを用意し、v-modelでコンポーネントのデータとバインドしておきます。ボタンにはv-on:click(login)と記述し、
<div id="login-template">
  <input type="text" placeholder="ログインID" v-model="userid">
  <input type="password" placeholder="パスワード" v-model="password">
  <button v-on:click="login">ログイン</button>
</div>コンポーネントのdataにはuser_とpasswordを返す関数を定義し、loginメソッドを定義しています。なお、auth.という仮の関数を置いています。
var auth = {
  login: function(id, pass){
    window.alert("login id:" + id + "\n" + "password:" + pass);
  }
}

var loginTemplate = `
  <div>
    <input type="text" placeholder="ログインID" v-model="userid">
    <input type="password" placeholder="パスワード" v-model="password">
    <button v-on:click="login">ログイン</button>
  </div>
`
Vue.component('user-login', {
  template: loginTemplate,
  data: function(){
    return {
      userid: '',
      password: ''
    }
  },
  methods: {
    login: function(){
      auth.login(this.userid, this.password);
    }
  }
});
以上で簡単なログイン用のコンポーネントが作成できました。このコンポーネントを、
new Vue({
  el: "#login-example"
});
<div id="login-example">
<user-login></user-login>
</div>ここまでのサンプルコードは、
ヘッダーコンポーネントの作成
より実践的な例として、
まずは、pageというコンポーネントの中に、
<page>
  <page-header></page-header>
  <!-- ページのコンテンツ -->
</page>ここで、content distributionという仕組みを使用します。Vue.content distributionのAPIは、
たとえば、page-headerコンポーネントを定義するとします。
var headerTemplate = `
        <div style="background: white;">
        <slot name="header"></slot>
   </div>
`
Vue.component('page-header', {
        template: headerTemplate
});上記のようにヘッダーのコンポーネントの中にslotというタグを埋め込みます。こうすることで親コンポーネントを使用する際に、
<div>
   <page-header>
     <h1 slot="header">冬の果物</h1>
   </page-header>
  <ul>
    <li>りんご</li>
    <li>イチゴ</li>
  </ul>
</div>上記のように、slot属性に対応する子コンポーネントのslotタグのname属性を指定することで、
   <div style="background: white;">
     <h1>冬の果物</h1>
   </div>
    <li>りんご</li>
    <li>イチゴ</li>
  </ul>
</div>
ここまでのサンプルコードは、
まとめ
いかがでしたか。ここまでVue.
次回は、


