おいおいおい。AWSをはじめて、
コマンドラインでデータベースを起動したら、
AMI
とりあえず、
AMIを作るときのVPCは特にどこでも良いらしい。ただ、
ちょっとこのあたりで、
$ aws ec2 describe-vpcs
$ aws ec2 describe-subnets
$ aws ec2 describe-internet-gateways
$ aws ec2 describe-route-tables
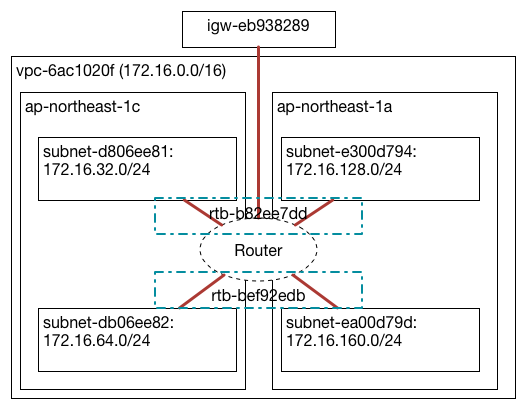
これでネットワークのCIDRとそれぞれのIDを列挙しておくことができた。
これがあったほうがこの後の作業が楽だということにはこの数日間で思い知らされている。もし、
$ aws ec2 describe-key-pairs
key-pairの名前もこれで[id_
$ aws ec2 describe-security-groups
今回はSecurity Groupについてはもう一度作り直していくことにした。
$ aws ec2 create-security-group --vpc-id vpc-6ac1020f --group-name webapp-ssh  --description "eccube-web server ssh SG"
 {
     "GroupId": "sg-d2e353b7"
 }
Security Groupを作ったら、
$ aws ec2 authorize-security-group-ingress --group-id sg-d2e353b7 --port 22 --protocol tcp --cidr m.y.I.p/32
| ID | Name | Source | Protocol |
|---|---|---|---|
| sg-d2e353b7 | webapp-ssh | myIp | TCP:22 |
改めてEC2を起動しようと思ったけど、
$ aws ec2 describe-images --owners amazon |jq '.[][] |select(.ImageType == "machine") | {"Name" :.Name,"ImageId":.ImageId }' |grep -A 1 amzn-ami-hvm
このコマンドで、
$ aws ec2 run-instances --key-name id_rsa --instance-type t2.micro --subnet-id subnet-d806ee81 --associate-public-ip-address --security-group-ids sg-d2e353b7 --image-id ami-35072834
これでEC2が立ち上がった。
        __|  __|_  )
        _|  (     /   Amazon Linux AMI
       ___|\___|___|
無事にログインもできたし、
$ sudo yum install httpd mysql php php-mbstring php-pdo php-mysql php-mcrypt
$ sudo chkconfig httpd on
なんだろう。いつもなら何も感じないこんなコマンドも、
とりあえず、
$ aws ec2 create-security-group --vpc-id vpc-6ac1020f --group-name webapp-http  --description "eccube-web server http SG"
{
    "GroupId": "sg-b15eeed4"
}
$ aws ec2 authorize-security-group-ingress --group-id sg-b15eeed4 --port 80 --protocol tcp --cidr 0.0.0.0/0
これで、
| ID | Name | Source | Protocol |
|---|---|---|---|
| sg-d2e353b7 | webapp-ssh | myIp | TCP:22 |
| sg-b15eeed4 | webapp-http | 0. |
TCP:80 |
今作ったhttpへのアクセスを認めていたSecurity Group webapp-httpを起動しているインスタンスにくっつけてみる。さっきEC2を起動した時にpublic IPばかり気にしてしまっていて、
describe-instancesでインスタンスの情報を取得するというのも有りだけど、
$ ec2-metadata
ami-id: ami-35072834
ami-launch-index: 0
ami-manifest-path: (unknown)
ancestor-ami-ids: not available
block-device-mapping:
         ami: /dev/xvda
         root: /dev/xvda
instance-id: i-44eb0fb1
instance-type: t2.micro
local-hostname: ip-172-16-32-209.ap-northeast-1.compute.internal
local-ipv4: 172.16.32.209
kernel-id: not available
placement: ap-northeast-1c
product-codes: not available
public-hostname:
public-ipv4: 54.x5.1xx.176
public-keys:
keyname:id_rsa
index:0
format:openssh-key
key:(begins from next line)
ssh-rsa =*********************************************************************************************************************==_id_rsa
ramdisk-id: not available
reservation-id: r-033810f1
security-groups: webapp-ssh
user-data: not available
けっこう便利かもしれない。これでinstance-idがわかったので、
$ aws ec2 modify-instance-attribute --groups sg-d2e353b7 sg-b15eeed4 --instance-id i-44eb0fb1
そしてApacheを起動して
$ sudo service httpd start
ブラウザでアクセスしてみる。
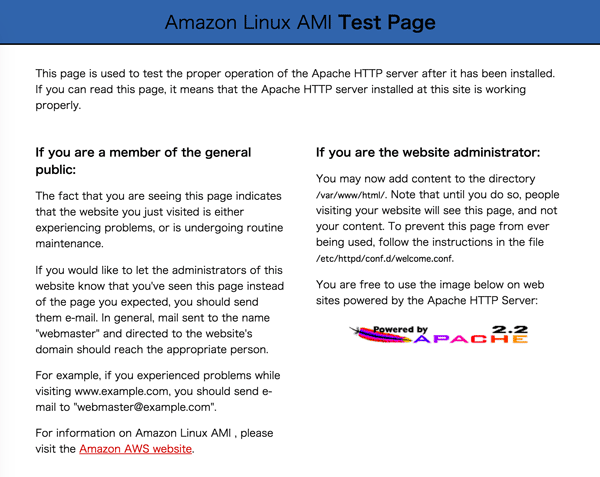
“Amazon Linux AMI Test Page”
このままテストページで何かしても面白くないので、
$ aws ec2 create-security-group --group-name webapp-mysql --vpc-id vpc-6ac1020f  --description mysql
{
    "GroupId": "sg-b4ac1fd1"
}
$ aws ec2 authorize-security-group-ingress --group-id sg-b4ac1fd1 --source-group sg-b4ac1fd1 --port 3306 --protocol tcp
| ID | Name | Source | Protocol |
|---|---|---|---|
| sg-d2e353b7 | webapp-ssh | myIp | TCP:22 |
| sg-b15eeed4 | webapp-http | 0. |
TCP:80 |
| sg-b4ac1fd1 | webapp-mysql | sg-b4ac1fd1 | TCP:3306 |
$ aws ec2 modify-instance-attribute --groups sg-d2e353b7 sg-b15eeed4 sg-b4ac1fd1 --instance-id i-44eb0fb1
$ aws rds modify-db-instance --vpc-security-group-ids sg-b4ac1fd1 --db-instance-identifier test-db
Security Groupを変更してみて、
$ mysql -h test-db.**********.ap-northeast-1.rds.amazonaws.com -u root -p
Enter password:
Welcome to the MySQL monitor.  Commands end with ; or \g.
Your MySQL connection id is 10
Server version: 5.6.19-log MySQL Community Server (GPL)

Copyright (c) 2000, 2015, Oracle and/or its affiliates. All rights reserved.

Oracle is a registered trademark of Oracle Corporation and/or its
affiliates. Other names may be trademarks of their respective
owners.

Type 'help;' or '\h' for help. Type '\c' to clear the current input statement.

mysql>
mysqlに接続できること。なんだろう、
簡単なWebアプリケーション
ミドルウェアとかその辺はこれで良いと思うけれど、
$ diff -Nur /etc/php.ini /etc/php.ini.orig
--- /etc/php.ini    2015-02-21 09:09:04.988734049 +0000
+++ /etc/php.ini.orig   2015-02-21 09:05:49.630312476 +0000
@@ -953,7 +953,7 @@
 [Date]
 ; Defines the default timezone used by the date functions
 ; http://www.php.net/manual/en/datetime.configuration.php#ini.date.timezone
-date.timezone = Asia/Tokyo
+;date.timezone =

 ; http://www.php.net/manual/en/datetime.configuration.php#ini.date.default-latitude
 ;date.default_latitude = 31.7667
そして、
<html>
  <head>
    <title>test application</title>
  </head>
  <body>
  <h1>InstanceID = <?php
   $instance_id = file_get_contents('http://169.254.169.254/latest/meta-data/instance-id');
   echo $instance_id;
?></h1>
あなたは
<?php
$dsn = 'mysql:dbname=counter;host=test-db.cojvgercnfvt.ap-northeast-1.rds.amazonaws.com';
$user = 'USERNAME’;
$password = *************;
try{

    $dbh = new PDO($dsn, $user, $password);
    $sql = "SELECT counter FROM counter LIMIT 1";
    $stmt = $dbh->query($sql);
    $result = $stmt->fetch(PDO::FETCH_ASSOC);
    echo $result['counter'];
    $sql = 'update counter set counter = counter + 1; ';
    $stmt = $dbh->prepare($sql);
    $flag = $stmt->execute(array());
    $dbh = null;

}catch (PDOException $e){
    print('Connection failed:'.$e->getMessage());
    die();
}

?>人目の訪問者です。
  </body>
</html>
すごくシンプルに、
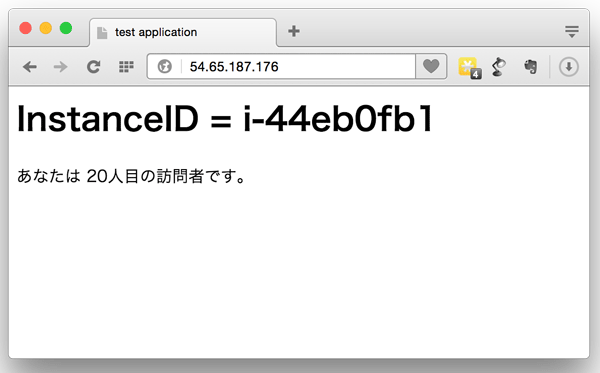
このアプリケーションをAutoScalingでスケーリングさせてみる。そのためにはまず、
$ aws ec2 create-image --instance-id i-44eb0fb1 --name access-counter-version-1
{
    "ImageId": "ami-e118fbe1"
}
できているかの確認をするために、
$ aws ec2 describe-images --owners self
{
    "Images": [
        {
            ~略~
            "ImageId": "ami-e118fbe1",
            "State": "pending",
        }
            ~略~
    ]
}
State:の所がpendingからavailableになればAMIの作成は完了だ。
ELB
AMIを作る所までできたら、
$ aws elb create-load-balancer --load-balancer-name webapp-lb --subnets subnet-d806ee81 subnet-e300d794
usage: aws [options] <command> <subcommand> [parameters]
aws: error: argument --listeners is required
なんとなくオプションを指定して実行してみるけれど、
$ aws elb create-load-balancer help
                ~略~
                [
            {
              "Protocol": "string",
              "LoadBalancerPort": integer,
              "InstanceProtocol": "string",
              "InstancePort": integer,
              "SSLCertificateId": "string"
            }
            ...
          ]
                ~略~
listenerにはJSON形式か、
とりあえず、
$ aws elb create-load-balancer --load-balancer-name webapp-elb --subnets subnet-d806ee81 subnet-e300d794 --listeners '[{"Protocol":"tcp","LoadBalancerPort":80,"InstanceProtocol":"tcp","InstancePort":80}]'
{
    "DNSName": "webapp-elb-1316290153.ap-northeast-1.elb.amazonaws.com"
}
無事にELBが作成できたっぽいけれど…、
$ curl webapp-elb-1316290153.ap-northeast-1.elb.amazonaws.com
反応がない。
だがしかし、
$ aws elb apply-security-groups-to-load-balancer --load-balancer-name webapp-elb --security-groups sg-b15eeed4
{
    "Security Groups": [
        "sg-b15eeed4"
    ]
}

$ curl webapp-elb-1316290153.ap-northeast-1.elb.amazonaws.com
curl: (52) Empty reply from server
無事に空っぽのレスポンスが返ってくるようになった。
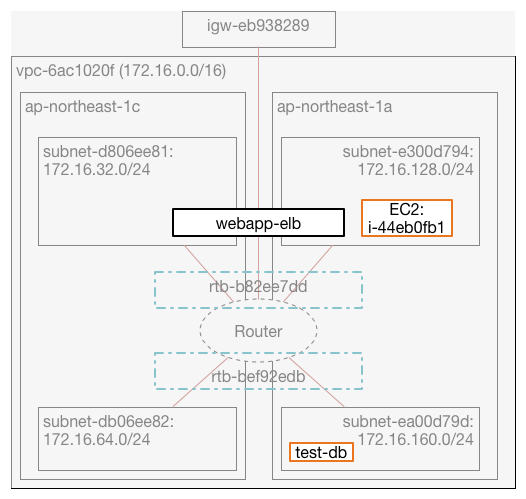
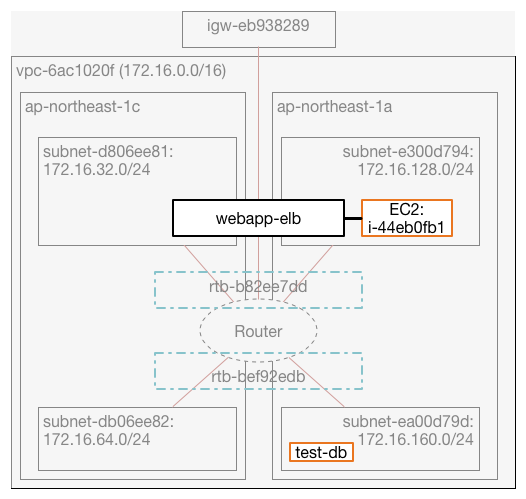
今はおそらくこんな感じで、
aws elb register-instances-with-load-balancer --load-balancer-name webapp-elb  --instances i-44eb0fb1
{
    "Instances": [
        {
            "InstanceId": "i-44eb0fb1"
        }
    ]
}
もう一度curlで見てみる。
$ curl webapp-elb-1316290153.ap-northeast-1.elb.amazonaws.com
<html>
  <head>
    <title>test application</title>
  </head>
  <body>
  <h1>InstanceID = i-44eb0fb1</h1>
あなたは
21人目の訪問者です。
  </body>
</html>
おお、
これで、
AutoScaling
次はついにAutoScalingというのをやってみる。負荷に応じて勝手にサーバができたり、
AutoScalingと一言で言ってしまっていたけど、
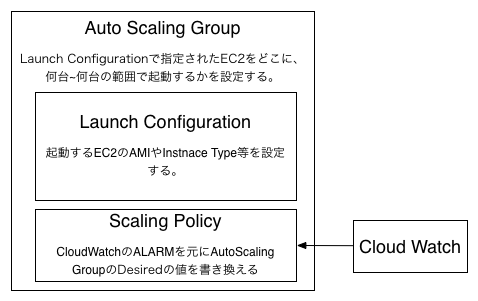
上の図のようなイメージになっているんだと思うけど、
Launch Configuration
Launch Configurationをまずは作ってみる。
$ aws autoscaling create-launch-configuration --image-id "ami-e118fbe1" --key-name id_rsa --instance-type t2.micro --launch-configuration-name webapp-lc --security-groups sg-b4ac1fd1 sg-b15eeed4
AMIさえ先に作ってあれば、
Security Groupの指定を忘れてしまっていて、
Auto Scaling Group
次にAutoScaling Groupを作成する。Auto Scaling Groupにはさっき作ったLaunch Configurationを指定するほかに、
$ aws autoscaling create-auto-scaling-group --load-balancer-names webapp-elb --launch-configuration-name webapp-lc --vpc-zone-identifier subnet-d806ee81,subnet-e300d794 --min-size 1 --max-size 2 --desired-capacity 2 --auto-scaling-group-name webapp-asg
--vpc-zone-identifierがなんだかわからなかったけど、
$ aws autoscaling attach-instances --auto-scaling-group-name webapp-asg --instance-ids i-44eb0fb1
その後に、
$ aws ec2 terminate-instances --instance-ids i-44eb0fb1 i-efc0211a
とりあえず、
ちょっとここで、
$ aws autoscaling describe-auto-scaling-instances
{
    "AutoScalingInstances": [
        {
            "AvailabilityZone": "ap-northeast-1a",
            "InstanceId": "i-3235dd2a",
            "AutoScalingGroupName": "webapp-asg",
            "HealthStatus": "HEALTHY",
            "LifecycleState": "InService",
            "LaunchConfigurationName": "webapp-lc-2"
        },
        {
            "AvailabilityZone": "ap-northeast-1c",
            "InstanceId": "i-78fe1f8d",
            "AutoScalingGroupName": "webapp-asg",
            "HealthStatus": "HEALTHY",
            "LifecycleState": "InService",
            "LaunchConfigurationName": "webapp-lc-2"
        }
    ]
}
なんと、
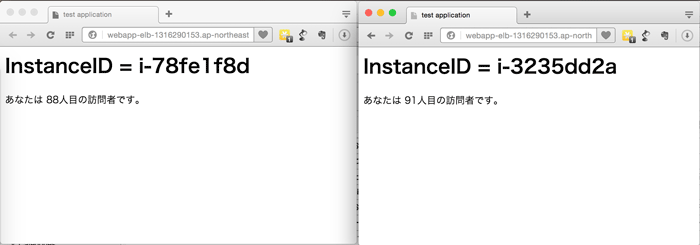
2つのタブを開いて、
Scaling Policy
いや、
順序としては、
$ aws autoscaling create-scaling-po[TAB]
出てこない。
Scaling Policyは作るものじゃないのか?? 知ったかぶって、
$ aws autoscaling [TAB]
put-scaling-policyが怪しい。
なんかロードバランサーとか、
$ aws autoscaling put-scaling-policy help

SYNOPSIS
            put-scaling-policy
          --auto-scaling-group-name <value>
          --policy-name <value>
          --scaling-adjustment <value>
          --adjustment-type <value>
          [--cooldown <value>]
          [--min-adjustment-step <value>]
          [--cli-input-json <value>]
          [--generate-cli-skeleton]
必須なのは、
--scaling-adjustmentにはintegerがパラメータとして取られる。--adjustment-typeには ChangeInCapac-ity ExactCapacity PercentChangeInCapacity この3つが指定できるらしい。
それぞれ調べてみると、
- ChangeInCapacityはscaling-adjustmentで指定された数だけ増減する
- ExactCapacityはScaling-adjustmentで指定された数にする
- ParcentChangeInCapacityはScaling-adjustmentで指定したパーセンテージ分増減する
といったものになるみたいだ。このTypeを使いこなすことによって、
$ aws autoscaling  put-scaling-policy --adjustment-type "ChangeInCapacity" --scaling-adjustment 1 --policy-name scaleout --auto-scaling-group-name webapp-asg
{
    "PolicyARN": "arn:aws:autoscaling:ap-northeast-1:376471586427:scalingPolicy:bfb61d87-1314-4425-9ecb-af95a9b952fd:autoScalingGroupName/webapp-asg:policyName/scaleout"
}
$ aws autoscaling  put-scaling-policy --adjustment-type "ChangeInCapacity" --scaling-adjustment -1 --policy-name scalein --auto-scaling-group-name webapp-asg
{
    "PolicyARN": "arn:aws:autoscaling:ap-northeast-1:376471586427:scalingPolicy:63b8e777-88a2-4509-93ca-b0ced8852ef8:autoScalingGroupName/webapp-asg:policyName/scalein"
}
スケールアウト
PolicyARNという今までに見たことのないような形のレスポンスが来ているが、
CloudWatch
あとはCloudWatchという監視のサービスを使って負荷に応じて自動的にスケールイン/アウトするように設定してあげれば良い。
Cloud Watchでは、
$ aws cloudwatch [TAB]
なんとなくそれっぽいのが、
$ aws cloudwatch list-metrics
ヘルプを見たりしながら、
$ aws cloudwatch list-metrics --namespace AWS/ELB --metric-name Latency --dimensions '[{"Name":"LoadBalancerName","Value":"webapp-elb"}]'
{
    "Metrics": [
        {
            "Namespace": "AWS/ELB",
            "Dimensions": [
                {
                    "Name": "LoadBalancerName",
                    "Value": "webapp-elb"
                }
            ],
            "MetricName": "Latency"
        },
       ~略~
            "MetricName": "Latency"
        }
    ]
}
今回はAZにかかわらず、
$ aws cloudwatch get-metric-statistics --namespace "AWS/ELB" --metric-name Latency --start-time "2015/02/20T10:00:00Z" --end-time "2015/02/20T14:00:00Z" --period 300 --statistics Average
{
    "Datapoints": [
        {
            "Timestamp": "2015-02-22T11:15:00Z",
            "Average": 1.1285146077473956e-05,
            "Unit": "Seconds"
        },
        {
            "Timestamp": "2015-02-22T12:50:00Z",
            "Average": 1.025199890136719e-05,
            "Unit": "Seconds"
        },
        {
            "Timestamp": "2015-02-22T10:00:00Z",
            "Average": 9.775161743164062e-06,
            "Unit": "Seconds"
        },
        ~略~
    ],
    "Label": "Latency"
}
であれば、
$ aws cloudwatch put-metric-alarm --namespace "AWS/ELB" \
--metric-name Latency --period 300 --statistic Average --threshold 1\
  --alarm-actions "arn:aws:autoscaling:ap-northeast-1:376471586427:scalingPolicy:bfb61d87-1314-4425-9ecb-af95a9b952fd:autoScalingGroupName/webapp-asg:policyName/scaleout"\
  --evaluation-periods 1  --alarm-name webapp-alarm-scaleout\
  --comparison-operator GreaterThanThreshold \
--dimensions Name=LoadBalancerName,Value=webapp-elb  --unit Seconds
これでELBからのLatencyの5分平均が1秒以上になった時にスケールアウトするはずだ。
Alarm-actionsにはさっき作ったScaling Policyのarnというのを指定するというのがなかなか難しい。というかarnってなんだ。とは言え、
$ aws cloudwatch put-metric-alarm --namespace "AWS/ELB" \
--metric-name Latency --period 300 --statistic Average \ --threshold 0.3  \
--alarm-actions "arn:aws:autoscaling:ap-northeast-1:376471586427:scalingPolicy:63b8e777-88a2-4509-93ca-b0ced8852ef8:autoScalingGroupName/webapp-asg:policyName/scalein"  \
 --evaluation-periods 2  --alarm-name webapp-alarm-scalein\
  --comparison-operator LessThanThreshold\
 --dimensions Name=LoadBalancerName,Value=webapp-elb  --unit Seconds
Latencyの5分平均が0.
さいごに
なんとかクラウドっぽくサーバが自動的に増減するような仕組みを作るところまでやることができた。
今まで数年間オンプレだけで頑張ってきたけど、
まだまだ知らないAWSのサービスは何十個もあるけれど、
この数日間、
マウスが嫌いなとあるインフラエンジニア。
以上、
- Work Program for AWS


