前回の第43回は、
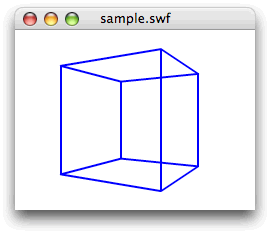
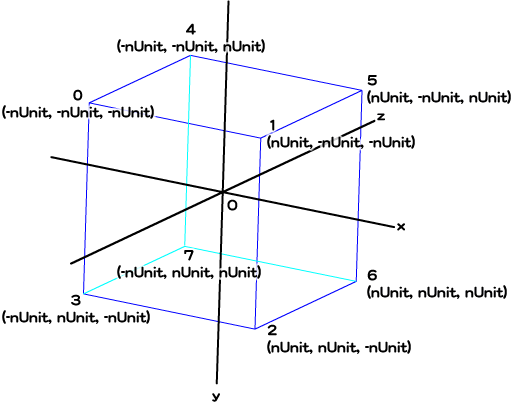
立方体の8頂点の座標を決める
まず、
前回書いたスクリプト1
var nUnit:Number = 100 / 2;
var mySprite:Sprite = new Sprite();
var vertices:Vector.<Vector3D> = new Vector.<Vector3D>();
var nDeceleration:Number = 0.3;
var myGraphics:Graphics = mySprite.graphics;
var nFocalLength:Number = transform.perspectiveProjection.focalLength;

mySprite.x = stage.stageWidth / 2;
mySprite.y = stage.stageHeight / 2;
/* 4頂点座標
vertices.push(new Vector3D(-nUnit, -nUnit, 0));
vertices.push(new Vector3D(nUnit, -nUnit, 0));
vertices.push(new Vector3D(nUnit, nUnit, 0));
vertices.push(new Vector3D(-nUnit, nUnit, 0));
*/   // 以下の8頂点座標に差替え

vertices.push(new Vector3D(-nUnit, -nUnit, -nUnit));
vertices.push(new Vector3D(nUnit, -nUnit, -nUnit));
vertices.push(new Vector3D(nUnit, nUnit, -nUnit));
vertices.push(new Vector3D(-nUnit, nUnit, -nUnit));
vertices.push(new Vector3D(-nUnit, -nUnit, nUnit));
vertices.push(new Vector3D(nUnit, -nUnit, nUnit));
vertices.push(new Vector3D(nUnit, nUnit, nUnit));
vertices.push(new Vector3D(-nUnit, nUnit, nUnit));
addChild(mySprite);

addEventListener(Event.ENTER_FRAME, xRotate);
function xRotate(eventObject:Event):void {
  var nRotationY:Number = mySprite.mouseX * nDeceleration;
  xTransform(vertices, nRotationY);
  var vertices2D:Vector.<Point >  = xGetVertices2D(vertices);
  xDrawLines(vertices2D);
}

function xTransform(myVertices:Vector.<Vector3D>, myRotation:Number):void {
  var nLength:uint = myVertices.length;
  var myMatrix3D:Matrix3D = new Matrix3D();
  myMatrix3D.prependRotation(myRotation, Vector3D.Y_AXIS);
  for (var i:int = 0; i<nLength; i++) {
    myVertices[i] = myMatrix3D.transformVector(myVertices[i]);
  }

}
function xGetVertices2D(myVertices:Vector.<Vector3D>):Vector.<Point >  {
  var vertices2D:Vector.<Point> = new Vector.<Point>();
  var nLength:uint = myVertices.length;

  for (var i:uint = 0; i < nLength; i++) {
    var myVector3D:Vector3D = myVertices[i].clone();
    myVector3D.w = (nFocalLength + myVector3D.z) / nFocalLength;
    myVector3D.project();
    vertices2D.push(new Point(myVector3D.x, myVector3D.y));
  }
  return vertices2D;
}

function xDrawLines(vertices2D:Vector.<Point>):void {
  var nLength:uint = vertices2D.length;
  var myPoint:Point = vertices2D[nLength - 1];
  myGraphics.clear();
  myGraphics.lineStyle(2, 0x0000FF);
  myGraphics.moveTo(myPoint.x, myPoint.y);
  for (var i:uint = 0; i < nLength; i++) {

    myPoint = vertices2D[i];
    myGraphics.lineTo(myPoint.x, myPoint.y);
  }
}
[ムービープレビュー]で確かめると、
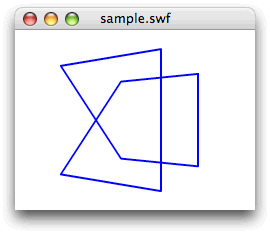
しかし、
さて、
だとすれば、
立方体のワイヤーフレームを描く
立方体はわかりやすさも考えて、
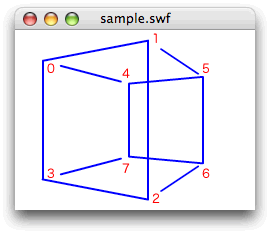
さて、
ひとつの部品を描くための頂点番号の組は、
var indices:Vector.<Vector.<uint>> = new Vector.<Vector.<uint>>();
indices.push(new <uint>[0, 1, 2, 3]);

indices.push(new <uint>[4, 5, 6, 7]);
indices.push(new <uint>[0, 4]);
indices.push(new <uint>[1, 5]);

indices.push(new <uint>[2, 6]);
indices.push(new <uint>[3, 7]);
ふたつ補足しよう。まず、
Vector.<Vector.<子のベース型>>つぎに、
new <ベース型>[エレメント0, エレメント1, …, エレメントN]これで描画するためのデータは整った。頂点座標と頂点番号の組合わせをそれぞれVectorインスタンスで受取って、
function xDraw(vertices2D:Vector.<Point>, myIndices:Vector.<Vector.<uint>>):void {
  var nLength:uint = myIndices.length;
  myGraphics.clear();
  for (var i:uint = 0; i < nLength; i++) {
    var myVertices:Vector.<Point> = new Vector.<Point>();

    var myIndex:Vector.<uint >  = myIndices[i];
    var nLength2:uint = myIndex.length;
    for (var j:uint = 0; j < nLength2; j++) {
      myVertices.push(vertices2D[myIndex[j]]);
    }
    xDrawLines(myVertices);

  }
}
最初のforループでは第2引数
関数xDrawLines()は、
function xDrawLines(vertices2D:Vector.<Point>):void {
  var nLength:uint = vertices2D.length;
  var myPoint:Point = vertices2D[nLength - 1];
  // myGraphics.clear();
  myGraphics.lineStyle(2, 0x0000FF);
  myGraphics.moveTo(myPoint.x, myPoint.y);
  for (var i:uint = 0; i < nLength; i++) {

    myPoint = vertices2D[i];
    myGraphics.lineTo(myPoint.x, myPoint.y);
  }
}
あとは、
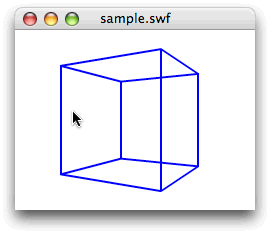
できあがったフレームアクション全体は、
// フレームアクション
var nUnit:Number = 100 / 2;
var mySprite:Sprite = new Sprite();
var vertices:Vector.<Vector3D> = new Vector.<Vector3D>();
var indices:Vector.<Vector.<uint>> = new Vector.<Vector.<uint>>();

var nDeceleration:Number = 0.3;
var myGraphics:Graphics = mySprite.graphics;
var nFocalLength:Number = transform.perspectiveProjection.focalLength;
mySprite.x = stage.stageWidth / 2;
mySprite.y = stage.stageHeight / 2;
vertices.push(new Vector3D(-nUnit, -nUnit, -nUnit));
vertices.push(new Vector3D(nUnit, -nUnit, -nUnit));
vertices.push(new Vector3D(nUnit, nUnit, -nUnit));
vertices.push(new Vector3D(-nUnit, nUnit, -nUnit));

vertices.push(new Vector3D(-nUnit, -nUnit, nUnit));
vertices.push(new Vector3D(nUnit, -nUnit, nUnit));
vertices.push(new Vector3D(nUnit, nUnit, nUnit));
vertices.push(new Vector3D(-nUnit, nUnit, nUnit));
indices.push(new <uint>[0, 1, 2, 3]);
indices.push(new <uint>[4, 5, 6, 7]);
indices.push(new <uint>[0, 4]);

indices.push(new <uint>[1, 5]);
indices.push(new <uint>[2, 6]);
indices.push(new <uint>[3, 7]);addChild(mySprite);
addEventListener(Event.ENTER_FRAME, xRotate);
function xRotate(eventObject:Event):void {
  var nRotationY:Number = mySprite.mouseX * nDeceleration;

  xTransform(vertices, nRotationY);
  var vertices2D:Vector.<Point >  = xGetVertices2D(vertices);
  xDraw(vertices2D, indices);
}
function xTransform(myVertices:Vector.<Vector3D>, myRotation:Number):void {
  var nLength:uint = myVertices.length;

  var myMatrix3D:Matrix3D = new Matrix3D();
  myMatrix3D.prependRotation(myRotation, Vector3D.Y_AXIS);
  for (var i:int = 0; i<nLength; i++) {
    myVertices[i] = myMatrix3D.transformVector(myVertices[i]);
  }
}
function xGetVertices2D(myVertices:Vector.<Vector3D>):Vector.<Point >  {

  var vertices2D:Vector.<Point> = new Vector.<Point>();
  var nLength:uint = myVertices.length;
  for (var i:uint = 0; i < nLength; i++) {
    var myVector3D:Vector3D = myVertices[i].clone();
    myVector3D.w = (nFocalLength + myVector3D.z) / nFocalLength;

    myVector3D.project();
    vertices2D.push(new Point(myVector3D.x, myVector3D.y));
  }
  return vertices2D;
}
function xDraw(vertices2D:Vector.<Point>, myIndices:Vector.<Vector.<uint>>):void {

  var nLength:uint = myIndices.length;
  myGraphics.clear();
  for (var i:uint = 0; i < nLength; i++) {
    var myVertices:Vector.<Point> = new Vector.<Point>();
    var myIndex:Vector.<uint >  = myIndices[i];

    var nLength2:uint = myIndex.length;
    for (var j:uint = 0; j < nLength2; j++) {
      myVertices.push(vertices2D[myIndex[j]]);
    }
    xDrawLines(myVertices);
  }
}
function xDrawLines(vertices2D:Vector.<Point>):void {

  var nLength:uint = vertices2D.length;
  var myPoint:Point = vertices2D[nLength - 1];
  if (nLength < 3) {
    --nLength;
  }
  myGraphics.lineStyle(2, 0x0000FF);
  myGraphics.moveTo(myPoint.x, myPoint.y);
  for (var i:uint = 0; i < nLength; i++) {

    myPoint = vertices2D[i];
    myGraphics.lineTo(myPoint.x, myPoint.y);
  }
}
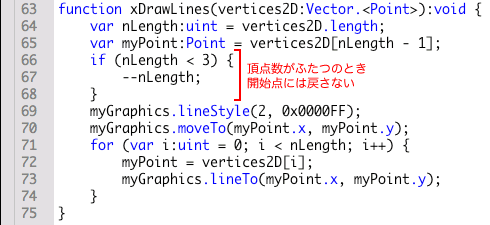
加わったのは、
次回からは、
今回解説した次のサンプルファイルがダウンロードできます。
- スクリプト1のサンプルファイル
(CS5形式/ 約61KB)


