


前回のベクトルの内積に続いて、
回転の軸を定める
第50回スクリプト3は、
")
")
幸いにして、
Matrix3D.appendRotation(回転の角度, 回転軸のVector3Dオブジェクト)そこで考えなければならないのは、
現に、
初めにほのめかしたように、
ベクトルの外積から垂直な線を求める
マウスポインタの動きとz軸というふたつのベクトルが決まった。これで外積が求められる。ふたつのベクトルをAとBとすると、

ベクトルは大きさと方向をもつ。もっとも、
したがって、
さて、
Vector3Dオブジェクト.crossProduct(もうひとつのVector3Dオブジェクト)ここまでのところで、
第50回スクリプト3の中で今回手を加えるのは、
まず、
こうして求めた回転の軸
// フレームアクションを修正
function xRotate(eventObject:Event):void {
  // var nRotationY:Number = mySprite.mouseX * nDeceleration;
  // var nRotationX:Number = mySprite.mouseY * nDeceleration;
  // 回す方向のベクトルを求める
  var mouseVector3D:Vector3D = new Vector3D(mySprite.mouseX, -mySprite.mouseY, 0);
  // z軸と回す方向のベクトルとの外積を求める
  var axisVector3D:Vector3D = Vector3D.Z_AXIS.crossProduct(mouseVector3D);
  var vertices2D:Vector.<Number> = new Vector.<Number>();
  var nRotation:Number = mouseVector3D.length * nDeceleration;
  axisVector3D.normalize();   // ベクトルの長さを1にする
  // xTransform(vertices2D, nRotationY, nRotationX);
  xTransform(vertices2D, nRotation, axisVector3D);   // 引数を変更
  xSetOrder();
  xDraw(vertices2D);
}
つぎに、
なお、
修正前の関数では、
// フレームアクションを修正
// function xTransform(vertices2D:Vector.<Number>, myRotationY:Number, myRotationX:Number):void {
function xTransform(vertices2D:Vector.<Number>, myRotation:Number, axisVector3D:Vector3D):void {
  // worldMatrix3D.appendRotation(myRotationY, Vector3D.Y_AXIS);
  // worldMatrix3D.appendRotation(myRotationX, Vector3D.X_AXIS);
  // Matrix3D.appendRotation()メソッドの呼出しは回転軸を定めて1度だけ
  worldMatrix3D.appendRotation(myRotation, axisVector3D);
  var myMatrix3D:Matrix3D = worldMatrix3D.clone();
  myMatrix3D.append(viewMatrix3D);
  Utils3D.projectVectors(myMatrix3D, vertices, vertices2D, uvtData);
}
細かいことにひとつ触れておこう。外積を計算するとき、
Matrix3D.

たとえば、
さらに実も蓋もないことをいうなら、
第50回スクリプト3に前述したふたつの関数の修正を加えたフレームアクション全体が以下のスクリプト1だ。これで第50回スクリプト3と見た目は同じように、
var nUnit:Number = 100 / 2;
var mySprite:Sprite = new Sprite();
var myTexture:BitmapData = new Image();
var vertices:Vector.<Number> = new Vector.<Number>();
var indices:Vector.<int> = new Vector.<int>();
var uvtData:Vector.<Number> = new Vector.<Number>();
var nDeceleration:Number = 0.3;
var myGraphics:Graphics = mySprite.graphics;
var myPerspective:PerspectiveProjection = transform.perspectiveProjection;
var worldMatrix3D:Matrix3D = new Matrix3D();
var viewMatrix3D:Matrix3D = myPerspective.toMatrix3D();
var nFaces:uint = 4;
var faces:Vector.<Vector.<uint>> = new Vector.<Vector.<uint>>();
var centers:Vector.<Vector3D> = new Vector.<Vector3D>();
faces.push(new <uint>[0, 1, 2, 3]);
faces.push(new <uint>[1, 5, 6, 2]);
faces.push(new <uint>[5, 4, 7, 6]);
faces.push(new <uint>[4, 8, 9, 7]);
centers.push(new Vector3D(0, 0, -nUnit));
centers.push(new Vector3D(nUnit, 0, 0));
centers.push(new Vector3D(0, 0, nUnit));
centers.push(new Vector3D(-nUnit, 0, 0));
viewMatrix3D.prependTranslation(0, 0, myPerspective.focalLength);
mySprite.x = stage.stageWidth / 2;
mySprite.y = stage.stageHeight / 2;
vertices.push(-nUnit, -nUnit, -nUnit);
vertices.push(nUnit, -nUnit, -nUnit);
vertices.push(nUnit, nUnit, -nUnit);
vertices.push(-nUnit, nUnit, -nUnit);
vertices.push(-nUnit, -nUnit, nUnit);
vertices.push(nUnit, -nUnit, nUnit);
vertices.push(nUnit, nUnit, nUnit);
vertices.push(-nUnit, nUnit, nUnit);
vertices.push(-nUnit, -nUnit, -nUnit);
vertices.push(-nUnit, nUnit, -nUnit);
for (var i:uint = 0; i < nFaces; i++) {
  addRectangleIndices(faces[i]);
}
uvtData.push(0, 0, 0);
uvtData.push(1/4, 0, 0);
uvtData.push(1/4, 1, 0);
uvtData.push(0, 1, 0);
uvtData.push(3/4, 0, 0);
uvtData.push(2/4, 0, 0);
uvtData.push(2/4, 1, 0);
uvtData.push(3/4, 1, 0);
uvtData.push(1, 0, 0);
uvtData.push(1, 1, 0);
addChild(mySprite);
addEventListener(Event.ENTER_FRAME, xRotate);
function xRotate(eventObject:Event):void {
  var mouseVector3D:Vector3D = new Vector3D(mySprite.mouseX, -mySprite.mouseY, 0);
  var axisVector3D:Vector3D = Vector3D.Z_AXIS.crossProduct(mouseVector3D);
  var vertices2D:Vector.<Number> = new Vector.<Number>();
  var nRotation:Number = mouseVector3D.length * nDeceleration;
  axisVector3D.normalize();
  xTransform(vertices2D, nRotation, axisVector3D);
  xSetOrder();
  xDraw(vertices2D);
}
function xTransform(vertices2D:Vector.<Number>, myRotation:Number, axisVector3D:Vector3D):void {
  worldMatrix3D.appendRotation(myRotation, axisVector3D);
  var myMatrix3D:Matrix3D = worldMatrix3D.clone();
  myMatrix3D.append(viewMatrix3D);
  Utils3D.projectVectors(myMatrix3D, vertices, vertices2D, uvtData);
}
function xDraw(vertices2D:Vector.<Number>):void {
  myGraphics.clear();
  myGraphics.beginBitmapFill(myTexture);
  myGraphics.drawTriangles(vertices2D, indices, uvtData);
  myGraphics.endFill();
}
function addRectangleIndices(face:Vector.<uint>):void {
  indices.push(face[0], face[1], face[3]);
  indices.push(face[1], face[2], face[3]);
}
function xSetOrder():void {
  var transformedFaces:Vector.<Array> = new Vector.<Array>();
  for (var i:uint = 0; i < nFaces; i++) {
    var transformedVector3D:Vector3D = worldMatrix3D.transformVector(centers[i]);
    transformedFaces[i] = [transformedVector3D, faces[i]];
  }
  transformedFaces.sort(compare);
  indices.length = 0;
  for (var j:uint = 0; j < nFaces; j++) {
    addRectangleIndices(transformedFaces[j][1]);
  }
}
function compare(a:Array, b:Array):Number {
  var nA:Number = a[0].z;
  var nB:Number = b[0].z;
  if (nA < nB) {
    return 1;
  } else if (nA > nB) {
    return -1;
  } else {
    return 0;
  }
}
ベクトルの外積を数学的に理解する
ベクトルの外積について、
まず、
- |A×B| = |A||B|sinθ
ベクトルAとBを隣合う2辺とする平行四辺形を考え、
| 外積の要素 | 求められた外積のベクトルとふたつのベクトルAとBとの関係 | ||
|---|---|---|---|
| 方向 | 角度 | ふたつのベクトルAとBのどちらにも垂直 | 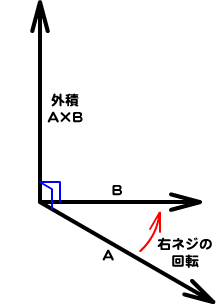 |
| 向き | ベクトルAからBに向かう回転で右ネジの進む向き | ||
| 大きさ | |A||B|sinθ | 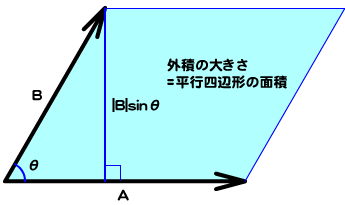 | |
前回の内積の説明で述べたとおり、
逆に、
| 演算 | 特別な場合 | 互いになす角 |
|---|---|---|
| 内積 | 内積が0 | 垂直 |
| 外積 | 外積の大きさが0 | 平行 |
3次元空間のベクトルAとBの外積A×Bは、
- A×B =
(aybz - azby, azbx - axbz, axby - aybx)
次回は再び内積をお題として、
今回解説した次のサンプルファイルがダウンロードできます。
- スクリプト1のサンプルファイル
(CS5形式/約119KB)