


今回から、
といっても、
もっとも、
お題の説明と準備
本論に入る前に、
けれど、
今回採上げるベクトルの内積では、
投影の変換を加える(再掲)")

第48回スクリプト2は、

まず準備として、
![図2 [ライブラリ]に加えたビットマップに[クラス]を設定](/assets/images/dev/serial/01/as3/0051/002.png "図2 [ライブラリ]に加えたビットマップに[クラス]を設定")
ベクトルの内積から面の向きがわかる
ベクトルは方向をもった大きさで、

つまり、
3次元空間のベクトルを表すために、
| ベクトル | 座標 |
|---|---|
| 視線 | (0, 0, 1) |
| 面(初期値) | (0, 0, -1) |
そして、
| 面の向き | ふたつのベクトルのなす角 | 内積の符号 |
|---|---|---|
| 裏 | 90度より小さい | +(正) |
| 真横 | 90度 | 0 |
| 表 | 90度より大きい | -(負) |

ここまでくれば、
- Vector3Dオブジェクト.dotProduct
(もうひとつのVector3Dオブジェクト)
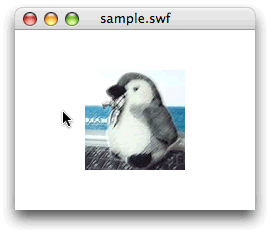
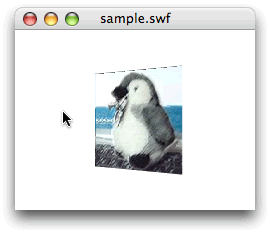
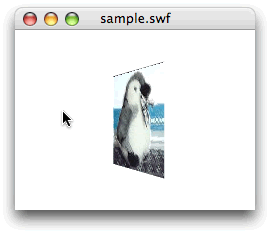
面の表と裏を塗替える
では、
第2は、
今回3次元空間の頂点座標は動かさない。変換のMatrix3Dオブジェクトに回転を加えて、
その結果のオブジェクトを変数 (worldMatrix3D) に残す。つまり、 座標ではなく変換行列で座標変換を管理するのだ。
したがって、
// フレームアクションに追加
var viewVector3D:Vector3D = Vector3D.Z_AXIS;   // 視線のベクトル
var faceVector3D:Vector3D = new Vector3D(0, 0, -1);   // 面のベクトル

function xRotate(eventObject:Event):void {
  var nRotationY:Number = mySprite.mouseX * nDeceleration;
  var vertices2D:Vector.<Number> = new Vector.<Number>();
  xTransform(vertices2D, nRotationY);
  var bFront:Boolean = xIsFront(faceVector3D, worldMatrix3D);  // 面の表裏を調べる
  trace(bFront);  // 確認用
  xDraw(vertices2D);
}

// 面の表裏を調べる関数の定義
function xIsFront(myVector3D:Vector3D, myMatrix3D:Matrix3D):Boolean {
  var directionVector3D:Vector3D = myMatrix3D.transformVector(myVector3D);
  var bFront:Boolean = (viewVector3D.dotProduct(directionVector3D) < 0);
  return bFront;
}
面の表裏を調べる関数
![図5 関数の戻り値を[出力]するときフレームレートは落とした方が見やすい](/assets/images/dev/serial/01/as3/0051/005.png "図5 関数の戻り値を[出力]するときフレームレートは落とした方が見やすい")
それでは、
第2に、
そして第3に、
// フレームアクションに追加
var backTexture:BitmapData = new Image2();   // 追加

function xRotate(eventObject:Event):void {
  var nRotationY:Number = mySprite.mouseX * nDeceleration;
  var vertices2D:Vector.<Number> = new Vector.<Number>();
  xTransform(vertices2D, nRotationY);
  var bFront:Boolean = xIsFront(faceVector3D, worldMatrix3D);
  // trace(bFront);  // 確認用
  // xDraw(vertices2D);
  xDraw(vertices2D, bFront);
}

// function xDraw(vertices2D:Vector.<Number>):void {
function xDraw(vertices2D:Vector.<Number>, bFront:Boolean):void {
  var texture:BitmapData = bFront ? myTexture : backTexture;   // 追加
  myGraphics.clear();
  // myGraphics.beginBitmapFill(myTexture);
  myGraphics.beginBitmapFill(texture);
  myGraphics.drawTriangles(vertices2D, indices, uvtData);
  myGraphics.endFill();
}
修正し終えたフレームアクション全体を、
// フレームアクション
var nUnit:Number = 100 / 2;
var mySprite:Sprite = new Sprite();
var myTexture:BitmapData = new Image();
var backTexture:BitmapData = new Image2();
var viewVector3D:Vector3D = Vector3D.Z_AXIS;
var faceVector3D:Vector3D = new Vector3D(0, 0, -1);
var vertices:Vector.<Number> = new Vector.<Number>();
var indices:Vector.<int> = new Vector.<int>();
var uvtData:Vector.<Number> = new Vector.<Number>();
var nDeceleration:Number = 0.3;
var myGraphics:Graphics = mySprite.graphics;
var myPerspective:PerspectiveProjection = transform.perspectiveProjection;
var worldMatrix3D:Matrix3D = new Matrix3D();
var viewMatrix3D:Matrix3D = myPerspective.toMatrix3D();
viewMatrix3D.prependTranslation(0, 0, myPerspective.focalLength);
mySprite.x = stage.stageWidth / 2;
mySprite.y = stage.stageHeight / 2;
vertices.push(-nUnit, -nUnit, 0);
vertices.push(nUnit, -nUnit, 0);
vertices.push(nUnit, nUnit, 0);
vertices.push(-nUnit, nUnit, 0);
indices.push(0, 1, 3);
indices.push(1, 2, 3);
uvtData.push(0, 0, 0);
uvtData.push(1, 0, 0);
uvtData.push(1, 1, 0);
uvtData.push(0, 1, 0);
addChild(mySprite);
addEventListener(Event.ENTER_FRAME, xRotate);
function xRotate(eventObject:Event):void {
  var nRotationY:Number = mySprite.mouseX * nDeceleration;
  var vertices2D:Vector.<Number> = new Vector.<Number>();
  xTransform(vertices2D, nRotationY);
  var bFront:Boolean = xIsFront(faceVector3D, worldMatrix3D);
  xDraw(vertices2D, bFront);
}
function xTransform(vertices2D:Vector.<Number>, myRotation:Number):void {
  worldMatrix3D.prependRotation(myRotation, Vector3D.Y_AXIS);
  var myMatrix3D:Matrix3D = worldMatrix3D.clone();
  myMatrix3D.append(viewMatrix3D);
  Utils3D.projectVectors(myMatrix3D, vertices, vertices2D, uvtData);
}
function xDraw(vertices2D:Vector.<Number>, bFront:Boolean):void {
  var texture:BitmapData = bFront ? myTexture : backTexture;
  myGraphics.clear();
  myGraphics.beginBitmapFill(texture);
  myGraphics.drawTriangles(vertices2D, indices, uvtData);
  myGraphics.endFill();
}
function xIsFront(myVector3D:Vector3D, myMatrix3D:Matrix3D):Boolean {
  var directionVector3D:Vector3D = myMatrix3D.transformVector(myVector3D);
  var bFront:Boolean = (viewVector3D.dotProduct(directionVector3D) < 0);
  return bFront;
}
ベクトルの内積を数学的に理解する
ベクトルの内積について、
ベクトルAとBの内積は、
A・
B = |A||B|cosθ A||B| > 0 (|A|≠0、
|B|≠0とする) A・
B = axbx + ayby A・
B = axbx + ayby + azbz - スクリプト1のサンプルファイル
(CS5形式/約61KB)
ベクトルAとBの始点を結んだとき、

ベクトルAとBの絶対値は、
つまり、
| 内積の値 | ベクトルのなす角(θ) | cosθ | |
|---|---|---|---|
| +(正) | 90度より小さい(鋭角) | +(正) | 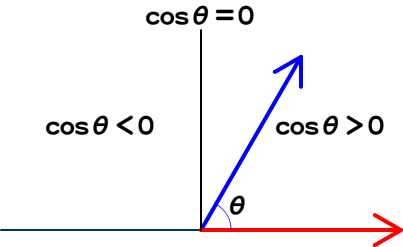 |
| 0 | 90度(直角) | 0 | |
| 負(-) | 90度より大きい(鈍角) | 負(-) | |
内積は、
3次元空間のベクトルA
次回は、
今回解説した次のサンプルファイルがダウンロードできます。