


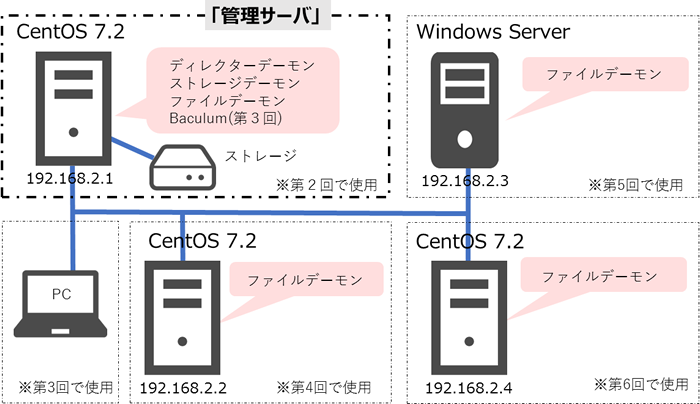
はじめに
前回までは、
今回は次のような内容です。
- Windows用のファイルデーモンをインストール
- 管理サーバの設定
- Windowsデータのバックアップ
- Windowsデータのリストア
Baculaは、
インストール
Baculaのコミュニティでは、
今回は、
| Windowsマシン | Windows server 2012 R2 |
|---|---|
| IPアドレス | 192. |
| Baculaのパッケージ | bacula-enterprise-win64-7. |
事前準備
Baculaは以下のポートで通信を行います。Firewallなど通信をブロックするものは設定を変更しておいてください。
| ポート番号 | 利用目的 |
|---|---|
| 9101 | ディレクターデーモン通信用 |
| 9102 | ファイルデーモン通信用 |
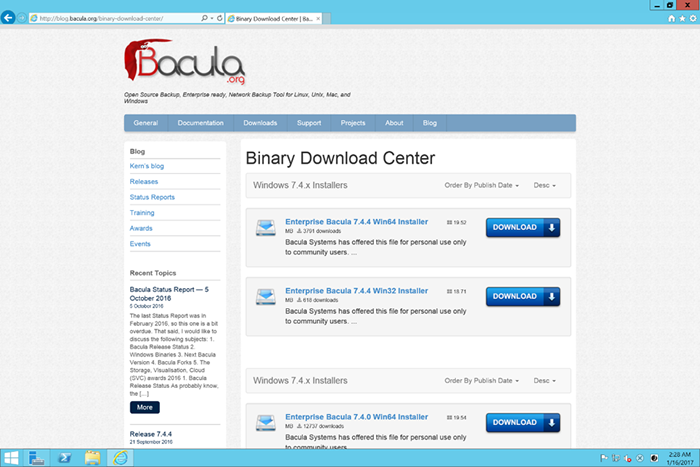
ダウンロード
Windows版のエージェントは下記のURLからダウンロードできます。
- Bacula.
org: - http://
blog. bacula. org/ binary-download-center/
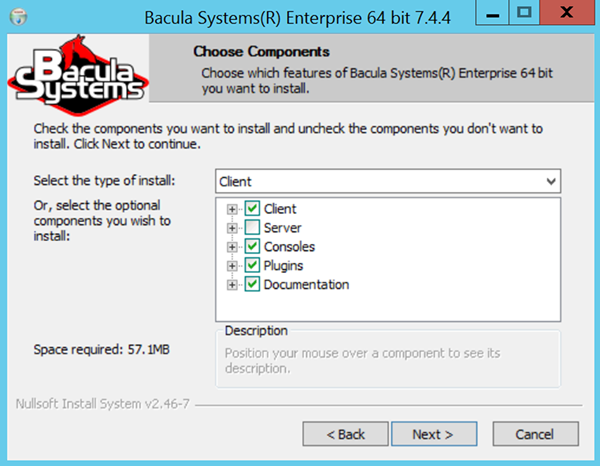
インストール
管理者権限で、

インストールウィザードが起動するので、

「I Agree」

デフォルトでは、

「Next」
管理サーバのbacula-dir.

今回は、
| 項目 | 設定例 | 内容 |
|---|---|---|
| DIR Name | bacula-dir | 管理サーバのbacula-dir. |
| DIR Password | bacula-pass | 管理サーバのbacula-dir. Windows上でbconsoleを利用する際に使用 |
| DIR Address | 192. | 管理サーバのIPアドレス |
bacula-dir.

Windows側でのインストールはこれで完了です。

インストールされた設定ファイルは、
- C:\Program Files\Bacula
管理サーバの設定
Windows側のインストールは完了しましたが、
Clientリソースの作成
Windows上にインストールしたファイルデーモンの設定ファイルは、
Windowsのbacula-fd.
- C:\Program Files\Bacula\bacula-fd.
conf
Clientリソースに必要なディレクティブは以下の情報です。
| リソース名 | ディレクティブ名 |
|---|---|
| FileDaemon | Name |
| FDport | |
| Director | Password |
#
# "Global" File daemon configuration specifications
#
FileDaemon {                            # this is me
  Name = bacula-win-fd
  FDport = 9102                # where we listen for the director
  WorkingDirectory = "C:\\Program Files\\Bacula\\working"
  Pid Directory = "C:\\Program Files\\Bacula\\working"
  Plugin Directory = "C:\\Program Files\\Bacula\\plugins"
  Maximum Concurrent Jobs = 10
}

#
# List Directors who are permitted to contact this File daemon
#
Director {
  Name = bacula-dir
  Password = "w18XF9TZ/1toUjYSkdEWHeSzd4GBam1YykeG3CanSv7q"
# Director must know this password
}
管理サーバのbacula-dir.
- /etc/
bacula/ bacula-dir. conf
下記の例や相対表を参考に、
Client {
  Name = bacula-win-fd               # Clientリソースの名前。Windowsのファイルデーモンと同じ設定
  Address = 192.168.2.3               # WindowsのマシンのIPアドレス
  FDPort = 9102                     # 使用するポート
  Catalog = MyCatalog
  Password = "w18XF9TZ/1toUjYSkdEWHeSzd4GBam1YykeG3CanSv7q"   # ファイルデーモンのパスワード
  File Retention = 30 days            # 30 days
  Job Retention = 6 months            # six months
  AutoPrune = yes                     # Prune expired Jobs/Files
}
| バックアップ対象 | 管理サーバ | ||
|---|---|---|---|
| bacula-fd. | bacula-dir. Clientリソース | 概要 | |
| リソース | ディレクティブ名 | ディレクティブ名 | |
| FileDaemon | Name | Name | Clientリソースの名前 |
| FDport | FDport | ファイルデーモンで使用するポート | |
| Director | Password | Password | Password |
| - | - | Address | 対象マシンのIPアドレス、 |
設定を反映させるため、
# systemctl restart bacula-dir.service
接続確認
bacula-dir.
管理サーバでターミナルを起動し、
# bconsole
Connecting to Director localhost:9101
1000 OK: 102 bacula-dir Version: 7.4.4 (20 September 2016)
Enter a period to cancel a command.
*
bconsoleは対話式のコマンドツールです。このまま
# bconsole
Connecting to Director localhost:9101
1000 OK: 102 bacula-dir Version: 7.4.4 (20 September 2016)
Enter a period to cancel a command.
*status
3番を入力します。
*status
Status available for:
     1: Director
     2: Storage
     3: Client
     4: Scheduled
     5: All
Select daemon type for status (1-5): 3
今回設定したWindowsのマシンは2番ですので、
The defined Client resources are:
     1: bacula-fd
     2: bacula-win-fd
Select Client (File daemon) resource (1-2): 2
Windowsマシンに入っているBaculaのエージェントのバージョン情報や、
これで管理サーバとWindowsマシン間の接続はできたことになります。
Connecting to Client bacula-win-fd at Bacula-win:9102

bacula-win-fd Version: 7.4.4 (28 September 2016)  VSS Linux Cross-compile Win64
Daemon started 23-Jan-17 18:15. Jobs: run=3 running=0.
Microsoft Datacenter Edition (build 9200), 64-bit
 Heap: heap=3,268,608 smbytes=26,063 max_bytes=5,119,938 bufs=75 max_bufs=215
 Sizes: boffset_t=8 size_t=8 debug=0 trace=1 mode=0,0 bwlimit=0kB/s
 Plugin: alldrives-fd.dll

Running Jobs:
Director connected at: 26-Jan-17 17:14
No Jobs running.
====

Terminated Jobs:
 JobId  Level    Files      Bytes   Status   Finished        Name
===================================================================
    89  Incr          1         0   OK       24-Jan-17 08:05 Win-Backup-TestJob
    93  Incr          1         0   OK       25-Jan-17 08:05 Win-Backup-TestJob
    97  Incr          1         0   OK       26-Jan-17 08:05 Win-Backup-TestJob
====
接続に失敗すると、
Connecting to Client bacula-win-fd at 192.168.2.3:9102
Failed to connect to Client bacula-win-fd.
バックアップ
接続確認ができたので、
バックアップテスト用のファイルを作成
次に、
- C:/Users/
admin01/ Desktop/ Bacula-test/ test1. txt
各テキストファイルには、
バックアップの設定
まずは、
Job {
  Name = "Win-Backup-TestJob"
  Type = Backup
  Level = Full
  Client = bacula-win-fd
  FileSet = "Win Set"
  Schedule = "WeeklyCycle"
  Storage = File1
  Messages = Standard
  Pool = File
  Priority = 10
  Write Bootstrap = "/var/spool/bacula/%c.bsr"
}

FileSet {
  Name = "Win Set"
  Include {
    Options {
      signature = MD5
    }

    File = "C:/Users/admin01/Desktop/Bacula-test"

  }
}
設定の反映
設定を反映させるため、
# systemctl restart bacula-dir.service
バックアップの実行
いよいよバックアップの実行です。
バックアップを実行するために、
# bconsole
Connecting to Director localhost:9101
1000 OK: 102 bacula-dir Version: 7.4.4 (20 September 2016)
Enter a period to cancel a command.
*
runを入力して実行します。
*run
実行するバックアップのジョブを選びます。今回は先程追加したWindowsのClientリソースである3を選択します。
*run
Automatically selected Catalog: MyCatalog
Using Catalog "MyCatalog"
A job name must be specified.
The defined Job resources are:
     1: BackupClient1
     2: Backup-TestJob
     3: Win-Backup-TestJob
     4: BackupCatalog
     5: RestoreFiles
Select Job resource (1-5): 3
バックアップ設定の内容が表示されます。この内容でよければ、
Run Backup job
JobName:  Win-Backup-TestJob
Level:    Full
Client:   bacula-win-fd
FileSet:  Win Set
Pool:     File (From Job resource)
Storage:  File1 (From Job resource)
When:     2017-01-26 09:39:35
Priority: 10
OK to run? (yes/mod/no): yes
Job queued. JobId=99
バックアップの確認
バックアップを実行したら、
bconsoleのmessagesでの確認もできますが、
bconsoleのlistオプションで以下のようにjobidを指定すると、
- *list joblog jobid=jobidの番号
*list joblog jobid=99

(省略)

  SD Errors:              0
  FD termination status:  OK
  SD termination status:  OK
  Termination:            Backup OK |
また、
- * list files jobid=jobidの番号
*list files jobid=99
+----------+
| Filename |
+----------+
| C:/Users/admin01/Desktop/Bacula-test/ |
| C:/Users/admin01/Desktop/Bacula-test/test1.txt |
+----------+
+-------+--------------------+---------------------+------+-------+----------+----------+-----------+
| JobId | Name               | StartTime           | Type | Level | JobFiles | JobBytes | JobStatus |
+-------+--------------------+---------------------+------+-------+----------+----------+-----------+
|    99 | Win-Backup-TestJob | 2017-01-26 09:40:58 | B    | F     |        3 |      453 | T         |
+-------+--------------------+---------------------+------+-------+----------+----------+-----------+
リストア
バックアップしたファイルを復元してみます。
準備
前節でバックアップした、
リストアの設定
管理サーバのbacula-dir.
リストアの実行
bconsoleからリストアを行います。
bconsoleを起動します。
# bconsole
Connecting to Director localhost:9101
1000 OK: 102 bacula-dir Version: 7.4.4 (20 September 2016)
Enter a period to cancel a command.
*
restoreを入力します。
*restore
3を入力します。
*restore
Automatically selected Catalog: MyCatalog
Using Catalog "MyCatalog"

First you select one or more JobIds that contain files
to be restored. You will be presented several methods
of specifying the JobIds. Then you will be allowed to
select which files from those JobIds are to be restored.

To select the JobIds, you have the following choices:
     1: List last 20 Jobs run
     2: List Jobs where a given File is saved
     3: Enter list of comma separated JobIds to select
     4: Enter SQL list command
     5: Select the most recent backup for a client
     6: Select backup for a client before a specified time
     7: Enter a list of files to restore
     8: Enter a list of files to restore before a specified time
     9: Find the JobIds of the most recent backup for a client
    10: Find the JobIds for a backup for a client before a specified time
    11: Enter a list of directories to restore for found JobIds
    12: Select full restore to a specified Job date
    13: Cancel
Select item:  (1-13): 3
リストアするJobIdを入力します。今回は、
Enter JobId(s), comma separated, to restore: 99
You have selected the following JobId: 99

Building directory tree for JobId(s) 99 ...
1 files inserted into the tree.

You are now entering file selection mode where you add (mark) and
remove (unmark) files to be restored. No files are initially added, unless
you used the "all" keyword on the command line.
Enter "done" to leave this mode.

cwd is: /
バックアップしたいファイルのディレクトリに移動します。ファイルの場所を探すため、
cwd is: /
$ find test1.txt
C:/Users/admin01/Desktop/Bacula-test/test1.txt
cdでディレクトリを移動します。
$ cd C:/Users/admin01/Desktop/Bacula-test/
cwd is: C:/Users/admin01/Desktop/Bacula-test/
markでバックアップ対象のファイルをマークします。ワイルドカードも使えます。
$ mark test*
1 files marked.
マークされたファイルを確認します。
$ lsmark
*test1.txt
doneでリストア対象のファイル設定は完了します。
$ done
Bootstrap records written to /var/spool/bacula/bacula-dir.restore.2.bsr
Bootstrap records written to /var/spool/bacula/bacula-dir.restore.2.bsr

The Job will require the following (*=>InChanger):
   Volume(s)                 Storage(s)                SD Device(s)
=======================================================

    Vol-0001                  File1                     FileChgr1

Volumes marked with "*" are in the Autochanger.


1 file selected to be restored.

Defined Clients:
     1: bacula-fd
     2: bacula-win-fd
Select the Client (1-2):
リストア先のマシンを選択します。今回は、
Defined Clients:
     1: bacula-fd
     2: bacula-win-fd
Select the Client (1-2): 2
リストアのジョブの定義内容が出力されます。
Select the Client (1-2): 2
Using Catalog "MyCatalog"
Run Restore job
JobName:         RestoreFiles
Bootstrap:       /var/spool/bacula/bacula-dir.restore.1.bsr
Where:           /tmp/bacula-restores
Replace:         Always
FileSet:         Full Set
Backup Client:   bacula-win-fd
Restore Client:  bacula-win-fd
Storage:         File1
When:            2017-02-08 00:58:57
Catalog:         MyCatalog
Priority:        10
Plugin Options:
OK to run? (yes/mod/no):
modを入力します。変更可能なジョブの項目が表示されます。
OK to run? (yes/mod/no): mod
Parameters to modify:
     1: Level
     2: Storage
     3: Job
     4: FileSet
     5: Restore Client
     6: When
     7: Priority
     8: Bootstrap
     9: Where
    10: File Relocation
    11: Replace
    12: JobId
    13: Plugin Options
Select parameter to modify (1-13):
9番目のWhereの値を変更するので、
Select parameter to modify (1-13): 9
Please enter the full path prefix for restore (/ for none): /
再度リストアのジョブの定義が表示されます。その内容でリストアを実行する場合はyesを入力します。これでリストアが実行されます。以下の例では、
Run Restore job
JobName:         RestoreFiles
Bootstrap:       /var/spool/bacula/bacula-dir.restore.1.bsr
Where:
Replace:         Always
FileSet:         Full Set
Backup Client:   bacula-win-fd
Restore Client:  bacula-win-fd
Storage:         File1
When:            2017-02-08 00:58:57
Catalog:         MyCatalog
Priority:        10
Plugin Options:
OK to run? (yes/mod/no): yes
Job queued. JobId=104
リストアの確認
リストアが成功していれば、
jobのログを確認するときには、
- *list joblog jobid=リストア時のジョブID
*list joblog jobid=104

(省略)

  FD Errors:              0
  FD termination status:  OK
  SD termination status:  OK
  Termination:            Restore OK |
次回はリストアについて、